Listen to this Post
Introduction
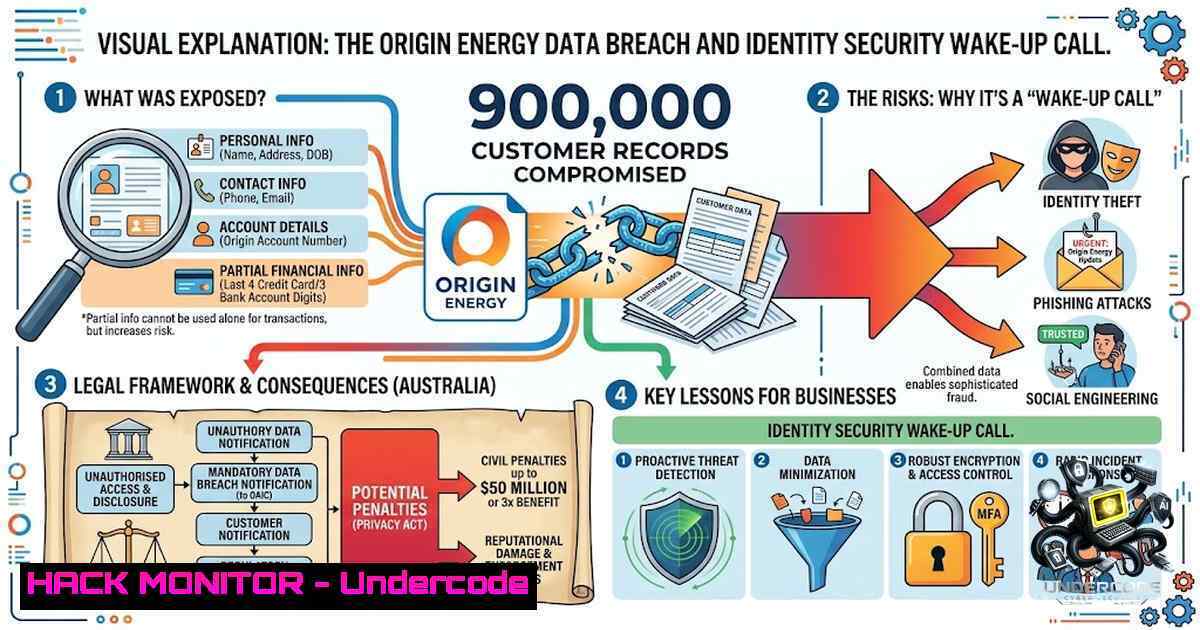
In July 2026, Australia’s largest electricity retailer, Origin Energy, confirmed that approximately 900,000 current and former customers had their personal data accessed in a cybersecurity incident. The breach exposed names, addresses, email addresses, dates of birth, phone numbers, and in some cases, partial banking and credit card details. Investigations later traced the attack to a former Accenture employee at a Manila call centre who allegedly attempted to extort the company. No dramatic firewall bypass. No Hollywood-style hacking. Just identity, access, and data—compromised through legitimate channels. This incident underscores a fundamental truth: your organisation’s biggest security risk may already have legitimate access. The question every IT leader must ask is not if an account will be compromised, but how far that compromised account can reach.
Learning Objectives & Secrets
- Objective 1: Implement Least Privilege Access — Understand how to grant users, applications, and systems only the minimum permissions necessary to perform their tasks, limiting the blast radius of compromised credentials.
-
Objective 2 Secret Tip: Continuous Access Evaluation — Move beyond static, point-in-time access reviews. Implement Continuous Access Evaluation (CAE) that reassesses permissions throughout active sessions, monitoring location changes, device health, and behavioural anomalies to revoke access immediately when risk indicators emerge.
-
Objective 3 Secret Tip: Just-in-Time (JIT) Privileged Access — Replace standing privileged access with time-bound, on-demand privilege activation. Users request access, complete required checks (including MFA and business justification), perform the task, and lose the role when the window closes—eliminating persistent high-risk attack surfaces.
You Should Know
- Implementing Least Privilege Across Cloud and On-Premises Environments
The principle of least privilege (PoLP) is foundational to zero trust architecture. It requires visibility into every identity, every system, and the true permissions that connect them. Here’s how to implement it:
Step-by-Step Guide:
Step 1: Audit Existing Permissions. Begin with a comprehensive inventory of all identities and their access rights. On Linux, use the following to audit user permissions:
 List all users and their groups
cut -d: -f1 /etc/passwd
groups [bash]

Audit sudo privileges
cat /etc/sudoers
visudo -c  Validate sudoers file syntax
On Windows (PowerShell as Administrator):
 List all local users
Get-LocalUser

List group memberships for a specific user
Get-LocalGroup | ForEach-Object {
$group = $_.Name
Get-LocalGroupMember -Group $group | Where-Object Name -like "username"
}

Export all user permissions for auditing
Get-ChildItem -Path C:\ -Recurse -ErrorAction SilentlyContinue | ForEach-Object {
try { Get-Acl $_.FullName } catch {}
} | Export-Csv -Path "permissions_audit.csv"
Step 2: Define Role-Based Access Controls (RBAC). Clearly define roles and associated permissions based on job necessities. In AWS, create least-privilege IAM policies:
{
"Version": "2012-10-17",
"Statement": [
{
"Sid": "AllowScopedS3Write",
"Effect": "Allow",
"Action": [
"s3:PutObject",
"s3:PutObjectAcl"
],
"Resource": "arn:aws:s3:::my-secure-bucket/",
"Condition": {
"StringEquals": {
"s3:x-amz-acl": "bucket-owner-full-control"
}
}
}
]
}
Step 3: Remove Excessive Permissions. Identify and eliminate overprivileged roles:
 AWS: Detach overly permissive policies
aws iam detach-user-policy --user-1ame <username> --policy-arn <policy_arn>

AWS: List all policies attached to a user
aws iam list-attached-user-policies --user-1ame <username>
- Continuous Monitoring with Linux Auditd and Windows Event Logging
Continuous monitoring is the eyes and ears of any security program. The Origin Energy breach remained undetected until a hacker contacted a newspaper with a sample of 50 customer records. Proactive monitoring could have flagged the anomalous data access earlier.
Linux Auditd Configuration:
 Install auditd
sudo apt-get update && sudo apt-get install auditd audispd-plugins  Debian/Ubuntu
sudo yum install auditd  RHEL/CentOS

Start and enable auditd
sudo systemctl enable auditd
sudo systemctl start auditd
Configure audit rules to monitor critical files and directories:
 Monitor password file for changes
sudo auditctl -w /etc/passwd -p rwxa -k identity_changes

Monitor sudoers file
sudo auditctl -w /etc/sudoers -p rwxa -k privilege_escalation

Monitor sensitive data directories
sudo auditctl -w /var/www/html/config -p rwxa -k data_access

Monitor all failed access attempts to sensitive files
sudo auditctl -a always,exit -F arch=b64 -S openat,read,write -F exit=-EACCES -k access_denied

View audit logs
sudo ausearch -k identity_changes
sudo aureport -au  Failed authentication attempts
Windows Advanced Audit Policy Configuration (PowerShell as Administrator):
 Enable advanced audit policies
auditpol /set /subcategory:"File System" /success:enable /failure:enable
auditpol /set /subcategory:"Registry" /success:enable /failure:enable
auditpol /set /subcategory:"Detailed File Share" /success:enable /failure:enable

Configure auditing for sensitive folders
$path = "C:\SensitiveData"
$acl = Get-Acl -Path $path
$auditRule = New-Object System.Security.AccessControl.FileSystemAuditRule(
"Everyone",
"ReadData,WriteData,Delete",
"Success,Failure",
"None"
)
$acl.AddAuditRule($auditRule)
Set-Acl -Path $path -Acl $acl

Query security event logs for suspicious activity
Get-WinEvent -LogName Security -FilterXPath "[System[EventID=4624 or EventID=4625]]" -MaxEvents 50
- Fast Access Revocation: Stopping the Bleeding in Minutes, Not Days
When a compromise is detected, speed of revocation determines the scope of damage. Origin Energy took days to confirm the breach after first becoming aware of a potential threat in early July.
Azure/Microsoft Entra ID – Immediate Session Revocation:
 Install Microsoft Graph PowerShell module
Install-Module Microsoft.Graph -Scope CurrentUser

Connect to Microsoft Graph
Connect-MgGraph -Scopes "User.Read.All", "User.ReadWrite.All"

Revoke all refresh tokens for a specific user (forces re-authentication)
Revoke-MgUserSignInSession -UserId "[email protected]"
AWS – Immediate IAM Credential Revocation:
 Deactivate a user's access keys
aws iam update-access-key --access-key-id <KEY_ID> --status Inactive --user-1ame <username>

Delete a user's access key entirely
aws iam delete-access-key --access-key-id <KEY_ID> --user-1ame <username>

Force password reset and revoke all sessions
aws iam update-login-profile --user-1ame <username> --password-reset-required
Windows Active Directory – Account Disablement and Session Termination:
 Disable the user account immediately
Disable-ADAccount -Identity "username"

Terminate all active user sessions
Get-ADUser -Identity "username" | ForEach-Object {
Get-ADUser -Identity $_.SamAccountName -Properties TerminalServicesProfile
}
 Force logoff all sessions (requires Terminal Services module)
quser /server:DOMAIN-CONTROLLER
logoff <session_id> /server:DOMAIN-CONTROLLER
4. Just-in-Time (JIT) Privileged Access with Azure PIM
JIT access eliminates standing privileged accounts—a primary target for attackers. Instead of always-on administrative access, privileges are granted only when needed and for a specific duration.
Step-by-Step Azure PIM Configuration:
Step 1: Navigate to the Azure portal → Microsoft Entra ID → Privileged Identity Management.
Step 2: Select “Azure AD roles” → “Assignments” → “Add assignments”.
Step 3: Select the role (e.g., Global Administrator), choose the user, and set “Assignment type” to “Eligible” (not “Active”).
Step 4: Configure activation settings: require MFA, require approval, set maximum activation duration (e.g., 4 hours), and require justification.
Step 5: Users activate their eligible roles through the Azure portal or via PowerShell:
 Activate a PIM role via PowerShell
$activation = @{
principalId = "user-object-id"
roleDefinitionId = "role-definition-id"
justifcation = "Incident response - required for emergency access"
scheduleInfo = @{
startDateTime = (Get-Date).ToUniversalTime().ToString("yyyy-MM-ddTHH:mm:ss.fffZ")
expiration = @{
type = "AfterDuration"
duration = "PT4H"  4 hours
}
}
}
 Use Microsoft Graph API to activate
Invoke-MgGraphRequest -Method POST -Uri "https://graph.microsoft.com/v1.0/roleManagement/directory/roleAssignments" -Body $activation
- Knowing Where Your Data Actually Lives: Data Discovery and Lineage
Organisations cannot protect data they do not know exists. Data discovery and lineage provide the visibility needed to understand where sensitive information resides, how it flows, and who can access it.
Linux Data Discovery Commands:
 Find all files containing potential PII (phone numbers)
grep -rE '\b[0-9]{10}\b' /path/to/data --include=".txt" --include=".csv" --include=".log"

Find all files containing email addresses
grep -rE '\b[A-Za-z0-9._%+-]+@[A-Za-z0-9.-]+.[A-Z|a-z]{2,}\b' /path/to/data

Identify large data stores
du -sh /path/to/data/ | sort -hr | head -20

List all mounted storage locations
df -h
lsblk
Windows Data Discovery (PowerShell):
 Search for files containing PII patterns
Get-ChildItem -Path C:\Data -Recurse -Include .txt,.csv,.log | Select-String -Pattern "\b\d{3}-\d{3}-\d{4}\b"  US phone format

Find all Excel and CSV files (potential data stores)
Get-ChildItem -Path C:\ -Recurse -Include .xlsx,.xls,.csv -ErrorAction SilentlyContinue | Export-Csv data_inventory.csv

Identify large directories
Get-ChildItem -Path C:\ -Directory | ForEach-Object {
$size = (Get-ChildItem -Path $_.FullName -Recurse -File -ErrorAction SilentlyContinue | Measure-Object -Property Length -Sum).Sum / 1GB
} | Sort-Object SizeGB -Descending
Cloud-1ative Discovery: Leverage Data Security Posture Management (DSPM) tools that continuously perform automated discovery across connected data stores, applying AI-driven classification for precise labelling. Solutions like Microsoft Purview can automate scanning of data sources, track data lineage, and provide visibility into where data originates and how it is transformed across the data estate.
6. Strong Vendor Controls: Third-Party Risk Management
The Origin Energy breach was traced to a former Accenture employee at a Manila call centre. This highlights a critical vulnerability: third-party vendors with legitimate access can become the weakest link in the security chain.
Best Practices for Vendor Access Control:
- Create a Comprehensive Vendor Inventory. Document every third-party with access to your systems, defining what data flows through them.
-
Implement Named Identity Access. Every third-party session must be linked to a named identity, not a generic shared account. Logs should capture who accessed what and when.
-
Apply Tiered Controls Based on Vendor Risk Level. High-risk vendors require stricter controls: MFA, session recording, and time-bound access.
-
Enforce Least Privilege for Vendors. Vendors should receive only the minimum access required to perform their contracted services—nothing more.
-
Continuous Monitoring and Auditing of Vendor Activity. Treat vendor access as dynamic, not static.
-
Contractual Security Requirements. Embed security expectations—including breach notification timelines, security audits, and compliance certifications—into vendor contracts.
What Undercode Say
-
Key Takeaway 1: The Origin Energy breach wasn’t a sophisticated hack—it was an insider threat leveraging legitimate access. This proves that perimeter defences alone are insufficient. The real battleground is identity and access management.
-
Key Takeaway 2: Security maturity isn’t measured by “we have never been breached.” It’s measured by how quickly you detect, contain, and recover when something goes wrong. Organisations that invest in least privilege, continuous monitoring, rapid revocation, and vendor controls will limit damage far more effectively than those relying solely on traditional defences.
-
Analysis: The 900,000-record breach represents a systemic failure in identity governance. Origin Energy first became aware of a potential threat in early July but initially did not believe it credible. This delayed response allowed the attacker to exfiltrate data across nearly a million customers. The incident follows a pattern: Qantas (2025), Optus and Medibank (2022)—each exposing the same underlying vulnerabilities. The lesson is clear: organisations must treat every identity—employee, contractor, and vendor—as a potential attack vector and implement controls accordingly. The cost of inaction extends beyond regulatory fines to long-term reputational damage and customer trust erosion.
Prediction
-
+1 The Origin Energy breach will accelerate adoption of Just-in-Time (JIT) privileged access and Continuous Access Evaluation (CAE) across Australian enterprises, driving a new wave of identity security investments over the next 12–18 months.
-
+1 Regulatory bodies will likely introduce stricter third-party risk management requirements, mandating that organisations maintain comprehensive vendor inventories and enforce named-identity access for all third parties.
-
-1 The stolen data—including names, addresses, dates of birth, and partial financial details—will fuel a surge in AI-powered targeted scams and identity fraud, as cybercriminals leverage the exposed personal information for social engineering attacks.
-
-1 The breach will have lasting financial implications for Origin Energy, with the company’s share price already down 6.3% since early July. Class-action lawsuits and regulatory penalties are likely to follow.
-
-1 Until organisations fundamentally shift from static access models to dynamic, context-aware identity security, similar breaches will continue to occur—not because attackers are getting smarter, but because defences remain anchored to outdated assumptions about trust and access.
▶️ Related Video (84% Match):
https://www.youtube.com/watch?v=-iko-29gJlk
🎯Let’s Practice For Free:
🎓 Live Courses & Certifications:
Join Undercode Academy for Verified Certifications
🚀 Request a Custom Project:
Secure, high-velocity infrastructure and disruptive technological engineering. Contact our engineering team for high-tier development and proprietary systems:
[email protected]
💎 Smart Architecture | 🛡️ Secure by Design | ⭐ Trusted by Thousands
IT/Security Reporter URL:
Reported By: https://lnkd.in/p/eEjeeP3A – Hackers Feeds
Extra Hub: Undercode MoN
Basic Verification: Pass ✅


