Listen to this Post
Introduction:
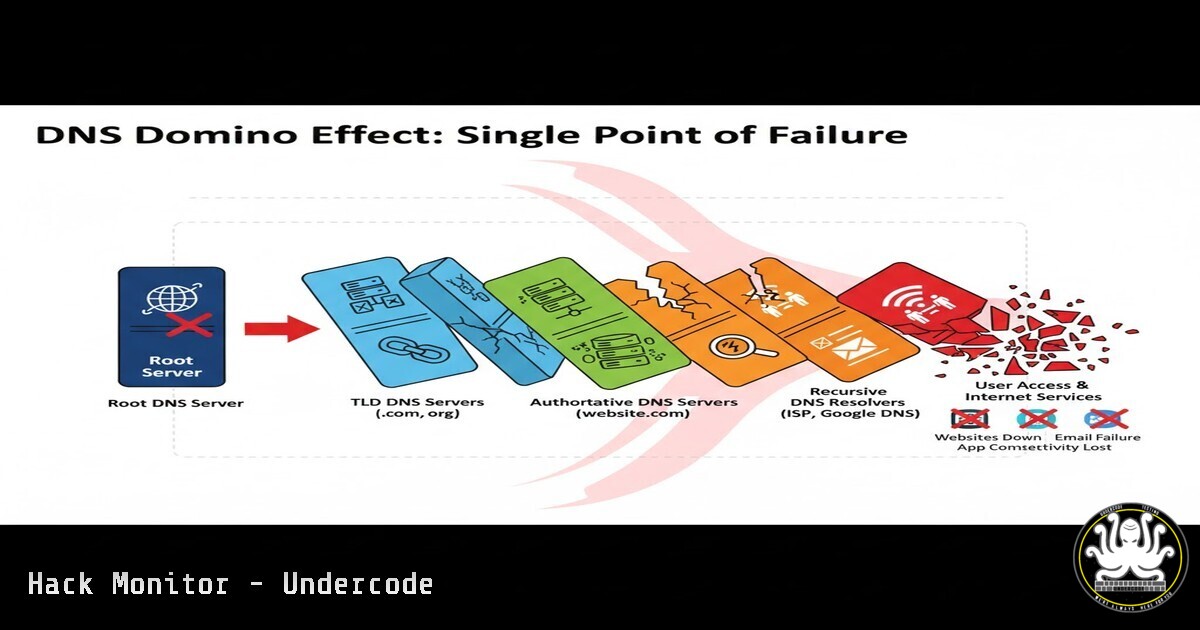
The recent Amazon Web Services (AWS) DNS outage serves as a stark reminder that the Domain Name System (DNS), a foundational protocol of the internet, remains a critical single point of failure. This incident, while not malicious, underscores a pervasive vulnerability that threat actors routinely exploit for ransomware, espionage, and large-scale disruption. Understanding and securing DNS is no longer a niche skill but a fundamental requirement for every cybersecurity professional.
Learning Objectives:
- Understand core DNS concepts and identify common vulnerabilities associated with internet-facing assets.
- Learn practical commands for DNS reconnaissance, enumeration, and hardening across Linux and Windows environments.
- Implement proactive DNS security controls to mitigate risks of outages, data exfiltration, and domain hijacking.
You Should Know:
1. DNS Reconnaissance with `dig` and `nslookup`
The first step in securing DNS is understanding what an attacker can see. The `dig` (Domain Information Groper) command is a powerful Linux/Unix tool for interrogating DNS name servers.
Verified Commands:
 Basic record lookup for a domain
dig example.com A

Query specific name servers (like AWS Route53)
dig @ns-1.aws-dns-01.net example.com

Perform a reverse DNS lookup for an IP
dig -x 192.0.2.1

Get all available record types for a domain
dig example.com ANY

Perform a trace to follow the DNS resolution path
dig example.com +trace
Step-by-step guide:
Using `dig` provides a wealth of information. The `A` record query returns the IP address of the domain. Querying specific name servers (@ns-server) helps diagnose misconfigurations or poisoning. The `ANY` query reveals all published records, which can expose unnecessary information like outdated MX (Mail Exchange) or TXT records. The `+trace` flag is critical for understanding the delegation path from the root servers down, helping to identify rogue or compromised DNS servers in the chain.
2. Enumerating DNS Zone Data
Attackers often attempt zone transfers to steal a complete map of an organization’s internal network. While modern servers restrict this, misconfigurations are common.
Verified Commands:
 Attempt a zone transfer (AXFR) from a name server
dig @ns1.example.com example.com AXFR

Use the `host` command for a simpler interface
host -l example.com ns1.example.com
Step-by-step guide:
A zone transfer (AXFR) is a legitimate operation for replicating DNS data between primary and secondary servers. If configured insecurely to allow requests from any IP, an attacker can use `dig @ns1.example.com example.com AXFR` to retrieve a complete list of all hosts, subdomains, and internal IP addresses. This provides a perfect blueprint for launching targeted attacks. Regularly testing your own domains for this vulnerability is a essential hardening step.
3. Windows DNS Administration with `dnscmd`
For Windows environments, the `dnscmd` utility is indispensable for managing and troubleshooting DNS servers directly from the command line.
Verified Commands:
 View all DNS zones on a server
dnscmd /EnumZones

Get detailed info for a specific zone
dnscmd /ZoneInfo example.com

Clear the DNS server cache
dnscmd /ClearCache

Create a new host (A) record
dnscmd /RecordAdd example.com www A 192.0.2.100
Step-by-step guide:
The `dnscmd` utility allows administrators to script and audit DNS configurations. `/EnumZones` lists all zones hosted on the server, revealing potential legacy or unauthorized domains. `/ZoneInfo` provides critical configuration details like secure dynamic update settings. Forcing a cache clear with `/ClearCache` can be a immediate remediation step after patching a DNS-related vulnerability or responding to a cache poisoning incident.
4. Detecting Subdomain Takeovers with `nslookup`
Subdomain takeovers occur when a DNS record points to a decommissioned cloud resource (e.g., an expired S3 bucket) that an attacker can claim.
Verified Commands:
 Linux/Windows: Check the CNAME target of a subdomain
nslookup legacyapp.example.com

Look for specific error indicators
nslookup

<blockquote>
  set type=CNAME
  assets-dev.example.com
Step-by-step guide:
Use `nslookup` to resolve subdomains, particularly those with `CNAME` records. If the `CNAME` points to a hostname like `aws-s3-bucket.s3-website-us-east-1.amazonaws.com` but that S3 bucket no longer exists, the subdomain is vulnerable. The `nslookup` response may show an error or an IP address owned by the cloud provider, indicating the resource is unclaimed. An attacker can register this resource and control the content served from your domain.
5. Hardening DNS with DNSSEC Validation
DNS Security Extensions (DNSSEC) cryptographically sign DNS data to prevent cache poisoning and spoofing attacks.
Verified Commands:
 Check if a domain has DNSSEC enabled (look for "ad" flag)
dig example.com +dnssec +multi

Validate DNSSEC on your local resolver
dig sigfail.verteiltesysteme.net
dig sigok.verteiltesysteme.net

On a Linux resolver, ensure DNSSEC validation is on in the config
sudo cat /etc/bind/named.conf.options | grep dnssec-validation
Step-by-step guide:
The `+dnssec` flag in a `dig` query will return `RRSIG` (Resource Record Signature) records if DNSSEC is implemented. The presence of the `ad` (Authentic Data) flag in the response header confirms the data was validated. The test domains `sigfail` and `sigok` are designed to verify your local resolver’s validation behavior. A properly configured resolver will refuse to resolve sigfail. Ensuring `dnssec-validation` is set to `auto` or `yes` in your DNS server configuration is critical for mitigation.
6. Scripting DNS Health Checks
Automating DNS checks is key for proactive security. A simple bash script can monitor for critical changes or failures.
Verified Code Snippet:
!/bin/bash
DOMAIN="example.com"
EXPECTED_IP="93.184.216.34"

CURRENT_IP=$(dig +short $DOMAIN A)

if [ "$CURRENT_IP" != "$EXPECTED_IP" ]; then
echo "ALERT: DNS record for $DOMAIN changed! Now resolves to $CURRENT_IP" | mail -s "DNS Alert" [email protected]
fi

Check for open zone transfers
for nameserver in $(dig +short $DOMAIN NS); do
echo "Checking $nameserver for open zone transfer..."
dig @$nameserver $DOMAIN AXFR | head -n 1 | grep -q ";\stransfer\sfailed" && echo "SECURE: $nameserver" || echo "VULNERABLE: $nameserver"
done
Step-by-step guide:
This script performs two vital checks. First, it resolves a critical domain and compares it to a known-good IP. Any discrepancy could indicate DNS hijacking or a misconfiguration, triggering an immediate email alert. Second, it iterates through all the authoritative name servers for the domain and attempts a zone transfer, reporting which servers are vulnerably configured. This script should be run regularly via a cron job.
7. Leveraging Threat Intelligence Feeds for DNS
Correlating your internal DNS queries with threat intelligence feeds can identify communication with known malicious domains.
Verified Commands / Tool Configurations:
 Using `grep` with a threat feed (e.g., from AlienVault OTX)
cat dns-queries.log | grep -f malicious_domains_otx.txt

Pi-hole / Network-wide Ad-blocker blocklist management
pihole -g
pihole -q malware.com

Query a domain's reputation with `whois` for red flags
whois shady-domain.net | grep -i "abuse"
Step-by-step guide:
Continuously monitor DNS query logs from your network. By downloading and using IOC (Indicators of Compromise) lists from open-source threat intelligence platforms, you can use simple commands like `grep` to spot malicious activity. Tools like Pi-hole automatically aggregate and block domains from community-maintained blocklists. A `whois` lookup can reveal recently created domains, hidden registration details, or abuse contact information, which are common traits of malicious infrastructure.
What Undercode Say:
- DNS is the Unseen Battlefield: The AWS outage was a benign stress test of a systemic weakness. A state-level actor or sophisticated cybercriminal group could exploit identical DNS dependencies to inflict weeks of catastrophic downtime, far exceeding the impact of most ransomware attacks.
- Proactive Discovery is Non-Negotiable: The cybersecurity community’s widespread knowledge gap in DNS, as highlighted by the referenced experiences of veterans and red teams, is the primary vulnerability. Organizations that fail to proactively discover, map, and harden their DNS assets are operating with a critical blind spot.
The analysis suggests that while the immediate focus is often on endpoints and networks, DNS provides a leverage point with an unparalleled blast radius. The mention of incidents like SIGRed, SolarWinds, and the FAA outage demonstrates that DNS is a common thread in both targeted attacks and operational failures. The call for education is not merely a service offering but a necessary industry-wide paradigm shift. Boards and CISOs must treat DNS expertise with the same seriousness as network security and incident response.
Prediction:
Within the next 18-24 months, we will witness a “Category 5” cyber hurricane precipitated by a coordinated, malicious attack on global DNS infrastructure or a major provider. This will not be a simple DDoS, but a sophisticated campaign combining software exploits (like SIGRed), credential theft, and social engineering to manipulate or poison DNS records at scale. The result will be widespread service unavailability, irreversible redirection of financial transactions, and mass credential harvesting, leading to a watershed regulatory moment that mandates DNSSEC, DNS monitoring, and third-party DNS provider resilience testing for critical infrastructure.
🎯Let’s Practice For Free:
IT/Security Reporter URL:
Reported By: Andy Jenkinson – Hackers Feeds
Extra Hub: Undercode MoN
Basic Verification: Pass ✅


