Listen to this Post
Introduction
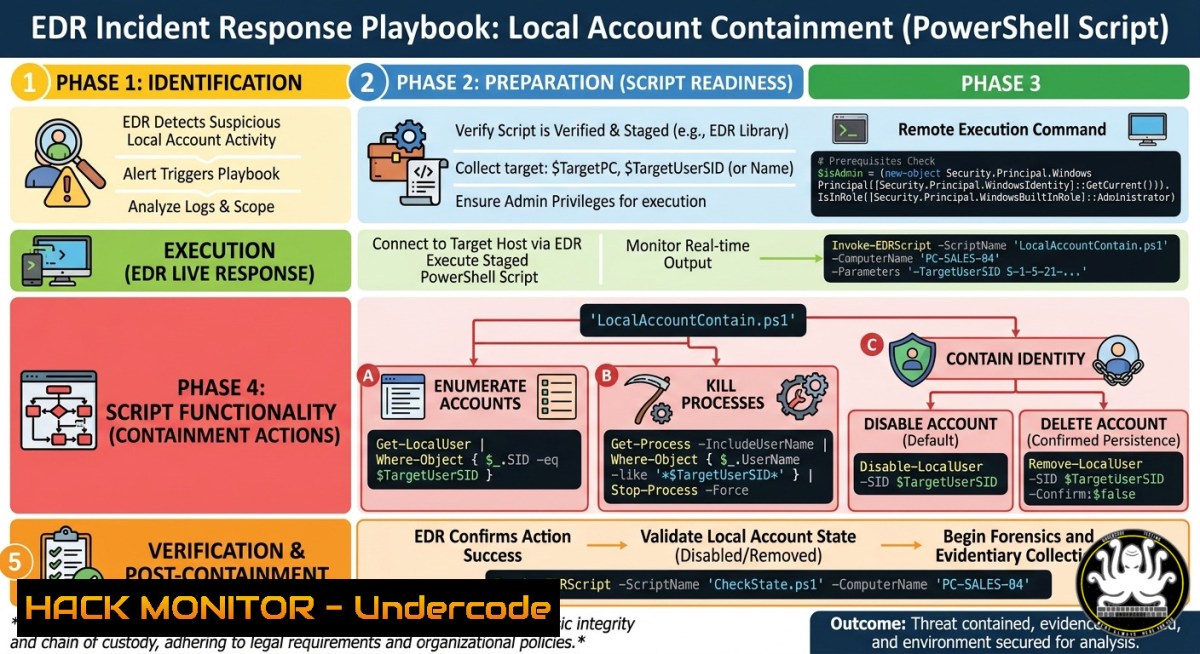
Local Windows accounts remain a common persistence mechanism for attackers, yet responding to them is less straightforward compared to the built‑in features for Entra ID or Active Directory identities. This playbook introduces a structured containment workflow that uses a single PowerShell script to enumerate local accounts and map SIDs, kill active processes tied to a compromised account, and rotate or delete local users to stop lateral movement. Although the examples focus on Microsoft Defender for Endpoint, the same methodology applies to CrowdStrike Falcon and SentinelOne.
Learning Objectives
- Enumerate and map local accounts – Learn how to list all local users on a Windows endpoint, retrieve their Security Identifiers (SIDs), and identify which accounts have administrative privileges.
- Terminate processes owned by a compromised SID – Use PowerShell to find and kill all processes running under a suspicious local account, cutting off active attacker sessions.
- Contain or delete malicious local accounts – Decide between rotating the account password (retaining it for business continuity) or deleting the account entirely to remove persistence.
You Should Know
1. Enumerating Local Accounts and Mapping SIDs
The first step in any local‑account incident is to get a full picture of who can log on to the compromised machine. Attackers often create hidden local accounts or enable disabled built‑in ones. Using Windows PowerShell (run as Administrator), you can quickly list all local users with their SIDs and group memberships.
Step‑by‑Step Guide
- Open an elevated PowerShell console (Run as Administrator).
2. List all local user accounts:
Get-LocalUser | Select-Object Name, Enabled, SID, LastLogon
3. Identify members of the local Administrators group:
Get-LocalGroupMember -Group "Administrators"
4. Map a specific SID to a username (useful if your EDR alert gives only a SID):
$sid = "S-1-5-21-123456789-1234567890-123456789-1001"
(Get-LocalUser | Where-Object { $_.SID -eq $sid }).Name
5. For a full forensics snapshot, use community‑maintained DFIR scripts that collect user accounts, processes, scheduled tasks, and registry entries.
💡 Pro tip: The local Administrator account always has a SID ending in `-500` (for example,
S-1-5-21...-500), while other local admins have different RIDs. Knowing this helps you quickly spot default vs. created accounts.
2. Terminating Processes Owned by a Compromised Account
Once you have identified a malicious local account, you must immediately kill any processes it is running. Attackers often leave behind reverse shells, RDP wrappers, or persistence mechanisms that need to be stopped before account remediation.
Step‑by‑Step Guide
- Find all processes owned by a specific username:
$username = "suspiciousUser"
Get-Process -IncludeUserName | Where-Object { $_.UserName -like "$username" }
2. Terminate those processes (use with caution):
Get-Process -IncludeUserName | Where-Object { $<em>.UserName -like "$username" } | Stop-Process -Force
3. Alternatively, use WMI to kill processes by SID:
$sid = "S-1-5-21-..."
Get-WmiObject -Class Win32_Process | Where-Object { $</em>.GetOwnerSid().Sid -eq $sid } | ForEach-Object { $_.Terminate() }
4. For multi‑endpoint containment, leverage your EDR’s API. For example, with Microsoft Defender for Endpoint, you can isolate the machine and kill processes across the fleet programmatically.
⚠️ Important: Some protected processes may resist
Stop-Process. In such cases, consider using Sysinternals’ ProcExp driver (via tools like Backstab) to forcibly terminate them – but be aware this is also a technique used by attackers. Always balance speed with forensic preservation.
3. Rotating or Deleting Local Users for Containment
After terminating active processes, you need to remove the compromised account’s ability to log on again. You have two main options:
– Rotation – Change the account password and optionally disable it (keeps the account for potential forensic analysis or business continuity).
– Deletion – Permanently remove the account, eliminating it as a persistence mechanism.
Step‑by‑Step Guide
1. Disable a local account (rotation):
Disable-LocalUser -Name "suspiciousUser"
 Or using the classic net user command:
net user suspiciousUser /active:no
2. Change the account password (if you need to keep it for analysis):
$password = ConvertTo-SecureString "NewStrongP@ssw0rd" -AsPlainText -Force
Set-LocalUser -Name "suspiciousUser" -Password $password
3. Delete the local account entirely:
Remove-LocalUser -Name "suspiciousUser"
4. Verify the account is gone:
Get-LocalUser | Where-Object { $_.Name -eq "suspiciousUser" }
🔁 Automation: The original playbook script combines all three steps (enumeration, kill, rotate/delete) into a single PowerShell script that accepts parameters like
-RunList,-RunKill,-Rotate, or-Delete. This makes it easy to integrate into your EDR’s automated response workflows.
4. Integrating with Microsoft Defender for Endpoint API
For SOC teams using Defender for Endpoint, you can automate the entire local‑account containment process via the Defender API. This is especially useful when the same compromised account appears on multiple endpoints.
Step‑by‑Step Guide
- Obtain an Azure AD access token for the Defender API:
$tenantId = "your-tenant-id"
$appId = "your-client-id"
$appSecret = "your-client-secret"
$body = @{
client_id = $appId
client_secret = $appSecret
scope = "https://api.security.microsoft.com/.default"
grant_type = "client_credentials"
}
$response = Invoke-RestMethod -Method Post -Uri "https://login.microsoftonline.com/$tenantId/oauth2/v2.0/token" -Body $body
$accessToken = $response.access_token
2. Isolate a machine containing the compromised account:
$headers = @{ Authorization = "Bearer $accessToken" }
$machineId = "your-machine-id"
$body = @{ Comment = "Local account compromise containment" } | ConvertTo-Json
Invoke-RestMethod -Method Post -Uri "https://api.security.microsoft.com/api/machines/$machineId/isolate" -Headers $headers -Body $body
3. Run the local‑account playbook script on the isolated machine via live response or remote PowerShell.
4. Lift isolation after the account has been contained:
Invoke-RestMethod -Method Post -Uri "https://api.security.microsoft.com/api/machines/$machineId/unisolate" -Headers $headers -Body $body
📌 Reference: Microsoft Defender for Endpoint exposes a layered API model with standard Azure AD‑based authentication, allowing you to automate nearly all response actions.
5. Adapting the Playbook for CrowdStrike Falcon
If your organization runs CrowdStrike Falcon, you can achieve the same local‑account containment using Falcon’s OAuth2 API and PowerShell.
Step‑by‑Step Guide
1. Obtain an OAuth2 token from Falcon:
$clientId = "your-client-id"
$clientSecret = "your-client-secret"
$body = @{ client_id = $clientId; client_secret = $clientSecret }
$response = Invoke-RestMethod -Method Post -Uri "https://api.crowdstrike.com/oauth2/token" -Body $body
$token = $response.access_token
2. Use Falcon’s host containment API to isolate the endpoint:
$headers = @{ Authorization = "Bearer $token" }
$hostId = "your-host-aid"
$body = @{ action_parameters = @{ name = "action"; value = "contain" } } | ConvertTo-Json
Invoke-RestMethod -Method Post -Uri "https://api.crowdstrike.com/devices/entities/devices-actions/v2?ids=$hostId" -Headers $headers -Body $body
3. Run the local‑account PowerShell script on the contained host via Falcon’s Real Time Response (RTR) or remote PowerShell.
4. Lift containment when the threat is cleared:
$body = @{ action_parameters = @{ name = "action"; value = "lift_containment" } } | ConvertTo-Json
Invoke-RestMethod -Method Post -Uri "https://api.crowdstrike.com/devices/entities/devices-actions/v2?ids=$hostId" -Headers $headers -Body $body
🦅 Reference: CrowdStrike Falcon’s API specification supports OAuth2 authentication and provides endpoints for host containment and detection management. The FalconPy Python library also offers extensive wrappers for these actions.
6. SentinelOne PowerShell Module for Local Account Containment
SentinelOne users can take advantage of the community‑developed `SentinelOne` PowerShell module to interact with the SentinelOne API, enabling automated local‑account response.
Step‑by‑Step Guide
- Install the SentinelOne PowerShell module (requires PowerShell 7.0 or higher):
Install-Module -Name SentinelOne
Alternatively, you can download a community wrapper like
SentinelOne-PowerShellWrapper.
2. Connect to your SentinelOne management console:
$S1BaseUri = "https://your-sentinelone-console.com"
$ApiToken = "your-api-token"
Set-S1ApiToken -ApiToken $ApiToken -BaseUri $S1BaseUri
3. Isolate an endpoint that has a compromised local account:
$agentId = "your-agent-id"
Invoke-S1AgentAction -AgentId $agentId -Action "networkDisconnect"
4. Run the local‑account containment script on the isolated agent (either via remote PowerShell or SentinelOne’s remote script execution).
5. Restore network connectivity after containment:
Invoke-S1AgentAction -AgentId $agentId -Action "networkConnect"
🛡️ Note: The `SentinelOne` module provides basic PowerShell cmdlets to work with SentinelOne API functions, including exporting and importing module settings. Always test your API tokens and permissions before running in production.
7. Hardening Local Account Security After Containment
Once an incident has been resolved, take proactive steps to reduce the risk of similar attacks in the future.
Step‑by‑Step Guide
- Disable the built‑in Administrator account (if not needed):
net user administrator /active:no
- Rename the built‑in Administrator account to make it less guessable:
wmic useraccount where name='Administrator' rename 'NewAdminName'
- Set a strong Group Policy to control local account usage:
– Enforce password complexity and maximum age.
– Limit the number of local administrators.
– Enable auditing of local logon events (Event IDs 4624, 4625, 4648, etc.).
4. Deploy LAPS (Local Administrator Password Solution) to regularly rotate local admin passwords on domain‑joined machines.
5. Monitor for creation of new local accounts via event logs and SIEM alerts.
🔐 Reference: The MITRE ATT&CK framework lists Account Access Removal (T1531) as a common adversary technique; proactive hardening directly mitigates this.
What Undercode Say:
- Automation is key – Manual response to local account incidents is too slow. The single‑script playbook reduces mean time to contain (MTTC) from hours to minutes.
- EDR APIs are force multipliers – Whether you use Microsoft Defender, CrowdStrike, or SentinelOne, their APIs allow you to combine endpoint isolation with account remediation in a single orchestrated workflow.
- Forensics vs. speed – Rotating an account (disabling/password change) preserves the account for later analysis, while deletion is more definitive. Choose based on your investigative requirements.
🧠 Analysis: Local account persistence is often overlooked because security teams focus on domain accounts. However, attackers know that local accounts give them a beachhead even if domain credentials are rotated. The playbook described – enumeration, SID mapping, process termination, and account containment – directly addresses this gap. The fact that the same workflow works across multiple EDR platforms (Defender, CrowdStrike, SentinelOne) means organizations are not locked into a single vendor’s playbook. By providing concrete PowerShell commands and API examples, this article empowers SOC analysts to move beyond manual, ad‑hoc remediation and build repeatable, automated response processes. The inclusion of commands for disabling, deleting, and rotating accounts, along with post‑incident hardening steps, ensures that the response not only stops the immediate threat but also reduces future risk.
Prediction:
-
- Adoption of automated local‑account containment playbooks will become a standard part of SOC runbooks within 12–18 months, significantly reducing lateral movement success rates.
-
- EDR vendors will likely embed native “local account containment” actions into their consoles, mirroring the capabilities currently available for Entra ID and Active Directory.
-
- PowerShell‑based DFIR scripts will continue to evolve, with community repositories offering pre‑built modules that integrate directly with major EDR APIs.
-
- Attackers will shift toward abusing service accounts and scheduled tasks that do not rely on traditional local user accounts, necessitating next‑generation detection logic.
▶️ Related Video (88% Match):
🎯Let’s Practice For Free:
IT/Security Reporter URL:
Reported By: Bert Janpals – Hackers Feeds
Extra Hub: Undercode MoN
Basic Verification: Pass ✅
🎓 Live Courses & Certifications:
Join Undercode Academy for Verified Certifications
🚀 Request a Custom Project:
Secure, high-velocity infrastructure and disruptive technological engineering. Contact our engineering team for high-tier development and proprietary systems:
[email protected]


