Listen to this Post
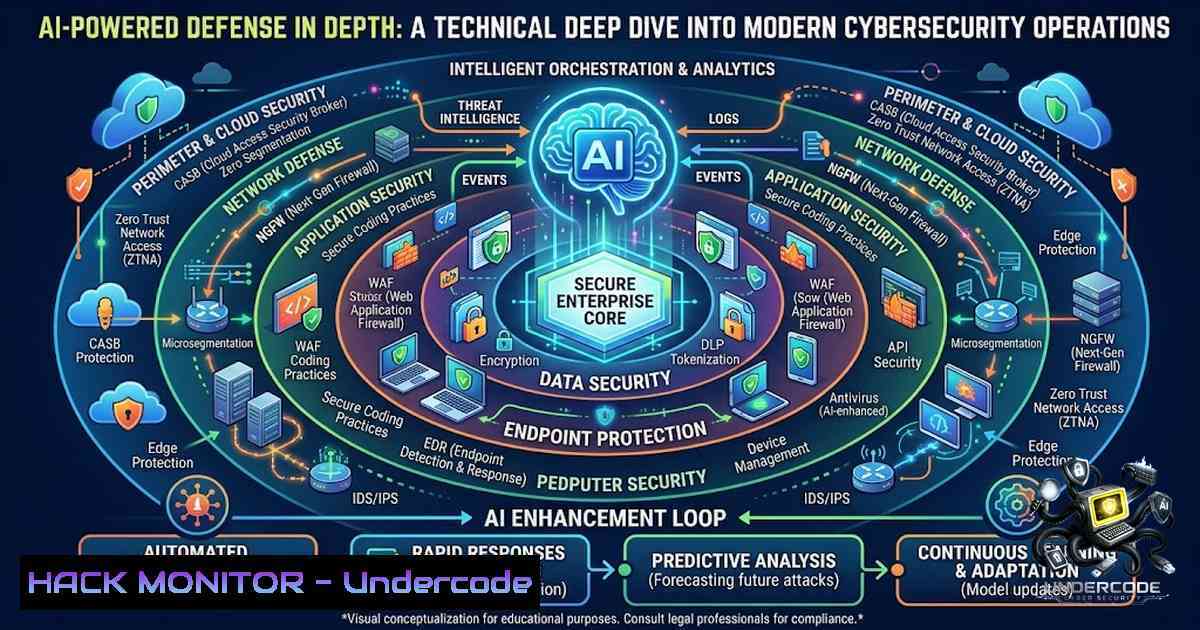
Introduction:
The fusion of Artificial Intelligence with cybersecurity has transitioned from a futuristic concept to an operational necessity. As highlighted by the recent 8-week AI in Cyber Security internship program at EduSkills Academy, the modern security professional must now navigate a complex landscape where machine learning models detect zero-day threats, deep learning algorithms power next-generation intrusion detection systems, and generative AI tools automate incident response at machine speed. This article translates that internship curriculum into actionable technical knowledge, providing security engineers, SOC analysts, and IT professionals with verified commands, configuration guides, and step-by-step tutorials to implement AI-driven defense mechanisms across Linux and Windows environments.
Learning Objectives:
- Master the deployment and configuration of AI-powered Intrusion Detection and Prevention Systems (IDS/IPS) using machine learning ensembles
- Implement SIEM-SOAR orchestration pipelines with automated threat enrichment and response playbooks
- Harden cloud, container, and endpoint infrastructure against AI-assisted attack vectors
- Apply Explainable AI (XAI) frameworks like SHAP and LIME to interpret and validate security model decisions
- Operationalize generative AI and large language models for log analysis, threat hunting, and automated reporting
You Should Know:
- Building an AI-Powered Intrusion Detection Pipeline with Machine Learning
The foundation of any AI-driven security operations center (SOC) is the ability to distinguish malicious network traffic from benign activity at scale. A practical implementation involves training an ensemble model—combining Long Short-Term Memory (LSTM) networks with Random Forest classifiers—on benchmark datasets like CICIDS2018 or NSL-KDD.
Step-by-Step Guide: Deploying a Machine Learning IDS on Ubuntu 24.04
This guide sets up a complete ML pipeline for malicious URL detection and network anomaly classification.
1.1 Environment Setup and Dependency Installation
Begin by provisioning a GPU-enabled Ubuntu server or a powerful local machine with Python 3.10+.
 Update system packages
sudo apt update && sudo apt upgrade -y

Install Python development tools and essential libraries
sudo apt install python3-pip python3-venv python3-dev build-essential -y

Create and activate a dedicated virtual environment
python3 -m venv ids-env
source ids-env/bin/activate

Install core ML and data science libraries
pip install scikit-learn pandas numpy matplotlib seaborn jupyter
pip install tensorflow keras xgboost lightgbm catboost
pip install networkx flask joblib colorama tld whois wordcloud
1.2 Data Preprocessing and Feature Engineering
For network-based IDS, raw packet captures (PCAPs) must be transformed into flow-based features. Use the NFStream library to extract statistical features from network flows.
 Python script: feature_extraction.py
import nfstream
import pandas as pd

Analyze a PCAP file and extract flow features
streamer = nfstream.NFStreamer(source="network_traffic.pcap")
flows = streamer.to_pandas()

Engineer additional features: packet size variance, inter-arrival time
flows['pkt_size_variance'] = flows.groupby('src_ip')['pkt_size'].transform('var')
flows['iat_variance'] = flows.groupby('src_ip')['iat'].transform('var')

Save processed dataset
flows.to_csv('processed_flows.csv', index=False)
1.3 Model Training and Serialization
Train an LSTM ensemble for sequence-based anomaly detection.
 train_threat_model.py
import pandas as pd
import numpy as np
from sklearn.model_selection import train_test_split
from sklearn.preprocessing import StandardScaler
from tensorflow.keras.models import Sequential
from tensorflow.keras.layers import LSTM, Dense, Dropout

Load and preprocess data
data = pd.read_csv('processed_flows.csv')
X = data.drop('label', axis=1).values
y = data['label'].values

Scale features
scaler = StandardScaler()
X_scaled = scaler.fit_transform(X)

Reshape for LSTM [samples, timesteps, features]
X_reshaped = X_scaled.reshape(X_scaled.shape[bash], 1, X_scaled.shape[bash])

Build LSTM model
model = Sequential([
LSTM(64, input_shape=(1, X_scaled.shape[bash]), return_sequences=True),
Dropout(0.2),
LSTM(32),
Dense(1, activation='sigmoid')
])

model.compile(optimizer='adam', loss='binary_crossentropy', metrics=['accuracy'])
model.fit(X_reshaped, y, epochs=10, batch_size=32, validation_split=0.2)

Save model and scaler
model.save('model.h5')
import joblib
joblib.dump(scaler, 'scaler.pkl')
1.4 Real-Time Inference with Flask API
Deploy the trained model as a REST API for integration with SIEM tools.
 app.py
from flask import Flask, request, jsonify
import numpy as np
import joblib
from tensorflow.keras.models import load_model

app = Flask(<strong>name</strong>)
model = load_model('model.h5')
scaler = joblib.load('scaler.pkl')

@app.route('/predict', methods=['POST'])
def predict():
data = request.json['features']
scaled = scaler.transform(np.array(data).reshape(1, -1))
reshaped = scaled.reshape(1, 1, -1)
prediction = model.predict(reshaped)
return jsonify({'malicious': float(prediction[bash][0])})

if <strong>name</strong> == '<strong>main</strong>':
app.run(host='0.0.0.0', port=5000)
Run the API server with python app.py. The endpoint can now ingest real-time flow data and return threat probabilities.
- SIEM-SOAR Automation: Orchestrating Incident Response with Wazuh and Shuffle
Modern security operations demand that detection triggers immediate, coordinated response actions. Integrating a SIEM (Security Information and Event Management) with a SOAR (Security Orchestration, Automation, and Response) platform reduces mean time to respond (MTTR) from hours to seconds.
Step-by-Step Guide: Building a SIEM-to-SOAR Pipeline
This tutorial connects Wazuh SIEM with Shuffle SOAR and TheHive for automated incident management.
2.1 Install and Configure Wazuh SIEM on Ubuntu
 Add Wazuh repository
curl -s https://packages.wazuh.com/key/GPG-KEY-WAZUH | sudo apt-key add -
echo "deb https://packages.wazuh.com/4.x/apt/ stable main" | sudo tee /etc/apt/sources.list.d/wazuh.list

Install Wazuh manager, indexer, and dashboard
sudo apt update
sudo apt install wazuh-manager wazuh-indexer wazuh-dashboard -y

Start services
sudo systemctl start wazuh-manager
sudo systemctl enable wazuh-manager
2.2 Deploy Shuffle SOAR for Workflow Automation
Shuffle is an open-source SOAR platform that uses webhooks to trigger automated playbooks.
 Clone and run Shuffle using Docker
git clone https://github.com/frikky/Shuffle.git
cd Shuffle/docker-compose
docker-compose up -d

Verify deployment
curl http://localhost:3001/api/v1/health
2.3 Create a Detection Rule and Webhook Integration
Configure Wazuh to send alerts to Shuffle via webhook. Edit the Wazuh ruleset:
<!-- /var/ossec/etc/rules/local_rules.xml -->
<group name="local,syslog,sshd,">
<rule id="100002" level="10">
<if_sid>5716</if_sid>
<match>sshd: Failed password</match>
<description>Multiple SSH failures detected - triggering SOAR</description>
</rule>
</group>
Configure Wazuh to forward alerts:
 /var/ossec/etc/ossec.conf
<ossec_config>
<integration>
<name>custom-webhook</name>
<hook_url>http://localhost:3001/api/v1/hook</hook_url>
<level>10</level>
</integration>
</ossec_config>

sudo systemctl restart wazuh-manager
2.4 Build a SOAR Playbook for Automated Response
In the Shuffle UI, create a workflow that:
1. Receives the webhook alert
- Enriches the source IP with VirusTotal and AbuseIPDB APIs
3. Triggers a firewall block rule via iptables
4. Creates a ticket in TheHive
 Example Python enrichment script for Shuffle
import requests

def enrich_ip(ip_address):
vt_url = f"https://www.virustotal.com/api/v3/ip_addresses/{ip_address}"
headers = {"x-apikey": "YOUR_VT_API_KEY"}
response = requests.get(vt_url, headers=headers)
return response.json()

Block IP via iptables (execute on target host)
import subprocess
subprocess.run(["iptables", "-A", "INPUT", "-s", ip_address, "-j", "DROP"])
2.5 Windows PowerShell Integration for SOAR
For Windows environments, use PowerShell to execute response actions:
 Block IP via Windows Firewall
New-1etFirewallRule -DisplayName "Block Malicious IP" -Direction Inbound -RemoteAddress $ip_address -Action Block

Set environment variable for API keys
$env:GEMINI_API_KEY = "your-actual-api-key-here"
- Cloud, Container, and Endpoint Hardening Against AI-Assisted Attacks
As AI models become targets themselves—through prompt injection, model poisoning, and adversarial attacks—infrastructure must be hardened to prevent exploitation. Container security is particularly critical, as compromised containers can lead to host escape and lateral movement.
Step-by-Step Guide: Hardening Docker Containers for Production
3.1 Implement Non-Root Users and Read-Only Filesystems
 Hardened Dockerfile
FROM python:3.12-slim AS builder

Create non-root user
RUN useradd -m -u 10000 -s /bin/bash appuser && \
mkdir -p /app /data && \
chown -R appuser:appuser /app /data

Switch to non-root user
USER appuser

Copy application with proper ownership
COPY --chown=appuser:appuser app /app

Set read-only root filesystem and tmpfs for temporary storage
CMD ["uvicorn", "app.main:app", "--host", "0.0.0.0", "--port", "8000"]
3.2 Runtime Security Flags
Run containers with strict security profiles:
 Run with read-only root, tmpfs, and dropped capabilities
docker run --rm \
--read-only \
--tmpfs /tmp:rw,noexec,nosuid,size=100m \
--cap-drop ALL \
--cap-add NET_BIND_SERVICE \
--security-opt no-1ew-privileges:true \
--security-opt seccomp=seccomp-profile.json \
my-hardened-app:latest
3.3 Block Cloud Metadata Egress from Containers
Prevent container escape attacks that target cloud metadata services:
 Add iptables rule to block metadata service (169.254.169.254)
sudo iptables -I FORWARD 1 -d 169.254.169.254 -j DROP

Persist rule across reboots
echo "iptables -I FORWARD 1 -d 169.254.169.254 -j DROP" | sudo tee -a /etc/rc.local
3.4 Endpoint Hardening for Windows
For Windows endpoints running security agents:
 Enable Windows Defender Application Guard
Enable-WindowsOptionalFeature -Online -FeatureName "Windows-Defender-ApplicationGuard"

Configure Attack Surface Reduction rules
Set-MpPreference -AttackSurfaceReductionRules_Ids 75668c1f-73b5-4cf0-bb93-3ecf5cb7cc84 -AttackSurfaceReductionRules_Actions Enabled

Enable credential guard
$credGuard = @"
Windows Defender Credential Guard
"@
Add-Registry -Path "HKLM:\System\CurrentControlSet\Control\Lsa" -1ame "LsaCfgFlags" -Value 1 -Type DWord
4. Explainable AI (XAI) for Transparent Security Decisions
Black-box models are unacceptable in security operations where decisions must be auditable and explainable. SHAP (SHapley Additive exPlanations) and LIME (Local Interpretable Model-agnostic Explanations) provide interpretability for ML-based threat detection.
Step-by-Step Guide: Implementing SHAP for IDS Interpretability
4.1 Install SHAP and Dependencies
pip install shap lime
4.2 Generate Explanations for Model Predictions
 explain_predictions.py
import shap
import joblib
import pandas as pd
import numpy as np
from tensorflow.keras.models import load_model

Load model and data
model = load_model('model.h5')
scaler = joblib.load('scaler.pkl')
X_test = pd.read_csv('X_test.csv').values

Wrap model for SHAP (use a wrapper for Keras models)
def model_predict(data):
scaled = scaler.transform(data)
reshaped = scaled.reshape(scaled.shape[bash], 1, scaled.shape[bash])
return model.predict(reshaped)

Create a SHAP explainer using GradientExplainer
explainer = shap.GradientExplainer(model, X_test[:100].reshape(-1, 1, X_test.shape[bash]))

Compute SHAP values for a sample
sample = X_test[bash].reshape(1, 1, X_test.shape[bash])
shap_values = explainer.shap_values(sample)

Visualize feature importance
shap.summary_plot(shap_values, X_test[:100], feature_names=feature_names)
4.3 Deploy XAI Dashboard
Integrate SHAP explanations into the Flask API:
@app.route('/explain', methods=['POST'])
def explain():
data = request.json['features']
sample = np.array(data).reshape(1, 1, -1)
shap_vals = explainer.shap_values(sample)
return jsonify({'shap_values': shap_vals.tolist()})
This allows SOC analysts to understand why a model flagged an event as malicious, enabling trust and compliance with regulatory frameworks.
- Generative AI and LLMs for Threat Hunting and Log Analysis
Large Language Models (LLMs) are transforming security operations by automating log analysis, generating detection rules, and assisting in incident documentation. However, they introduce new attack surfaces, including prompt injection and data leakage.
Step-by-Step Guide: Deploying an LLM-Powered Log Analyzer
5.1 Set Up a Local LLM with Ollama
 Install Ollama
curl -fsSL https://ollama.com/install.sh | sh

Pull a lightweight model for log analysis
ollama pull llama3.2:3b

Run the model
ollama run llama3.2:3b
5.2 Build a RAG Pipeline for CVE Analysis
Retrieval-Augmented Generation (RAG) enhances LLM responses with up-to-date vulnerability data.
 rag_cve_analyzer.py
from langchain.embeddings import HuggingFaceEmbeddings
from langchain.vectorstores import Chroma
from langchain.llms import Ollama
from langchain.chains import RetrievalQA

Load CVE data into vector store
embeddings = HuggingFaceEmbeddings(model_name="all-MiniLM-L6-v2")
vectorstore = Chroma.from_documents(documents=cve_docs, embedding=embeddings)

Create RAG chain
llm = Ollama(model="llama3.2:3b")
qa_chain = RetrievalQA.from_chain_type(llm, retriever=vectorstore.as_retriever())

Query for a specific CVE
response = qa_chain.run("What are the mitigation steps for CVE-2024-12345?")
print(response)
5.3 Automate Detection Rule Generation
Use LLMs to generate Snort or Sigma rules from natural language descriptions:
prompt = """
Generate a Snort rule to detect SQL injection attempts targeting a web server.
Include the rule header, options, and a brief explanation.
"""

response = llm.invoke(prompt)
print(response)
5.4 Secure LLM Deployment with Guardrails
Implement input sanitization and output filtering to prevent prompt injection:
def sanitize_input(user_input):
 Block potentially malicious patterns
blocked_patterns = ["system(", "exec(", "import os", "subprocess"]
for pattern in blocked_patterns:
if pattern in user_input.lower():
return "Input blocked due to security policy."
return user_input

def validate_output(llm_response):
 Ensure no sensitive data is leaked
sensitive_patterns = [r'\b\d{3}-\d{2}-\d{4}\b', r'api[_-]key']
 Implement regex filtering
return filtered_response
What Undercode Say:
- Key Takeaway 1: The EduSkills AI in Cyber Security internship curriculum directly maps to enterprise-grade security operations—from ML-based IDS deployment to SIEM-SOAR orchestration. The practical exposure to XAI and generative AI is particularly valuable, as these are the fastest-growing domains in the industry.
-
Key Takeaway 2: Modern cybersecurity is no longer about reactive rule-matching; it’s about proactive, AI-driven defense. The ability to deploy, explain, and secure AI models is becoming as critical as traditional network security skills. Professionals who master these techniques will lead the next generation of security operations centers.
Analysis: The internship program’s comprehensive coverage—spanning machine learning, deep learning, reinforcement learning, SIEM/SOAR automation, cloud/container security, threat intelligence, and digital forensics—reflects the industry’s demand for T-shaped security professionals. The inclusion of Explainable AI and Generative AI indicates a forward-looking curriculum that addresses both the opportunities and risks posed by AI in cybersecurity. As AI-powered attacks become more sophisticated, the ability to build interpretable, resilient defense systems will separate effective security teams from those that are perpetually reactive. The practical commands and configurations provided in this article serve as a bridge between academic knowledge and operational reality, enabling practitioners to immediately apply these concepts in their environments.
Prediction:
+1 The integration of generative AI into SOAR platforms will reduce average incident response times by 60-80% within the next 18 months, as LLMs automate playbook generation and threat enrichment.
+1 XAI frameworks like SHAP will become mandatory compliance requirements for AI-driven security tools in regulated industries (finance, healthcare) by 2028, driving widespread adoption of interpretable models.
-1 The democratization of AI-powered penetration testing tools will lower the barrier to entry for malicious actors, leading to a surge in automated, AI-assisted attacks that exploit zero-day vulnerabilities at machine speed.
+1 Container security hardening practices—including seccomp profiles, non-root execution, and metadata blocking—will become standardized across CI/CD pipelines, reducing container escape incidents by over 70% in production environments.
-1 Organizations that fail to implement robust LLM guardrails will experience significant data breaches through prompt injection and model inversion attacks, with the average cost of an AI-related breach exceeding $5 million by 2027.
▶️ Related Video (74% Match):
🎯Let’s Practice For Free:
🎓 Live Courses & Certifications:
Join Undercode Academy for Verified Certifications
🚀 Request a Custom Project:
Secure, high-velocity infrastructure and disruptive technological engineering. Contact our engineering team for high-tier development and proprietary systems:
[email protected]
💎 Smart Architecture | 🛡️ Secure by Design | ⭐ Trusted by Thousands
IT/Security Reporter URL:
Reported By: Neelapala Govardhini – Hackers Feeds
Extra Hub: Undercode MoN
Basic Verification: Pass ✅


