Listen to this Post
Introduction:
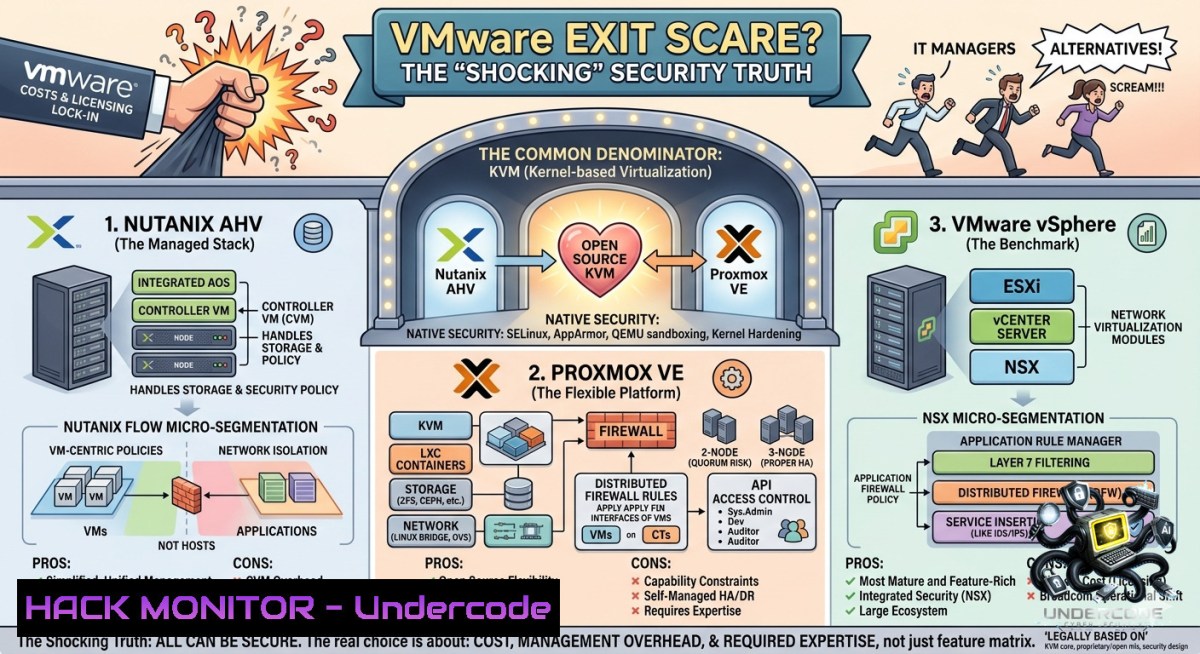
A hypervisor is the software layer that enables multiple virtual machines (VMs) to share physical hardware – essentially the backbone of modern data centers and cloud computing. Recently, a major vendor narrative has attempted to paint any migration away from VMware vSphere 8 (to alternatives like Nutanix AHV or Proxmox VE) as a reckless security gamble, but this is corporate gaslighting designed to enforce vendor lock-in rather than reflect technical reality.
Learning Objectives:
– Evaluate the security posture and risk profile of KVM‑based hypervisors (Nutanix AHV, Proxmox) versus proprietary solutions.
– Execute a controlled hypervisor migration plan with verified Linux/Windows commands, backup validation, and network testing.
– Harden a KVM/QEMU environment against common attack vectors including VM escape, insecure management APIs, and misconfigured storage.
You Should Know:
1. Deconstructing the “Migration Risk” Narrative – A Technical Reality Check
The fear being pushed is that moving from VMware to any alternative inherently creates catastrophic outages and security holes. While any infrastructure change requires planning, the claim ignores that KVM (Kernel‑based Virtual Machine) powers Google Cloud Compute Engine, AWS Nitro, and Oracle Cloud – environments that handle millions of production workloads. The real risk lies not in the hypervisor choice but in poorly executed migration steps. Below is a step‑by‑step validation of a safe migration from VMware to a KVM‑based platform, including commands to verify compatibility and performance.
Step‑by‑step guide:
1. Inventory existing VMs on VMware ESXi (run from a Linux jumpbox or vSphere CLI):
 List all VMs with power state and guest OS
vim-cmd vmsvc/getallvms
 Export VM configuration for each
vim-cmd vmsvc/get.config <vmid> > vm_config_<vmid>.txt
2. Convert VMware VMDK disks to KVM‑compatible QCOW2 format using `qemu-img` (install on any Linux host):
 Example: convert disk1.vmdk to qcow2 (optimized for KVM)
qemu-img convert -f vmdk -O qcow2 source.vmdk target.qcow2
 Verify conversion integrity
qemu-img check target.qcow2
3. Test the converted VM on a staging KVM host (Ubuntu/Debian with `libvirt`):
 Install KVM and tools
sudo apt update && sudo apt install qemu-kvm libvirt-daemon-system virt-manager -y
 Create a VM from the qcow2 disk (using virt-install)
virt-install --1ame test-vm --memory 4096 --vcpus 2 --disk path=target.qcow2,format=qcow2 --os-variant generic --import --1etwork bridge:virbr0
4. Validate network and performance parity – run Windows `ping` and Linux `iperf3` from inside the guest to measure latency and throughput against the original VMware VM. A deviation >10% indicates a networking misconfiguration (e.g., missing virtio drivers).
2. Hardening the KVM/QEMU Environment Against VM Escape & Lateral Movement
VM escape – where an attacker breaks out of a guest VM to compromise the host – is the nightmare scenario for any hypervisor. While VMware has had its share of CVEs (e.g., CVE‑2021‑21985), KVM’s small trusted computing base and kernel integration reduce attack surface. However, misconfigurations can reintroduce risk. Follow this guide to lock down a Proxmox or pure KVM deployment.
Step‑by‑step guide:
1. Isolate management traffic from VM traffic – on Linux host, create separate bridges:
 Create management bridge (no VM traffic)
sudo ip link add name mgmt0 type bridge
sudo ip addr add 10.10.10.2/24 dev mgmt0
 Create VM bridge with VLAN tagging
sudo ip link add name vmbr0 type bridge
sudo ip link set eth0 master vmbr0
2. Disable unnecessary QEMU monitor and guest agent features (edit libvirt domain XML):
<features>
<acpi/>
<apic/>
<hyperv>
<relaxed state='off'/>
</hyperv>
<kvm>
<hidden state='on'/> <!-- Hides KVM presence from guest -->
</kvm>
</features>
3. Apply SELinux or AppArmor profiles to restrict QEMU processes:
 On RHEL/CentOS
sudo setsebool -P virt_use_nfs off
sudo setsebool -P virt_use_samba off
 On Debian/Ubuntu
sudo aa-enforce /etc/apparmor.d/libvirt/
4. Monitor for anomalous syscalls using auditd – log any attempt by QEMU to access host files outside `/var/lib/libvirt`:
sudo auditctl -w / -p r -k qemu_escape -S openat -F uid=$(id -u libvirt-qemu)
5. Windows host hardening (if using Hyper‑V or WSL2 with KVM) – disable guest services that allow host‑guest shared memory:
 Disable Hyper-V integration services that can be abused
Set-VM -1ame "YourVM" -GuestServiceInterfaceEnabled $false
3. Backup & Disaster Recovery Strategies That Neutralize Migration Risk
One of the primary FUD (Fear, Uncertainty, Doubt) tactics used by VMware’s narrative is that only its native backup APIs (VADP) are reliable. In reality, both Nutanix AHV and Proxmox offer crash‑consistent and application‑consistent backup mechanisms. This section provides a cross‑platform backup validation routine.
Step‑by‑step guide:
1. For Proxmox – use `vzdump` to create compressed backups while the VM runs:
vzdump 101 --mode snapshot --compress zstd --dumpdir /backups/proxmox/
2. For pure KVM – create a snapshot via `virsh` then backup the disk:
virsh snapshot-create-as --domain myvm --1ame backup-snap --disk-only --atomic
 Copy the qcow2 disk to remote storage
rsync -av /var/lib/libvirt/images/myvm.qcow2 user@backup-server:/backups/
virsh blockcommit myvm vda --active --pivot
3. Validate backup integrity – mount the backup and check filesystem:
modprobe nbd
qemu-1bd -c /dev/nbd0 /backups/myvm.qcow2
mount /dev/nbd0p1 /mnt/vm_check
 Run filesystem check (Linux guest) or use ntfsfix (Windows guest)
ntfsfix /dev/nbd0p1
4. Automate backup testing using a cron job on Linux or Task Scheduler on Windows to restore the backup to an isolated network and run a `curl` / `Test-1etConnection` against a known endpoint.
4. API Security & Cloud Hardening for Hybrid Hypervisor Deployments
If you migrate to Nutanix or Proxmox but expose management APIs to the internet or internal untrusted networks, you create a worse risk than staying on VMware. Attackers actively scan for exposed `:8006` (Proxmox), `:9440` (Nutanix Prism), or `:16509` (libvirt). This guide shows how to securely front these APIs.
Step‑by‑step guide:
1. Use a reverse proxy with mutual TLS (mTLS) – on Linux, deploy NGINX with client certificate validation:
server {
listen 443 ssl;
ssl_verify_client on;
ssl_client_certificate /etc/nginx/client_ca.crt;
location / {
proxy_pass https://localhost:8006;  Proxmox API
proxy_set_header X-Forwarded-For $proxy_add_x_forwarded_for;
}
}
2. Restrict API access to VPN or bastion IPs using iptables on the hypervisor host:
iptables -A INPUT -p tcp --dport 8006 -s 10.0.0.0/8 -j ACCEPT
iptables -A INPUT -p tcp --dport 8006 -j DROP
3. Audit API logs for brute‑force or unauthorized access (example for Proxmox, tailing `/var/log/pveproxy/access.log`):
tail -f /var/log/pveproxy/access.log | grep --color "401\|403"
4. Windows admins – use PowerShell to monitor WinRM or Hyper-V API attempts:
Get-WinEvent -FilterHashtable @{LogName='Microsoft-Windows-PowerShell/Operational'; ID=4104} | Where-Object {$_.Message -match "Invoke-Command"}
5. Vulnerability Exploitation & Mitigation in a Multi‑Hypervisor Environment
Both VMware and KVM have had critical vulnerabilities. The difference is that the open‑source KVM stack often gets fixes faster (hours to days) compared to proprietary patch cycles (weeks to months). However, you must know how to apply mitigations before a patch is released. This section covers live‑patching techniques.
Step‑by‑step guide:
1. Detect a VM escape attempt – look for unexpected `dmesg` messages on the host:
dmesg | grep -i "kvm\|qemu\|vmexit" | grep -E "fault|error|invalid"
2. Mitigate speculative execution vulnerabilities (Spectre v2) on KVM hosts by disabling indirect branch prediction:
 Add to kernel command line in /etc/default/grub
GRUB_CMDLINE_LINUX="spectre_v2=on spec_store_bypass_disable=on"
sudo update-grub && sudo reboot
3. Isolate suspicious VMs using cgroups to limit CPU and memory spikes that could indicate cryptojacking or escape attempts:
virsh schedinfo myvm --set cpu_shares=512 --set vcpu_period=100000 --set vcpu_quota=50000
4. For Windows‑based Hyper‑V hosts (if part of hybrid environment), enable nested virtualization protections:
Set-VMProcessor -VMName "SuspiciousVM" -EnableHostResourceProtection $true -ExposeVirtualizationExtensions $false
What Undercode Say:
– Key Takeaway 1: The “migration risk” narrative is a classic vendor lock‑in tactic; technical evidence from AWS Nitro and Google Cloud shows KVM is production‑ready and secure when configured properly.
– Key Takeaway 2: Real security risk lies not in the hypervisor brand but in poor implementation – exposed management APIs, untested backups, and lack of isolation between tenant and management traffic.
Analysis: The post from Charles Crampton correctly identifies corporate gaslighting around VMware migrations. By examining the actual attack surfaces (VM escape, API exposure, backup integrity), we see that Nutanix AHV, Proxmox, and pure KVM are not inherently less secure. In fact, their open‑source nature allows faster patching and community auditing. The commands and steps provided above give engineers a practical way to validate and harden any hypervisor migration, turning the FUD into a measurable risk assessment. Organizations should focus on their operational maturity and budget, not on vendor scare tactics.
Prediction:
– +1 By 2028, KVM‑based hypervisors (including Proxmox and Nutanix) will capture over 40% of the enterprise virtualization market as VMware licensing costs continue to rise and open‑source security tooling matures.
– +1 Automated, AI‑driven migration assistants will emerge to convert VMware configurations to KVM with zero downtime, rendering the “migration risk” argument obsolete within three years.
– -1 However, early adopters who rush migrations without following backup and API hardening steps (like those outlined above) will experience a temporary spike in misconfiguration‑based breaches, giving ammunition to VMware’s marketing team for another 12–18 months.
– -1 The complexity of managing heterogeneous hypervisor environments (VMware + KVM + cloud) will lead to a niche but profitable market for “cross‑hypervisor ransomware” that targets poorly synchronized security policies.
▶️ Related Video (70% Match):
🎯Let’s Practice For Free:
🎓 Live Courses & Certifications:
[Join Undercode Academy for Verified Certifications](https://undercode.co.uk/certifications/)
🚀 Request a Custom Project:
Secure, high-velocity infrastructure and disruptive technological engineering. Contact our engineering team for high-tier development and proprietary systems:
[[email protected]](mailto:[email protected])
💎 Smart Architecture | 🛡️ Secure by Design | ⭐ Trusted by Thousands
IT/Security Reporter URL:
Reported By: [Charlescrampton There](https://www.linkedin.com/posts/charlescrampton_there-is-a-narrative-being-pushed-right-now-share-7467016951748263936–Ni5/) – Hackers Feeds
Extra Hub: Undercode MoN
Basic Verification: Pass ✅
🔐JOIN OUR CYBER WORLD [ CVE News • HackMonitor • UndercodeNews ]
[💬 Whatsapp](https://undercode.help/whatsapp) | [💬 Telegram](https://t.me/UndercodeCommunity)
📢 Follow UndercodeTesting & Stay Tuned:
[𝕏 formerly Twitter 🐦](https://x.com/undercodeupdate) | [@ Threads](https://www.threads.net/@undercodetesting) | [🔗 Linkedin](https://www.linkedin.com/company/undercodetesting/) | [🦋BlueSky](https://bsky.app/profile/undercode.bsky.social)


