
Listen to this Post
Introduction:
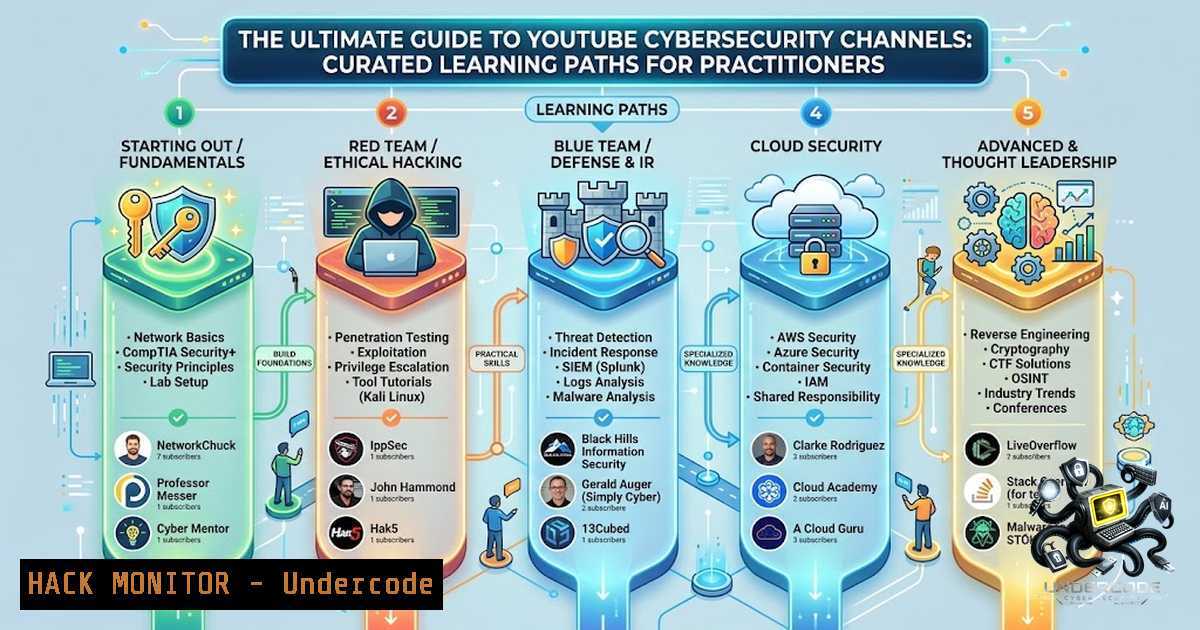
In the rapidly evolving landscape of cybersecurity, professionals are increasingly turning to micro-learning platforms like YouTube to supplement traditional education and certification paths. This shift reflects a need for agile, practitioner-driven insights that cut through theoretical noise to deliver actionable, real-world skills. The curated list below offers a strategic roadmap for leveraging video content to master everything from foundational Linux commands to advanced cloud security configurations and forensic analysis, empowering both novice and seasoned professionals to stay ahead of threats.
Learning Objectives & Secrets:
- Objective 1: Develop a rapid, practical understanding of core cybersecurity concepts (networking, OS internals, attack vectors) by leveraging visual demonstrations and walkthroughs.
- Objective 2 (Secret Tip): Use channels like NetworkChuck and David Bombal to build a “lab-first” mentality, executing commands alongside the video to build muscle memory for incident response and system administration.
- Objective 3 (Secret Tip): Combine offensive (IppSec, HackerSploit) and defensive (DFIR Science, Elastic Security) content to adopt a “purple team” perspective, enabling you to anticipate attacker methodology while strengthening detection workflows.
You Should Know:
- Building Your Cybersecurity Home Lab with Linux & Windows
A fundamental step to absorbing the knowledge from channels like NetworkChuck and David Bombal is establishing a safe, virtualized environment for experimentation. This lab is your digital playground to break, fix, and secure systems without organizational risk.
Step‑by‑step guide explaining what this does and how to use it:
– Step 1: Install a Hypervisor. Download and install VMware Workstation Player (Free for Windows/Linux) or VirtualBox. This creates the foundation for your virtual machines (VMs).
– Step 2: Deploy a Linux Attack Machine. Install a Kali Linux VM. This will be your primary platform for offensive tools. Default credentials are often kali/kali.
– Step 3: Deploy a Windows Target Machine. Install a Windows 10/11 Evaluation VM. Ensure it is on the same “Host-Only” or “NAT” network as Kali to allow communication.
– Step 4: Configure Networking. In your hypervisor settings, set the network adapter to “NAT” or “Host-Only.” This isolates your lab from your home network while allowing VMs to communicate.
– Step 5: Snapshot and Clone. Before making major changes, take a snapshot of your VMs. This allows you to revert to a clean state instantly after a failed exploit or misconfiguration.
Linux Commands for Initial Setup:
– `sudo apt update && sudo apt upgrade -y` (Updates Kali packages)
– `sudo apt install openssh-server` (Installs SSH server for remote access)
– `sudo systemctl enable ssh –1ow` (Enables SSH to connect from your host)
– `ip a` (Shows IP address for Kali to connect from your Windows host)
Windows Commands for Initial Setup (PowerShell Admin):
– `Set-ExecutionPolicy RemoteSigned` (Allows local scripts to run)
– `Enable-WindowsOptionalFeature -Online -FeatureName “Microsoft-Hyper-V”` (Enables native Hyper-V if preferred)
– `Get-1etIPAddress -AddressFamily IPv4` (Finds Windows VM IP address for lateral movement exercises)
- Mastering Offensive Security: Tool Configuration & Exploitation Workflows
Channels like IppSec, The Cyber Mentor, and HackerSploit emphasize a methodological approach to penetration testing. Moving beyond automated tools, they stress enumeration and exploit chaining to validate vulnerabilities.
Step‑by‑step guide explaining what this does and how to use it:
– Step 1: Reconnaissance with Nmap. Use `nmap` to map the attack surface of your target VM. Focus on open ports and services.
– Command: `nmap -sV -sC -O
– Step 2: Exploitation with Metasploit. If a vulnerability is found (e.g., EternalBlue on port 445), use Metasploit to establish a foothold.
– Command sequence: `msfconsole` -> `use exploit/windows/smb/ms17_010_eternalblue` -> `set RHOSTS
– Step 3: Privilege Escalation. Once inside, use WinPeas or LinPeas to identify misconfigurations that allow elevation to SYSTEM or root.
– Linux: `./linpeas.sh`
– Windows: `.\winpeas.exe`
– Step 4: Post-Exploitation. Dump password hashes using `mimikatz` or `hashdump` within Meterpreter to understand lateral movement risks.
– Meterpreter: `load kiwi` -> `creds_all`
– Step 5: Cleanup. Always remove your files and logs to return the environment to its original state for repeatable practice.
- Cloud Security Hardening: AWS & Azure in Practice
Stephane Maarek and John Savill provide deep insights into AWS and Azure security. A common theme is the principle of least privilege and identity management, which are critical for preventing data breaches in the cloud.
Step‑by‑step guide explaining what this does and how to use it:
– Step 1: IAM Policy Review. In your AWS console, navigate to IAM. Identify any policy with `”Effect”: “Allow”` and `”Action”: “”` (AdministratorAccess). This is a high-risk configuration.
– Step 2: Implement a Custom Policy. Create a policy that restricts actions to specific services (e.g., S3) and resources (e.g., a specific bucket).
– Code Snippet (AWS IAM Policy):
{
"Version": "2012-10-17",
"Statement": [
{
"Effect": "Allow",
"Action": [
"s3:GetObject",
"s3:PutObject"
],
"Resource": "arn:aws:s3:::my-secure-bucket/",
"Condition": {
"IpAddress": {"aws:SourceIp": "192.168.1.0/24"}
}
}
]
}
– Step 3: Azure Identity Protection. In Azure, navigate to Azure AD > Security > Identity Protection. Configure user risk and sign-in risk policies to block high-risk sign-ins or force MFA.
– Step 4: Cloud Security Posture Management (CSPM). Enable AWS Security Hub or Azure Defender to continuously monitor configurations and generate compliance reports based on CIS benchmarks.
– Step 5: API Security. Use Postman to test your API endpoints with invalid tokens to ensure the `401 Unauthorized` response is properly configured and no sensitive data is returned.
- Defensive Operations: SIEM, Threat Hunting, and Detection Engineering
Elastic Security and Microsoft Security channels demonstrate how to turn raw data into actionable intelligence. This involves configuring SIEMs to ingest logs, creating custom detection rules, and mapping alerts to the MITRE ATT&CK framework.
Step‑by‑step guide explaining what this does and how to use it:
– Step 1: Log Ingestion. Install Elastic Agent on a Windows machine. Configure it to ship Windows Event Logs (Security, System, Application) to your Elastic Stack.
– Step 2: Create a Custom Detection Rule. Using the Elastic UI, create a rule to detect multiple failed logon attempts followed by a successful one (a classic brute force indicator).
– Query (KQL): `event.code: 4625 AND (winlog.event_data.Status: 0xC000006A OR winlog.event_data.Status: 0xC000006D)` followed by `event.code: 4624`
– Step 3: MITRE ATT&CK Mapping. Tag your rule with techniques like `T1110.001` (Brute Force: Password Guessing).
– Step 4: Enable Windows Defender ATP. On your Windows VM, set up `Microsoft Defender for Endpoint` to collect endpoint-level telemetry.
– Step 5: Threat Hunting. Use Azure Sentinel’s hunting query language (KQL) to look for anomalous activities, such as a user account logging in from multiple disparate geographic locations within a short time window.
5. Forensic Analysis & Memory Triage
DFIR Science emphasizes that incident response begins with understanding the artifacts left behind. Memory analysis is crucial for detecting fileless malware and advanced persistent threats (APTs).
Step‑by‑step guide explaining what this does and how to use it:
– Step 1: Acquire a Memory Dump. Use the `DumpIt` tool (for Windows) or `LiME` (for Linux) to create a raw memory image of a compromised system.
– Step 2: Analyze with Volatility. Use Volatility 3 to analyze the memory dump and extract process lists, network connections, and command history.
– Command: `vol -f
– Command: `vol -f
– Step 3: Check for Hidden Processes. Compare the `pslist` output with `psscan` to identify processes that may be unlinked from standard system structures (a common rootkit technique).
– Step 4: Extract Registry Hives. Dump the SAM and SYSTEM hives from the memory dump or from the local disk to crack local user passwords.
– Command (Windows): `reg save hklm\sam C:\temp\sam.hive`
– Command (Windows): `reg save hklm\system C:\temp\system.hive`
– Step 5: Timeline Analysis. Use `timeline` plugins to correlate event times, malware execution, and network activity to reconstruct the sequence of an attack.
What Undercode Say:
- Key Takeaway 1: YouTube is an accelerator for practical skills; it bridges the gap between certification theory and real-world execution, but it is most effective when paired with active hands-on lab work.
- Key Takeaway 2: The combination of offensive and defensive channel consumption fosters a holistic, purple-team mindset, essential for modern security roles where understanding both attack and defense is paramount.
Prediction:
- +1 The rise of AI-curated playlists and interactive video platforms will further personalize cybersecurity learning, allowing professionals to skip beginner content they’ve mastered and dive straight into niche, advanced exploit and cloud techniques.
- +1 As video content becomes more integrated with cloud labs (e.g., interactive coding environments), platforms like YouTube will transform into primary training grounds for talent, accelerating the skill acquisition rate for entry-level SOC analysts.
- -1 The dynamic nature of video content versus static certification curricula may lead to a widening skill gap among professionals who rely solely on traditional courses, potentially making them less responsive to emerging zero-day threats.
▶️ Related Video (84% Match):
🎯Let’s Practice For Free:
🎓 Live Courses & Certifications:
Join Undercode Academy for Verified Certifications
🚀 Request a Custom Project:
Secure, high-velocity infrastructure and disruptive technological engineering. Contact our engineering team for high-tier development and proprietary systems:
[email protected]
💎 Smart Architecture | 🛡️ Secure by Design | ⭐ Trusted by Thousands
IT/Security Reporter URL:
Reported By: https://lnkd.in/p/eUiCCjqi – Hackers Feeds
Extra Hub: Undercode MoN
Basic Verification: Pass ✅


