Listen to this Post
Introduction:
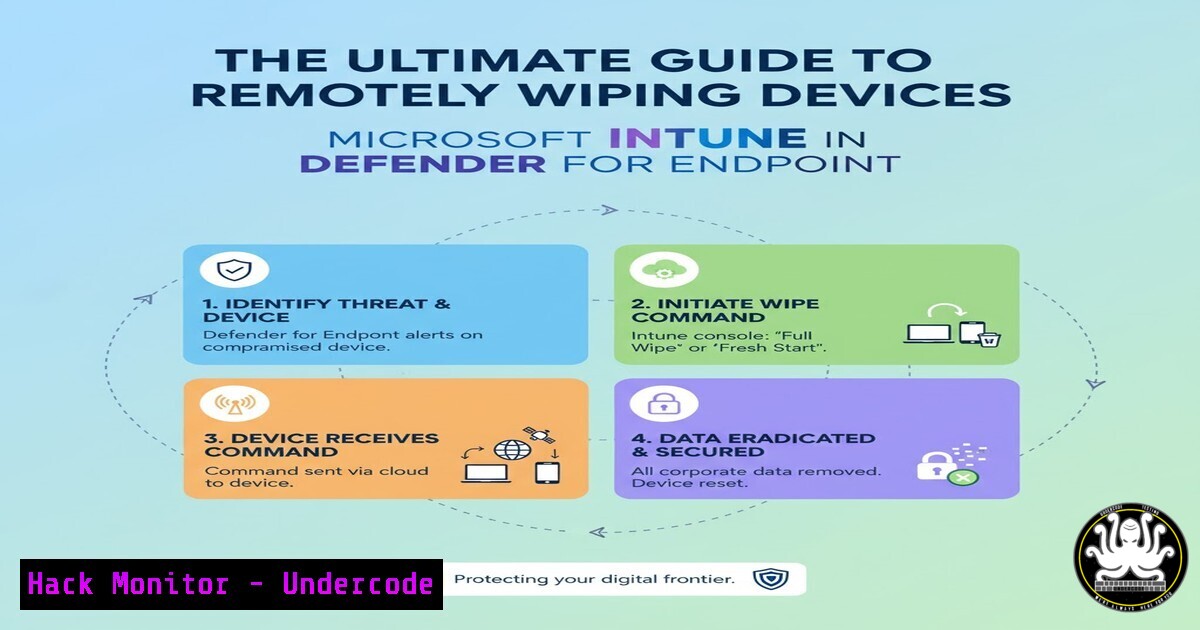
In today’s mobile-first workforce, the ability to remotely secure a compromised or lost device is a critical component of any cybersecurity strategy. Microsoft Intune, integrated with Defender for Endpoint, provides a powerful mechanism for administrators to perform remote wipes, protecting sensitive corporate data from falling into the wrong hands. This guide delves into the technical commands, security configurations, and procedural steps necessary to execute these actions effectively and securely.
Learning Objectives:
- Understand the integration between Microsoft Intune and Defender for Endpoint for device remediation.
- Master the PowerShell and API commands used to query device inventory and initiate remote actions.
- Configure and implement security policies to pre-harden endpoints and automate threat response.
You Should Know:
1. Querying Devices with PowerShell for Microsoft Graph
To interact with Intune and Defender programmatically, you must first authenticate and retrieve a list of managed devices. This is done using the Microsoft Graph API.
 Install the Microsoft Graph PowerShell module if not already present
 Install-Module Microsoft.Graph -Scope CurrentUser

Connect to Microsoft Graph with the necessary scopes
Connect-MgGraph -Scopes "DeviceManagementManagedDevices.ReadWrite.All", "User.Read"

Get all Intune managed devices
$ManagedDevices = Get-MgDeviceManagementManagedDevice

Display device name, OS, and last check-in date
$ManagedDevices | Select-Object DeviceName, OperatingSystem, LastSyncDateTime | Format-Table
Step-by-step guide:
1. Open Windows PowerShell as an administrator.
- Run the `Install-Module` command to ensure the Microsoft Graph module is available.
- Execute
Connect-MgGraph. This will open a browser window for you to authenticate with your Microsoft 365 admin credentials. - Once authenticated, run the `Get-MgDeviceManagementManagedDevice` cmdlet to fetch all Intune-managed devices.
- The output is piped to `Select-Object` to display a clean table of device names, their OS, and the last time they synced with Intune, which is crucial for determining if a device is active and reachable.
-
Initiating a Remote Wipe via Microsoft Graph API
While the Intune portal provides a GUI, automating a wipe via the Graph API is essential for large-scale or scripted responses to security incidents.
 Use curl to call the Microsoft Graph API. Requires a valid OAuth2 Bearer Token.
curl -X POST https://graph.microsoft.com/v1.0/deviceManagement/managedDevices/{deviceId}/wipe \
-H 'Authorization: Bearer {ACCESS_TOKEN}' \
-H 'Content-Type: application/json' \
-d '{
"keepEnrollmentData": false,
"keepUserData": false,
"macOsUnlockCode": null
}'
Step-by-step guide:
- First, you must obtain an access token. This can be done through Azure CLI (`az account get-access-token –resource https://graph.microsoft.com`) or via an app registration in Azure AD.
- Replace `{ACCESS_TOKEN}` in the header with the actual token string.
- Find the specific `{deviceId}` by using the PowerShell command from the previous section or by looking it up in the Intune console.
- The `keepEnrollmentData` and `keepUserData` parameters are critical. Setting both to `false` performs a full wipe, removing all corporate and user data. Setting `keepEnrollmentData` to `true` is a corporate wipe-only, which removes company data but keeps the device enrolled in management.
- Execute the `curl` command. A 204 No Content response typically indicates success.
-
Advanced Hunting in Defender for Endpoint to Identify Compromised Devices
Before wiping a device, you need evidence of compromise. Defender for Endpoint’s Advanced Hunting feature uses a Kusto Query Language (KQL) interface to proactively search for threats.
DeviceInfo
| where OnboardingStatus == "Onboarded"
| where Timestamp > ago(7d)
| join (DeviceFileEvents
| where ActionType == "FileCreated"
| where FileName endswith ".exe"
| where FolderPath contains "Temp"
) on DeviceId
| project Timestamp, DeviceName, FileName, FolderPath, InitiatingProcessFileName
| top 100 by Timestamp desc
Step-by-step guide:
- Navigate to the Microsoft 365 Defender portal (security.microsoft.com).
2. Go to Hunting > Advanced Hunting.
- Paste the KQL query into the query window.
- This specific query identifies executable files created in temporary directories on onboarded devices in the last week—a common indicator of malware download.
- Click Run query. The results will show a list of devices and suspicious files, providing the justification needed to initiate a remote wipe on a specific target.
-
Configuring a Conditional Access Policy for Automated Device Blocking
Prevention is better than cure. Use Azure AD Conditional Access to automatically block non-compliant or risky devices from accessing corporate resources, which can be a precursor to a wipe command.
 Create a new Conditional Access policy (example structure)
$conditions = New-Object -TypeName Microsoft.Open.MSGraph.Model.ConditionalAccessConditionSet
$conditions.Applications = New-Object -TypeName Microsoft.Open.MSGraph.Model.ConditionalAccessApplicationCondition
$conditions.Applications.IncludeApplications = "All"
$conditions.Users = New-Object -TypeName Microsoft.Open.MSGraph.Model.ConditionalAccessUserCondition
$conditions.Users.IncludeUsers = "All"
$conditions.Locations = $null

$grantcontrols = New-Object -TypeName Microsoft.Open.MSGraph.Model.ConditionalAccessGrantControls
$grantcontrols._Operator = "OR"
$grantcontrols.BuiltInControls = "block"

New-MgIdentityConditionalAccessPolicy -DisplayName "Block devices marked as high risk" -State "enabled" -Conditions $conditions -GrantControls $grantcontrols
Step-by-step guide:
- This PowerShell script outlines the structure for creating a Conditional Access policy that blocks access.
- The `Conditions` object defines the scope (e.g., all applications and all users).
- The `GrantControls` object is set to “block”, which is the action taken when the conditions are met.
- In practice, you would refine the `Conditions` to target devices where `Device.RiskState` equals “highRisk” (this requires the Identity Protection signals).
- Executing `New-MgIdentityConditionalAccessPolicy` creates and enables the policy. A device flagged by Defender for Endpoint as high risk would then be automatically blocked, triggering an investigation and potential wipe.
5. Leveraging Intune Security Baselines for Endpoint Hardening
A wiped device should be re-provisioned with hardened security configurations. Intune Security Baselines provide pre-configured groups of Windows settings that follow best practices.
 Get all available security baselines
Get-MgDeviceManagementTemplate -Filter "isof('microsoft.graph.securityBaselineTemplate')"

Assign a specific security baseline to a group
$params = @{
"@odata.type = "microsoft.graph.securityBaselineTemplate"
DisplayName = "Windows Security Baseline - Hardened"
Description = "Custom hardened baseline based on CIS benchmarks"
}

New-MgDeviceManagementTemplate -BodyParameter $params
Step-by-step guide:
- Use the `Get-MgDeviceManagementTemplate` cmdlet to list all available baseline templates, such as the “MDM Security Baseline” or “Microsoft Defender for Endpoint baseline”.
- While creating a baseline fully via PowerShell is complex, the snippet shows the initial creation of a custom template object.
- Typically, you would configure the baseline in the Intune admin console (Endpoint security > Security baselines), adjusting hundreds of specific settings for BitLocker, Windows Defender Antivirus, Local Policies, and more.
- Once configured, you assign the baseline to Azure AD groups. Devices, whether new or after a wipe and re-enrollment, will then automatically receive these hardened settings, reducing the attack surface.
-
Scripting a Compromise Response with a Custom Intune Remediation
Intune Proactive Remediations can be used to detect a compromise and automatically trigger a response, such as running a script that collects forensic data before a wipe is initiated.
 Example Detection Script for Proactive Remediation
 Checks for a specific malicious process and reports it.

$MaliciousProcessName = "mimikatz.exe"
$Process = Get-Process -Name $MaliciousProcessName -ErrorAction SilentlyContinue

if ($Process) {
 Write to standard output for Intune to detect as a failure.
Write-Output "Detected malicious process: $MaliciousProcessName"
exit 1  Exit code 1 signals detection to Intune.
} else {
Write-Output "System clean."
exit 0  Exit code 0 signals no detection.
}
Step-by-step guide:
- This PowerShell script is designed as a “detection script” for an Intune Proactive Remediation.
- It searches for a process with a known malicious name (e.g.,
mimikatz.exe). - If the process is found, it writes an output and returns an exit code of
1. Intune interprets this as a detection. - You can pair this with a “remediation script” that could attempt to kill the process, quarantine the file, or, more critically, trigger an alert to the SOC who can then decide on a remote wipe.
- This package is uploaded to Intune (Reports > Endpoint analytics > Proactive remediations) and assigned to device groups, enabling automated threat detection and response.
-
Auditing Wipe Actions with the Unified Audit Log
After performing a sensitive action like a remote wipe, it is crucial to audit the event to maintain a chain of custody and for compliance purposes.
 Search the Unified Audit Log for "Delete device" actions (which includes wipes)
Search-UnifiedAuditLog -Operations "Delete device" -StartDate (Get-Date).AddDays(-1) -EndDate (Get-Date) -ResultSize 1000

A more specific KQL query for the Office 365 Management Activity API
OfficeActivity
| where Operation == "Delete device"
| where TimeGenerated >= ago(1d)
| project TimeGenerated, UserId, DeviceName, DeviceId, ResultStatus
Step-by-step guide:
- The `Search-UnifiedAuditLog` PowerShell cmdlet is used to search for specific operations within the Microsoft 365 ecosystem. The “Delete device” operation corresponds to a remote wipe.
- Specify a date range with `-StartDate` and
-EndDate. - The results will show who initiated the wipe, the target device, and the timestamp.
- Alternatively, you can use the KQL query in the Microsoft 365 Defender Advanced Hunting log to achieve a similar result, correlating the wipe event with other security data.
What Undercode Say:
- The integration of Intune and Defender for Endpoint creates a powerful, automated “Assume Breach” posture, where the focus shifts from pure prevention to rapid containment and remediation.
- The decision between a “full wipe” and a “corporate wipe” is not just technical but also operational; a full wipe on a personally-owned device (BYOD) can lead to data loss lawsuits, making accurate device identification and policy assignment paramount.
The technical capability to remotely wipe a device is a fundamental control, but its power necessitates strict procedural safeguards. The commands and scripts provided are the technical foundation, but they must be governed by a clear Incident Response Plan. This plan should define roles, authorization levels (e.g., who can approve a wipe), and escalation paths. Automating detection and response is the end-goal, but initial implementations should focus on robust logging and manual approval for wipes to prevent adversarial or accidental destruction of critical evidence or data. The future of endpoint management is intrinsically linked to security automation, where a high-fidelity alert from Defender can automatically trigger a series of containment actions, including a forced wipe, with minimal human intervention.
Prediction:
The convergence of Endpoint Management (Intune) and Endpoint Protection (Defender) will lead to the rise of fully autonomous security remediation systems. Within the next 3-5 years, we predict that AI-driven SOCs will leverage these integrated platforms to automatically quarantine, investigate, and if necessary, perform remote wipes on compromised devices within seconds of initial detection, far outpacing human reaction times. This will drastically reduce the dwell time of attackers but will also raise significant ethical and legal questions about delegating destructive actions to algorithms, necessitating the development of sophisticated “circuit breaker” and approval workflows within the automation itself.
🎯Let’s Practice For Free:
IT/Security Reporter URL:
Reported By: Thomasvrhydn Remotely – Hackers Feeds
Extra Hub: Undercode MoN
Basic Verification: Pass ✅


