Listen to this Post
Introduction:
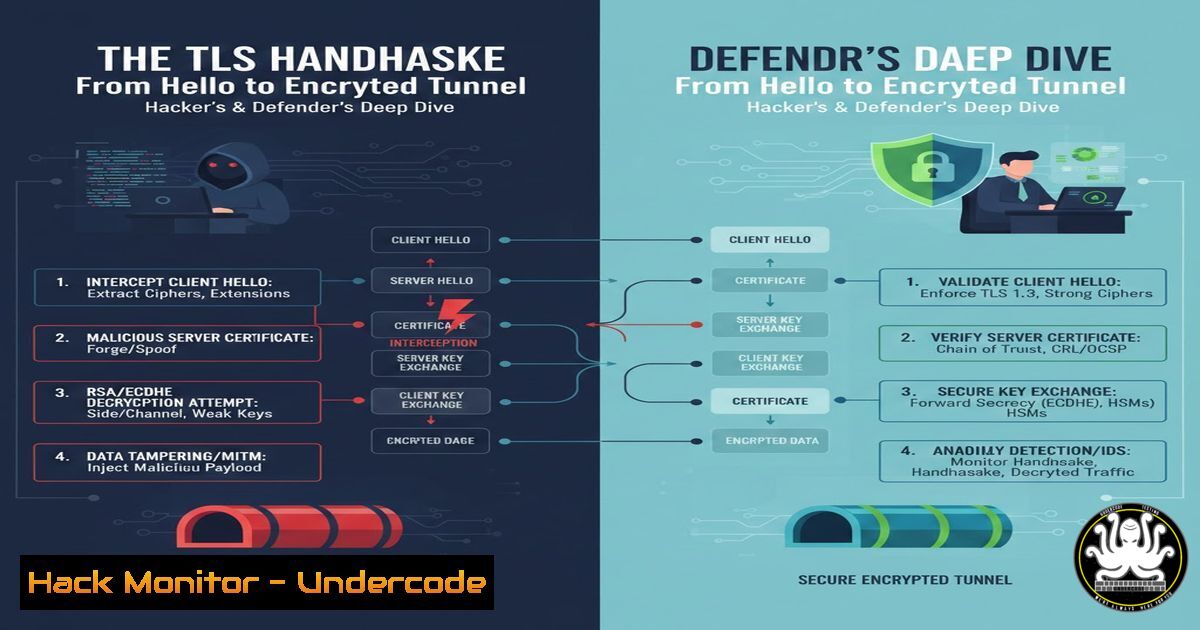
The Transport Layer Security (TLS) protocol is the unbreakable seal on the envelope of the modern internet, facilitating everything from secure logins to financial transactions. At its heart lies the TLS handshake, a cryptographic dance that establishes a secure channel over an otherwise insecure network. Understanding this process is not just academic; it’s fundamental for securing web applications, diagnosing network issues, and even identifying potential weaknesses attackers might exploit.
Learning Objectives:
- Decode the intricate, packet-by-packet exchange of the TLS 1.3 handshake and its evolution from earlier versions.
- Master practical commands to inspect, validate, and troubleshoot TLS connections and certificates from both Linux and Windows systems.
- Implement hardening measures for your web servers, including cipher suite configuration, HTTP Strict Transport Security (HSTS), and certificate pinning.
You Should Know:
- The Packets Behind the Pictures: Capturing & Decrypting the Handshake
While the original post outlines the logical steps, security professionals need to see the raw data. Tools like Wireshark and command-line utilities make this invisible process visible.
Step‑by‑step guide explaining what this does and how to use it.
Step 1: Capture Traffic. Open Wireshark and start capturing on your primary network interface. Apply a display filter like `tls.handshake` or tcp.port == 443.
Step 2: Trigger a Handshake. Use `curl` or `openssl s_client` to initiate a connection. For example: openssl s_client -connect example.com:443 -state. This command will output a verbose log of the handshake states.
Step 3: Analyze in Wireshark. Look for the sequence: Client Hello, Server Hello, Certificate, `Server Key Exchange` (in TLS 1.2), etc. TLS 1.3 handshakes are more compact, often completing in 1-RTT (one round trip).
Step 4 (Advanced): Decrypt with Keys. To decrypt HTTPS traffic in Wireshark, you must provide the session keys. Set the `SSLKEYLOGFILE` environment variable in your browser and point Wireshark to this file under Edit -> Preferences -> Protocols -> TLS -> (Pre)-Master-Secret log filename.
- Certificate Authority: The Web of Trust You Rely On
The client’s verification of the server’s certificate is the critical trust anchor. This involves checking the digital signature chain back to a trusted root CA.
Step‑by‑step guide explaining what this does and how to use it.
Step 1: Fetch a Certificate. echo | openssl s_client -connect google.com:443 2>/dev/null | openssl x509 -noout -text. This fetches and displays Google’s certificate details.
Step 2: Verify the Chain. Use OpenSSL to verify: openssl verify -verbose -CAfile <path_to_trusted_root> google_cert.pem. On Windows, use the Certificate Manager (certmgr.msc) to inspect Trusted Root Certification Authorities.
Step 3: Check for Weaknesses. Tools like `testssl.sh` (Linux) or SSL Labs’ online scanner can audit certificates for issues like weak signatures (SHA-1), overly long validity periods, or incorrect subject alternative names (SANs).
- Cipher Suite Negotiation: Choosing the Right Lock & Key
The “Client Hello” lists supported cipher suites. The server picks one. A weak choice compromises security.
Step‑by‑step guide explaining what this does and how to use it.
Step 1: List Server’s Preferred Ciphers. nmap --script ssl-enum-ciphers -p 443 example.com. This Nmap script enumerates and grades the cipher suites offered by the server.
Step 2: Harden Your Server (nginx example). In your nginx config, prioritize strong, modern ciphers:
ssl_ciphers ECDHE-ECDSA-AES256-GCM-SHA384:ECDHE-RSA-AES256-GCM-SHA384;
ssl_prefer_server_ciphers on;
Step 3: Disable Legacy Protocols. Explicitly disable old protocols: ssl_protocols TLSv1.2 TLSv1.3;. Never use SSLv2, SSLv3, or TLSv1.0/1.1 in production.
4. Symmetric Session Keys: The Workhorse of Encryption
After the asymmetric key exchange, both sides derive identical session keys. This is where the bulk encryption happens (AES-GCM, ChaCha20).
Step‑by‑step guide explaining what this does and how to use it.
Step 1: Understand the Derivation. The “master secret” is derived from the “pre-master secret” and both random values (ClientHello.random, ServerHello.random) using a Pseudorandom Function (PRF). This is handled by the library (OpenSSL, SChannel).
Step 2: Force Key Re-negotiation (Test). For testing, you can force renegotiation with OpenSSL: During an `s_client` session, press `R` then ENTER. Observe new handshake packets in Wireshark.
Step 3: Implement Forward Secrecy. Ensure your server supports and prioritizes Ephemeral Diffie-Hellman (DHE) or Elliptic-Curve Diffie-Hellman (ECDHE) key exchange. This ensures a compromised private key can’t decrypt past sessions.
5. Beyond the Handshake: Ongoing Security Headers
The handshake establishes the tunnel, but HTTP headers instruct the browser how to use it securely.
Step‑by‑step guide explaining what this does and how to use it.
Step 1: Deploy HSTS. HTTP Strict Transport Security tells browsers to only use HTTPS. Configure in your web server:
Apache: `Header always set Strict-Transport-Security “max-age=31536000; includeSubDomains”`
Nginx: `add_header Strict-Transport-Security “max-age=31536000; includeSubDomains” always;`
Step 2: Implement Certificate Pinning (with caution). Specify which CAs or public keys are valid for your domain. This can be done via HTTP Public Key Pinning (HPKP, now deprecated) or via Expect-CT header. Modern best practice is to use Certificate Transparency (CT) logs.
What Undercode Say:
- Trust, Then Verify, Then Encrypt. The TLS handshake’s elegance lies in its hybrid model: asymmetric crypto for initial authentication and key establishment, followed by symmetric crypto for performance. A flaw in any single step breaks the entire chain.
- Visibility is Control. You cannot secure what you cannot measure. Regularly auditing your TLS configurations, certificates, and supported protocols with automated tools is non-negotiable for enterprise security. Misconfigurations like supporting deprecated protocols are low-hanging fruit for attackers.
Prediction:
The future of TLS is a tug-of-war between optimization and quantum resistance. TLS 1.3’s streamlined 1-RTT (and 0-RTT) handshake will become ubiquitous, reducing latency but introducing new considerations for replay attacks. The most significant shift will be the migration to post-quantum cryptography (PQC). Within the next 5-10 years, TLS handshakes will begin integrating PQC algorithms, likely in hybrid mode alongside classical ECDHE, to future-proof sessions against quantum decryption. Furthermore, automated certificate management via ACME (like Let’s Encrypt) will evolve further, with shorter lifetimes (moving from 90 days to potentially even less) increasing the attack cost and forcing tighter integration of certificate lifecycle management into DevOps pipelines.
▶️ Related Video (80% Match):
🎯Let’s Practice For Free:
IT/Security Reporter URL:
Reported By: Durgesh Singh – Hackers Feeds
Extra Hub: Undercode MoN
Basic Verification: Pass ✅


