Listen to this Post
Introduction:
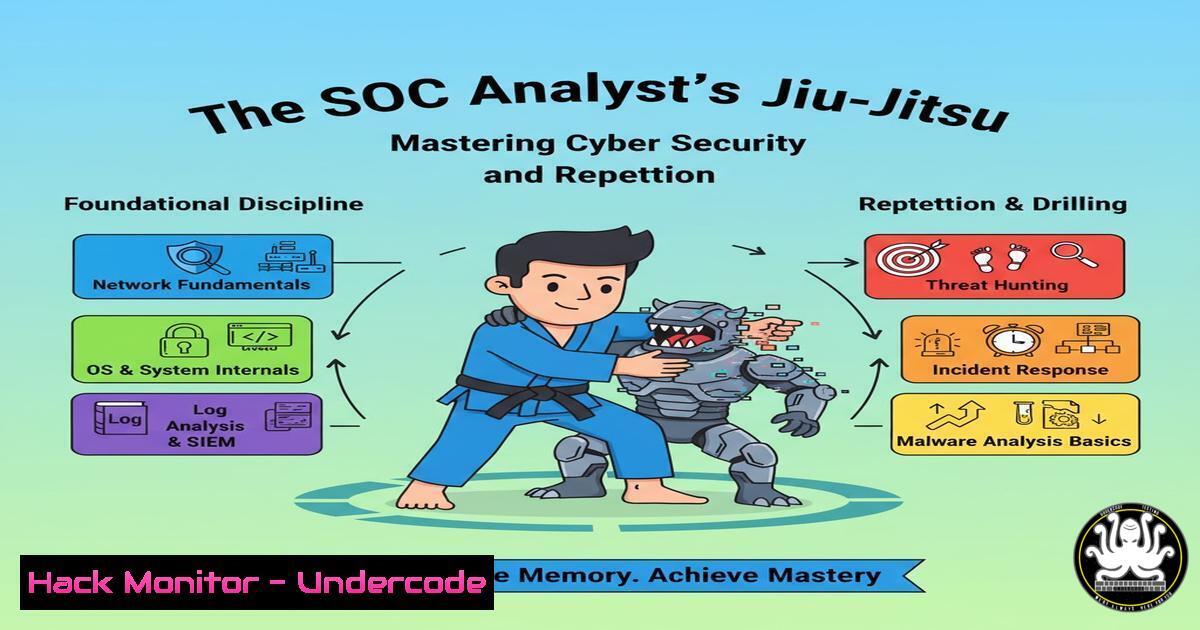
The journey to mastering cybersecurity mirrors the disciplined path of a martial artist. Just as a Brazilian Jiu-Jitsu practitioner spends years perfecting techniques against countless variables, a proficient Security Operations Center (SOC) analyst must build a foundational skill set through continuous, guided practice. This article deconstructs the core technical commands and procedures that form the bedrock of effective defensive security operations.
Learning Objectives:
- Master fundamental Linux and Windows command-line utilities for incident investigation.
- Develop proficiency in network analysis and threat hunting using common security tools.
- Understand and apply critical log analysis and system hardening techniques.
You Should Know:
1. Linux Process and Network Analysis
A SOC analyst’s first response to a potential compromise often involves triaging a Linux system. The following command sequence provides a comprehensive snapshot of system activity.
 Process and Network Enumeration
ps aux --sort=-%mem | head -20  List top 20 processes by memory usage
ss -tulnpan  Display all listening and established connections
lsof -i -P -n  List all open files and network connections
netstat -tulnp  Alternative network connection listing
ls -la /proc/<PID>/exe  Examine the executable path of a suspicious process
cat /proc/<PID>/cmdline  View the full command line of a process
Step-by-step guide:
Begin by running `ps aux` to get a process listing, sorted by memory usage to identify resource hogs. Note any unfamiliar process IDs (PIDs). For any suspicious PID, use `ss -tulnpan` or `lsof -i -P -n` to see if it has established network connections. Cross-reference the connected IPs with threat intelligence feeds. Finally, use `ls -la /proc/
2. Windows Forensic Triage Commands
Windows endpoints are primary targets. These commands are essential for initial live response before deploying a full EDR tool.
:: System and Network Information
tasklist /svc /fo table  List all running processes with their services
netstat -ano | findstr LISTENING  Show listening ports and owning PID
wmic process get name,processid,parentprocessid,commandline  Detailed process list with command lines
systeminfo | findstr /B /C:"OS Name" /C:"OS Version"  Get precise OS version
schtasks /query /fo LIST /v  List all scheduled tasks in detail
Step-by-step guide:
Start with `tasklist /svc` to map processes to services. Then, run `netstat -ano` to correlate listening ports with the PIDs from the tasklist. For any unknown process, the `wmic process` command is invaluable as it reveals the exact command line used to execute the process, often uncovering obfuscated scripts or unusual arguments. Always check scheduled tasks with `schtasks /query` for persistence mechanisms.
- Network Traffic Capture and Analysis with tcpdump & Wireshark
Understanding raw network traffic is non-negotiable. `tcpdump` allows for packet capture, while Wireshark provides deep analysis.
 tcpdump capture and filter examples
sudo tcpdump -i any -w initial_capture.pcap host 192.168.1.100  Capture traffic to/from a specific host
sudo tcpdump -i any -n port 53  Capture DNS queries
sudo tcpdump -r suspicious.pcap -A 'tcp[((tcp[12:1] & 0xf0) >> 2):4] = 0x47455420'  Read a capture and filter for HTTP GET requests
Step-by-step guide:
To investigate communication with a suspect IP, initiate a capture with sudo tcpdump -i any -w capture.pcap host <IP>. After stopping the capture, open the `capture.pcap` file in Wireshark. Use the display filter `http.request` to quickly find all web requests, or `dns.qry.name contains “malicious”` to search for specific DNS queries. Following TCP streams in Wireshark (Right-click > Follow > TCP Stream) reconstructs the entire conversation between client and server.
4. Log Analysis with grep and jq
Server and application logs are a goldmine for threat hunters. `grep` is the classic tool, while `jq` is essential for parsing structured JSON logs.
 Searching and parsing logs
grep -i "failed password" /var/log/auth.log  Find SSH brute-force attempts
grep -r "<?php" /var/www/html --include=".php"  Recursively search for PHP files containing a tag
cat web_logs.json | jq 'select(.status_code == "500")'  Parse JSON logs and filter for 500 errors
journalctl -u ssh --since "1 hour ago" --no-pager  View SSH service logs from the last hour
tail -f /var/log/apache2/access.log | grep --line-buffered 10.0.0.5  Tail a log file and filter for a specific IP in real-time
Step-by-step guide:
When investigating a potential web attack, first use `grep` to search access logs for the attacker’s IP: grep "10.0.0.5" /var/log/apache2/access.log. To analyze a JSON-based log from a cloud service, pipe it through jq: cat cloud-trail.json | jq '.Records[] | select(.eventName == "DeleteBucket")'. This allows you to filter for high-impact events like a bucket deletion in AWS.
5. System Hardening and Integrity Checks
Proactive hardening prevents many common attacks. These commands help validate system integrity and configurations.
 File Integrity and Permission Audits
find / -type f -perm -o=w -user root 2>/dev/null  Find world-writable files owned by root
lsattr /path/to/suspicious/file  Check for extended attributes like immutable flags
chattr +i /bin/chmod  Make a critical binary immutable (prevent change)
aide --check  Check file system integrity against a known-good database
getfacl /etc/passwd  View the full Access Control List for a critical file
Step-by-step guide:
Regularly audit file permissions with `find / -type f -perm -o=w -user root 2>/dev/null` to locate improperly writable system files. To protect critical binaries from being tampered with, you can set the immutable flag with chattr +i /bin/chmod. Remember that this can also be a persistence technique used by attackers, so check key binaries with lsattr. Initialize an AIDE database on a clean system (aide --init) and use it periodically (aide --check) to detect unauthorized file changes.
- Vulnerability Scanning and Mitigation with Nmap and SSH
Understanding what is exposed is the first step in mitigation. Nmap identifies services, while SSH hardening secures a common entry point.
 Network Scanning and Service Hardening
nmap -sV -sC -O 192.168.1.0/24  Version detection, script scanning, and OS detection
nmap --script vuln 10.0.0.10  Run vulnerability scripts against a target
 SSH Hardening in /etc/ssh/sshd_config
 Protocol 2
 PermitRootLogin no
 PasswordAuthentication no
 AllowUsers specific_user
systemctl restart sshd  Restart SSH service to apply new config
Step-by-step guide:
Perform an internal network scan with `nmap -sV -sC 192.168.1.0/24` to inventory active hosts and their services. For critical servers, run a vulnerability script scan (nmap --script vuln). To harden an SSH server, edit `/etc/ssh/sshd_config` to disable root login (PermitRootLogin no) and password authentication (PasswordAuthentication no), forcing key-based logins. Always test the new configuration before restarting the service with systemctl restart sshd.
7. Cloud Security Fundamentals with AWS CLI
Cloud environments require their own command set. The AWS CLI is critical for auditing and securing resources.
 AWS Security Auditing Commands
aws iam list-users --output table  List all IAM users
aws iam list-access-keys --user-name <username>  List access keys for a user
aws ec2 describe-security-groups --group-ids <sg-id>  Describe a specific security group's rules
aws s3api get-bucket-policy --bucket <bucket-name>  Check the policy on an S3 bucket
aws cloudtrail lookup-events --lookup-attributes AttributeKey=EventName,AttributeValue=ConsoleLogin  Check for console logins
Step-by-step guide:
To audit for over-privileged IAM users, start by listing all users with aws iam list-users. For each user, check their access keys with aws iam list-access-keys. A key step in securing S3 is to check bucket policies: aws s3api get-bucket-policy --bucket my-bucket. To investigate a specific event, use CloudTrail lookup: `aws cloudtrail lookup-events –lookup-attributes AttributeKey=EventName,AttributeValue=RunInstances` to see who has been launching EC2 instances.
What Undercode Say:
- Mastery is a process, not an event. Just as in Jiu-Jitsu, proficiency in a SOC is built by repeatedly drilling foundational commands until they become second nature, allowing for fluid response under pressure.
- Context is king. A command’s output is meaningless without the context of the system, the network, and the business environment. The same `netstat` output can be normal on one server and a critical indicator of compromise on another.
The analogy to martial arts is not merely motivational; it is technically apt. The commands listed are the basic “moves” of cybersecurity. An analyst who has not internalized netstat, grep, tcpdump, and their Windows counterparts is like a grappler who has not mastered a proper guard. They lack the foundational posture to defend effectively. The real-world security landscape is a sparring match with an adaptive opponent, not a scripted kata. True expertise comes from applying these foundational skills against a live, resisting adversary, learning from each engagement, and refining one’s technique over years. The roadmap to becoming a competent analyst is not a secret, but it demands the same discipline, patience, and commitment to fundamentals as any true mastery.
Prediction:
The future of cybersecurity will see a stratification of talent. As attacks become more automated and sophisticated, the value of human analysts will not diminish but will shift. Those who have merely memorized for certifications will be outpaced by AI-driven tools. However, analysts who have embraced the disciplined journey of mastery—who understand the “why” behind the commands and can creatively adapt foundational knowledge to novel threats—will become the strategic leaders. They will be the ones directing AI systems, designing resilient architectures, and mentoring the next generation, turning the relentless onslaught of attacks into a catalyst for building more intelligent and robust defenses.
🎯Let’s Practice For Free:
IT/Security Reporter URL:
Reported By: Sean Mitchell – Hackers Feeds
Extra Hub: Undercode MoN
Basic Verification: Pass ✅


