Listen to this Post
Introduction:
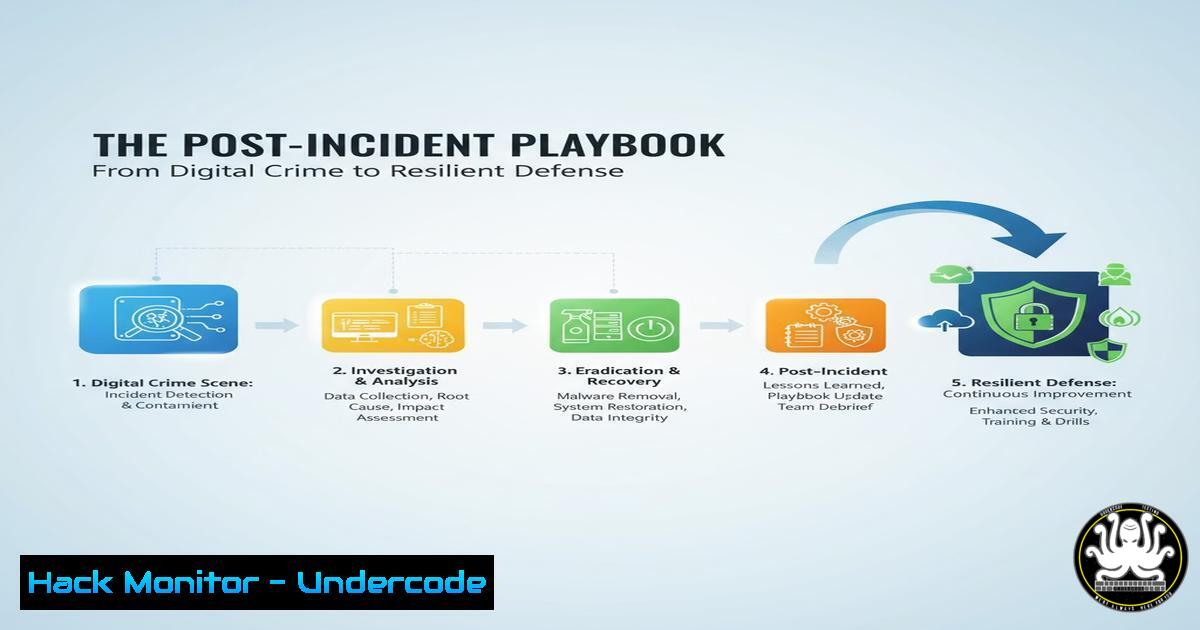
A security breach is not the end, but a critical beginning. The actions taken immediately after an incident are pivotal for containment, recovery, and fortifying defenses against future attacks. This guide provides a structured, technical playbook for navigating the complex post-incident response landscape, transforming chaos into a strategic recovery operation.
Learning Objectives:
- Master the forensic data collection process for both Linux and Windows environments to preserve critical evidence.
- Execute precise containment and eradication procedures to remove threat actor presence and restore system integrity.
- Implement advanced hardening and monitoring measures to prevent recurrence and build a more resilient security posture.
You Should Know:
1. System Triage and Forensic Data Collection
The initial response phase is about gathering volatile and persistent data without altering the crime scene. This data is crucial for understanding the attack vector and the scope of the compromise.
Linux Memory Capture:
`sudo dd if=/proc/kcore of=/external_drive/memory_dump.img bs=1M`
This command creates a bit-for-bit copy of the system’s physical memory. `/proc/kcore` is a virtual file representing the kernel’s address space. Use this to analyze running processes, network connections, and malware in memory. Always dump to an external drive to avoid contaminating the compromised system.
Linux Process & Network Snapshot:
`ps auxef | tee /external_drive/process_list.txt`
`netstat -tunape | tee /external_drive/network_connections.txt`
`lsof -V | tee /external_drive/open_files.txt`
This trio provides a snapshot of all running processes (with arguments and relationships), all active network connections (with owning PID), and every open file and socket. The `tee` command both displays and saves the output for evidence.
Windows Forensic Timeline:
`Get-WinEvent -LogName Security, System, Application -Oldest | Select-Object TimeCreated, Id, LevelDisplayName, Message | Export-Csv C:\Evidence\event_logs.csv -NoTypeInformation`
This PowerShell command extracts all events from the core Windows logs, preserving the chronological order. Analyzing these logs helps pinpoint the exact time of initial compromise and subsequent attacker actions.
Windows Persistence Check:
`wmic startup get caption, command`
`Get-CimInstance Win32_Service | Select-Object Name, State, PathName, StartMode | Where-Object {$_.State -eq ‘Running’}`
These commands list all applications configured to run at startup and all currently running services, which are common places for attackers to establish persistence.
2. Containment and Eradication Procedures
Once critical data is collected, the focus shifts to isolating the threat and removing its components from the environment.
Linux Network Isolation:
`sudo iptables -A INPUT -s -j DROP`
`sudo iptables -A OUTPUT -d -j DROP`
These `iptables` rules immediately block all incoming traffic from a known attacker IP and all outgoing traffic to a identified Command & Control server, severing the attacker’s link.
Linux Malware Process Kill:
`sudo kill -9 $(pgrep -f “suspicious_process_name”)`
This command finds the Process ID (PID) of a suspicious process by name and sends a SIGKILL signal (-9) to terminate it immediately and forcefully.
Windows Host-Level Firewall Rule:
`New-NetFirewallRule -DisplayName “Block Attacker” -Direction Inbound -Protocol Any -RemoteAddress
This PowerShell command creates a new Windows Firewall rule to block all inbound traffic from a specific malicious IP address.
Windows Malicious Service Removal:
`sc query “MaliciousService”`
`sc stop “MaliciousService”`
`sc delete “MaliciousService”`
This sequence of Service Control (sc) commands queries for a malicious service, stops it if it’s running, and then deletes its configuration from the system entirely.
3. System Hardening and Configuration Review
After eradication, systems must be hardened to prevent re-infection via the same or similar vulnerabilities.
Linux SSH Hardening:
`sudo sed -i ‘s/^PasswordAuthentication yes/PasswordAuthentication no/’ /etc/ssh/sshd_config`
`sudo sed -i ‘s/^PermitRootLogin yes/PermitRootLogin no/’ /etc/ssh/sshd_config`
These `sed` commands edit the SSH configuration file to disable password-based authentication (enforcing key-based only) and explicitly disable direct root logins, two critical security measures.
Linux Unauthorized Privilege Escalation Check:
`find / -perm -4000 -type f 2>/dev/null`
This command finds all files with the SUID (Set User ID) bit set, which allows a file to run with the privileges of its owner. Review this list for unexpected binaries, as this is a common privilege escalation vector.
Windows User Account Audit:
`Get-LocalUser | Where-Object {$_.Enabled -eq $true}`
`net localgroup administrators`
These PowerShell and command-line commands list all enabled local user accounts and the members of the local administrators group, helping to identify any unauthorized accounts created by an attacker.
Windows PowerShell Logging Enforcement:
`Set-ItemProperty -Path “HKLM:\SOFTWARE\Policies\Microsoft\Windows\PowerShell\ModuleLogging” -Name “EnableModuleLogging” -Value 1`
This command enables deep module logging for PowerShell, which is essential for detecting and investigating malicious PowerShell scripts.
4. Logging and Monitoring Enhancement
A breach reveals gaps in visibility. Enhancing logging is non-negotiable for future detection.
Linux Auditd Rule for Sensitive Files:
`sudo auditctl -w /etc/passwd -p wa -k identity_theft`
`sudo auditctl -w /etc/shadow -p r -k identity_theft`
These `auditctl` commands tell the Linux Audit daemon to watch the `/etc/passwd` file for any write or attribute change (-p wa) and the `/etc/shadow` file for any read access (-p r), logging any such event with the key “identity_theft”.
Linux Centralized Logging (RSYSLOG):
`echo “. @:514″ | sudo tee -a /etc/rsyslog.conf`
This command configures the RSYSLOG service to forward all log messages (.) via UDP (port 514) to a central log server’s IP address, protecting logs from tampering on the compromised host.
Windows Command Line Process Auditing:
`auditpol /set /subcategory:”Process Creation” /success:enable`
This command enables auditing for process creation events, which will log details every time a process is started, including the command line arguments—invaluable for tracking attacker activity.
5. Vulnerability Assessment and Patch Verification
Understanding the initial point of entry is key to ensuring it is sealed.
Linux Package Vulnerability Check (Ubuntu/Debian):
`sudo apt list –upgradable`
`ubuntu-security-status`
The first command lists all packages with available updates. The second, a Ubuntu-specific tool, shows which updates are security-related, helping to prioritize patching.
Windows System Patch Status:
`Get-HotFix | Sort-Object InstalledOn -Descending | Select-Object -First 10`
This PowerShell command lists the 10 most recently installed patches, allowing you to verify if the patch for the exploited vulnerability has been applied.
Network Vulnerability Scan (Nmap NSE):
`nmap -sV –script vuln `
This Nmap command performs a version scan (-sV) and runs all scripts in the “vuln” category against a target or subnet to identify known vulnerabilities.
6. Application Security Hardening (Web Servers)
Attackers often breach through web applications, so their configuration must be scrutinized.
Apache HTTP Security Headers:
`Header always set Strict-Transport-Security “max-age=63072000; includeSubDomains”`
`Header always set X-Content-Type-Options nosniff`
`Header always set X-Frame-Options DENY`
These directives, placed in the Apache virtual host or `.htaccess` file, enforce HTTPS, prevent MIME-type sniffing, and disable clickjacking attacks, respectively.
Nginx Server Token Suppression:
`server_tokens off;`
This directive in the Nginx configuration file removes the server version from HTTP response headers, obscuring version information from potential attackers.
Database User Privilege Audit (MySQL):
`SELECT user, host, authentication_string FROM mysql.user;`
`SHOW GRANTS FOR ‘application_user’@’localhost’;`
These SQL commands list all database users and then show the exact privileges granted to a specific application account, allowing you to enforce the principle of least privilege.
7. Cloud & Container Security Post-Incident
Modern infrastructures require specific checks to ensure attacker persistence isn’t lurking in cloud metadata or container images.
AWS IAM User/Key Rotation:
`aws iam list-users`
`aws iam list-access-keys –user-name `
`aws iam create-access-key –user-name `
`aws iam delete-access-key –user-name –access-key-id `
This sequence of AWS CLI commands lists users, finds their access keys, creates a new key, and deletes the old, potentially compromised one.
Docker Image Integrity Check:
`docker image ls –digests`
This command lists all local Docker images along with their cryptographic digests. After an incident, you should pull fresh, verified images from a trusted repository and check that the digests match.
Kubernetes Secret Review:
`kubectl get secrets –all-namespaces -o yaml | grep -A 5 -B 5 “suspicious_key”`
This `kubectl` command retrieves all secrets from all namespaces and searches for any that contain a known malicious string or key, which could be a backdoor left by an attacker.
What Undercode Say:
- The Root Cause is King: The most expensive mistake is focusing solely on eradication without a conclusive root cause analysis. Without it, you are guaranteed to be breached again through the same architectural or procedural flaw.
- Assume Persistence, Verify Everything: The modern attacker thrives on stealth. You must operate under the assumption that they have multiple backdoors and persistence mechanisms. Every account, key, and system component must be treated as suspect and rigorously validated.
The post-incident phase is a race against two adversaries: the external threat actor and internal organizational pressure to “just get things working again.” Succumbing to the latter without completing a methodical, evidence-driven investigation is a tactical failure that cedes ground to the former. The goal is not merely to restore service, but to rebuild a more defensible and observable environment. This process is painful and resource-intensive, but it is the only way to transform a security failure into a long-term strategic advantage. The commands and procedures outlined are the technical manifestation of a resilient mindset.
Prediction:
The future of post-incident response will be dominated by AI-powered forensic triage. Machine learning models will automatically correlate terabytes of log, network, and endpoint data to reconstruct attack timelines in minutes, not weeks. Furthermore, we will see the rise of “Immunity-as-Code,” where the digital fingerprints of an attack are automatically converted into proactive, enforceable security policies across the entire enterprise ecosystem, creating a learning defense that evolves with each attempted breach.
🎯Let’s Practice For Free:
IT/Security Reporter URL:
Reported By: Kaaviya Balaji – Hackers Feeds
Extra Hub: Undercode MoN
Basic Verification: Pass ✅


