Listen to this Post
Introduction:
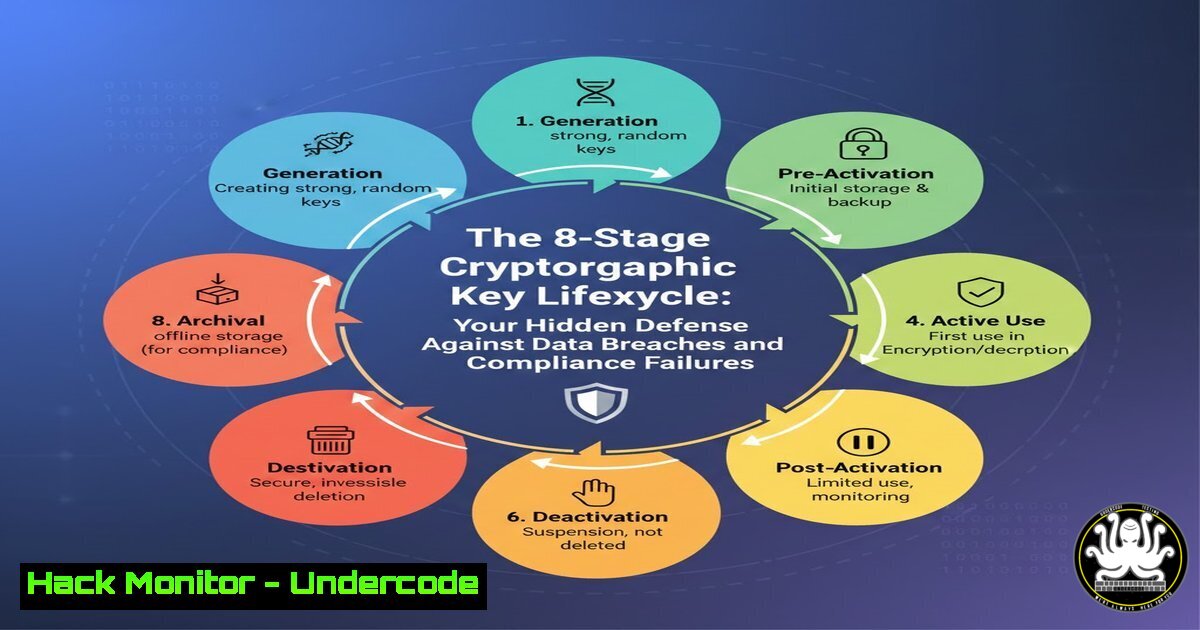
Cryptographic keys are the silent guardians of our digital world, securing everything from user logins and API communications to encrypted databases and cloud workloads. Yet, their management—from creation to destruction—is often a misunderstood and neglected practice, creating invisible vulnerabilities that attackers eagerly exploit. Mastering the eight-stage key lifecycle isn’t just administrative; it’s the foundational control that dictates data security, breach resilience, and compliance with mandates like SOC 2, ISO 27001, and PCI DSS.
Learning Objectives:
- Understand the eight critical phases of the cryptographic key lifecycle and the technical risks at each stage.
- Implement practical commands and configurations for key management on Linux, Windows, and Cloud KMS platforms.
- Develop automated policies for key rotation, secure distribution, and auditable destruction to meet compliance requirements.
You Should Know:
- Stage 1 & 2: Key Generation & Provisioning – Secure Birth and Assignment
The lifecycle begins with cryptographically secure generation. Weak random number generators or predictable seeds lead to keys that can be brute-forced. Provisioning involves securely distributing the key to its intended system or service.
Step‑by‑step guide explaining what this does and how to use it.
On Linux (using OpenSSL and `keyctl`):
 Generate a strong 256-bit AES key using a secure random source
openssl rand -hex 32 > /secure/path/aes_key.hex

Generate an RSA 4096-bit private key
openssl genrsa -out /secure/path/private.pem 4096

Load the key into the Linux kernel keyring for application use (ephemeral)
keyctl add user my_aes_key "cat /secure/path/aes_key.hex" @u
On Windows (using PowerShell):
 Generate a cryptographically random byte array for an AES key
$key = New-Object Byte[] 32
[bash]::ToBase64String($key) | Out-File -FilePath "C:\secure\aes_key.b64"

Create a self-signed certificate (which contains a key pair) via PowerShell
New-SelfSignedCertificate -DnsName "securehost.internal" -CertStoreLocation "Cert:\LocalMachine\My"
Cloud KMS (AWS Example):
 Generate a Customer Master Key (CMK) in AWS KMS
aws kms create-key --description "Production DB Encryption Key" --key-usage ENCRYPT_DECRYPT --origin AWS_KMS

Create a data key encrypted under that CMK for use in your application
aws kms generate-data-key --key-id alias/ProductionKey --key-spec AES_256
The output includes a plaintext key (for immediate use, held in memory) and a ciphertext blob (for storage). Always immediately erase the plaintext from disk after loading into memory.
- Stage 3: Secure Storage – The Fort Knox for Your Keys
A key is only as secure as its storage. Hard-coded keys in source code, configuration files, or world-readable locations are a top cause of breaches.
Step‑by‑step guide explaining what this does and how to use it.
Linux Kernel Key Retention Service:
 Add a key to the user-specific keyring (lasts for user's session)
echo -n "MySuperSecretKey" | keyctl padd user app_key @u

List keys in the keyring
keyctl list @u

Pipe a key directly to an application without writing to disk
keyctl print $(keyctl request user app_key) | my_encryption_app --
Using HashiCorp Vault for Centralized Storage:
 Enable the transit secrets engine (for encryption as a service)
vault secrets enable transit

Create a named encryption key in Vault
vault write -f transit/keys/my_application_key
Hardware Security Module (HSM) Integration (via PKCS11):
Applications can be configured to use libraries like `libpkcs11` to perform all cryptographic operations on the HSM, ensuring keys never leave the hardware.
- Stage 4 & 5: Distribution & Usage – Controlled Access and Audit
Keys must be securely distributed to authorized systems. All usage must be logged to detect anomalies. Avoid manual distribution; use automated, authenticated channels.
Step‑by‑step guide explaining what this does and how to use it.
Secure Distribution with Ansible (using Vault for encryption):
 In your playbook, the sensitive key is an encrypted variable
- name: Deploy application configuration
hosts: app_servers
vars_files:
- secrets.yml  This file is encrypted with ansible-vault
tasks:
- name: Write application key to kernel keyring
ansible.builtin.shell: |
echo "{{ app_encryption_key }}" | keyctl padd user app_key @u
Enable AWS KMS Key Usage Auditing via CloudTrail:
 Ensure CloudTrail is enabled and logging to a secure S3 bucket
aws cloudtrail lookup-events --lookup-attributes AttributeKey=EventName,AttributeValue=Decrypt --max-results 5
This allows you to see every `Decrypt` or `GenerateDataKey` call, including the source IP and IAM user/role.
- Stage 6: Rotation – Limiting the Blast Radius
Regular key rotation limits the amount of data protected by a single key and reduces the impact of a potential compromise. It must be automated.
Step‑by‑step guide explaining what this does and how to use it.
Automated Rotation in AWS KMS:
 Enable annual automatic key rotation for a CMK
aws kms enable-key-rotation --key-id alias/ProductionKey

Manually rotate a key immediately and alias the new version
aws kms create-key --description "Production DB Encryption Key v2"
aws kms update-alias --alias-name alias/ProductionKey --target-key-id <new-key-id>
Application-Side Rotation with Re-Encryption:
1. Generate a new key (Key B).
- For each data ciphertext encrypted with old key (Key A), decrypt with Key A and immediately re-encrypt with Key B.
- Update the application’s key reference to Key B.
- Schedule Key A for archival and eventual deletion.
-
Stage 7 & 8: Revocation & Destruction – The Final Firewall
Revocation immediately disables a key for new operations (e.g., after a suspected breach). Destruction permanently and irreversibly deletes it, which is a critical requirement for data sovereignty and compliance.
Step‑by‑step guide explaining what this does and how to use it.
Revocation in AWS KMS:
 Schedule key deletion with a 7-30 day waiting period (mandatory)
aws kms schedule-key-deletion --key-id <key-id> --pending-window-in-days 7
During the waiting period, the key is unusable but can be recovered (CancelKeyDeletion).
Cryptographic Shredding (On-Premises):
For keys stored on disk, use secure deletion tools:
 Linux: Use `shred` to overwrite the key file before deletion
shred -u -z -n 5 /secure/path/aes_key.hex

Windows (Sysinternals): Use `sdelete`
sdelete -p 3 -s -z C:\secure\aes_key.b64
For HSMs: Use the HSM’s proprietary command to zeroize the key slot, which is a physical destruction of the key material in hardware.
What Undercode Say:
- Lifecycle Management is a Technical System, Not a Policy. True key security is enforced through automated tooling—HSMs, KMS,
keyctl, and orchestration scripts—that remove human error from the equation. A policy document alone is useless. - The Weakest Link is Often Distribution. The moment a key leaves a secured KMS or HSM is its most vulnerable. Architect your systems to use encryption-as-a-service (like Vault Transit) or key APIs where possible, so keys never need to be fully exposed to application memory.
Prediction:
The convergence of stringent global data protection laws (like DPDP) and the rise of quantum computing threats will force a fundamental shift in key lifecycle management. We will see the widespread adoption of automated, quantum-resistant key lifecycle pipelines, where keys are not only rotated more frequently but also seamlessly migrated to post-quantum cryptographic algorithms. Cloud providers will begin offering “Lifecycle-as-a-Service,” using AI to analyze usage patterns and CloudTrail logs to automatically trigger rotation or revocation upon detecting anomalous access, moving from a scheduled model to a dynamic, risk-based model. The organizations that treat key management as a core engineering discipline will survive the coming compliance and cryptographic upheavals; those that don’t will become headline-making breach statistics.
▶️ Related Video (80% Match):
🎯Let’s Practice For Free:
IT/Security Reporter URL:
Reported By: Chiraggoswami23 Cybersecurity – Hackers Feeds
Extra Hub: Undercode MoN
Basic Verification: Pass ✅


