Listen to this Post
Introduction:
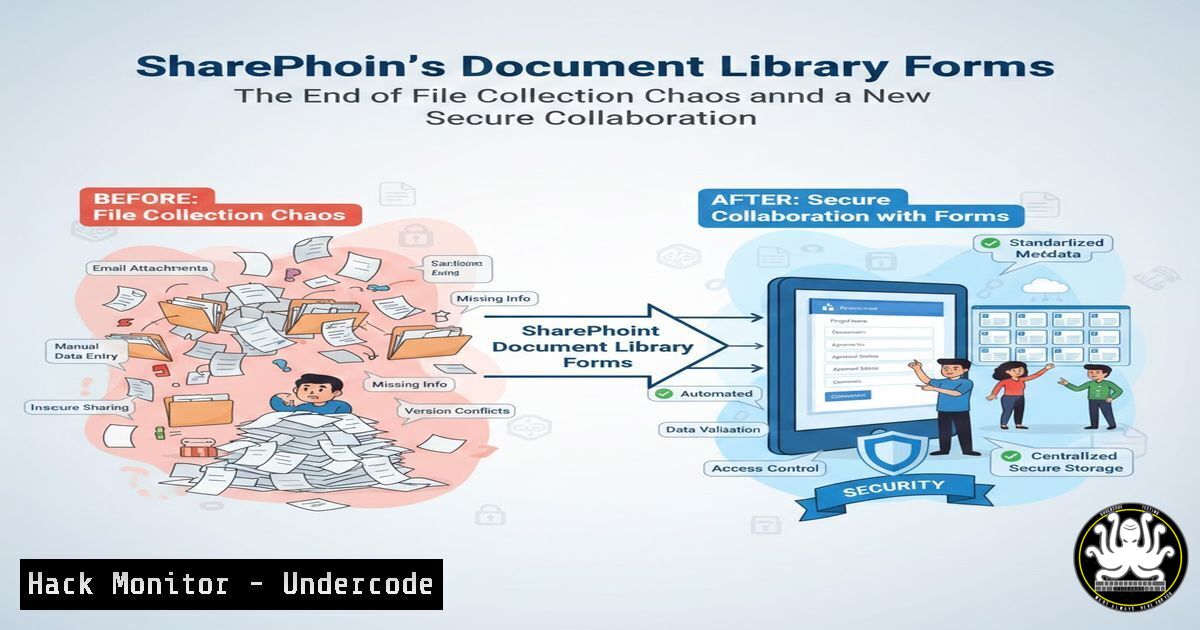
Microsoft has officially addressed a long-standing collaboration pain point in SharePoint Online by introducing Forms for Document Libraries. This transformative feature allows organizations to collect files with structured metadata directly into a document library through a customizable form, eliminating the need for complex Power Automate workflows or granting broad library access. This shift represents a significant step forward in secure, efficient, and auditable file ingestion processes within the Microsoft 365 ecosystem.
Learning Objectives:
- Understand the core functionality and security benefits of using Forms with SharePoint Document Libraries.
- Learn how to configure and deploy a Form for secure external and internal file collection.
- Master the administrative controls, including file type restrictions and metadata enforcement, to maintain data governance.
You Should Know:
1. Setting Up Your First Document Library Form
The integration of Microsoft Forms directly into the SharePoint Document Library interface simplifies a previously complex process. This feature is being rolled out to Microsoft 365 tenants, so it may not be immediately available in all organizations.
Step‑by‑step guide explaining what this does and how to use it.
1. Navigate to your Target Library: Go to the SharePoint Document Library where you want to collect files.
2. Initiate Form Creation: Click on the Integrate menu in the library’s command bar and select Forms. If this option is not visible, the feature may not yet be available in your tenant.
3. Design the Form: A new Microsoft Form will open in a pane alongside your library. Here, you can:
Add a title and description.
Insert a File upload question. This is the crucial component that links the form to the library.
Add other question types (text, choice, date) to capture the required metadata for each file.
4. Save and Share: Once the form is designed, save it. You can then share the form link with contributors. They do not need direct access to the SharePoint site to submit files and metadata.
2. Configuring Security and Access Controls
This feature’s primary security advantage is the principle of least privilege. You can collect files from users without granting them “Contributor” permissions to the entire library, drastically reducing the attack surface and risk of accidental data modification or deletion.
Step‑by‑step guide explaining what this does and how to use it.
1. Leverage the Anonymous Link: When sharing the form, use the “Anyone with the link can respond” option for external collection. This generates a unique, unguessable URL.
2. Restrict Internal Access: For internal users, the form will automatically authenticate them, but they can still submit without direct library permissions if their access level is set appropriately at the site level.
3. Audit Submissions: All submissions are logged. You can review them within the Forms response tab, providing a clear audit trail of who uploaded what and when, based on the authenticated user or anonymous submission timestamp.
3. Enforcing Data Governance with File Restrictions
To protect the library from potentially malicious or unwanted files, SharePoint administrators can enforce upload restrictions. This is a critical step in preventing data loss or the introduction of malware.
Step‑by‑step guide explaining what this does and how to use it.
1. Access SharePoint Admin Center: Navigate to the SharePoint admin center (https://admin.microsoft.com//SharePoint).
2. Configure File Upload Limits: Go to Settings -> Site storage limits. While the default maximum file size is 250 GB, it is advisable to set a more reasonable limit (e.g., 100 MB or 1 GB) for performance and security.
3. Block Specific File Types (PowerShell): For granular control, use PowerShell to block dangerous file types like .exe, .ps1, or .bat.
 Connect to SharePoint Online (SPO)
Connect-SPOService -Url https://yourtenant-admin.sharepoint.com

Get the current blocked file types for the specific site
$site = Get-SPOSite -Identity https://yourtenant.sharepoint.com/sites/yoursite

Add to the list of blocked file types
$blockedFileTypes = $site.DenyAddAndCustomizePages + "exe,ps1,bat,scr"
Set-SPOSite -Identity $site.Url -DenyAddAndCustomizePages $blockedFileTypes
This ensures that even if a user attempts to upload a blocked file type via the form, the operation will be rejected by SharePoint.
4. Automating Metadata Tagging and Folder Placement
The form responses automatically become metadata for the uploaded files. This structured data can then be used with SharePoint’s native features to automatically organize content, such as using columns for custom sorting or creating views that filter based on form responses.
Step‑by‑step guide explaining what this does and how to use it.
1. Map Form Fields to Library Columns: When you create the form, SharePoint automatically creates new columns in the document library for each non-file question (e.g., “Project Name,” “Department”).
2. Utilize Metadata for Views: Create custom views in your library that filter or group files based on these new metadata columns. For example, a view could show “All files from Project Alpha.”
3. Automate with Default Column Values: For libraries with a folder structure, you can set default values for metadata columns based on the folder. Right-click a folder -> Properties -> Edit all to set default metadata that will apply to all items uploaded to that folder, including those from the form.
5. Monitoring and Logging for Compliance
Maintaining visibility over the file ingestion process is crucial for compliance (e.g., GDPR, HIPAA). The combination of Forms and SharePoint provides built-in logging capabilities.
Step‑by‑step guide explaining what this does and how to use it.
1. Review Forms Analytics: Inside the Form itself, go to the Responses tab to see analytics on submission times and respondent data.
2. Audit Log Search in Compliance Center: For a enterprise-grade audit, use the Microsoft Purview Compliance Portal.
Navigate to the Compliance Center (https://compliance.microsoft.com/).
Go to Solutions -> Audit.
Search for activities like “File uploaded,” “File accessed,” and “File modified.” Filter by the specific site and library to track all form-driven uploads.
3. Use PowerShell for Detailed Logs:
 Search the Unified Audit Log for specific file activities
Search-UnifiedAuditLog -StartDate (Get-Date).AddDays(-7) -EndDate (Get-Date) -Operations "FileUploaded,FileAccessed" -ResultSize 5000 | Where-Object {$_.SiteUrl -eq "https://yourtenant.sharepoint.com/sites/yoursite"}
This command retrieves a detailed log of all file upload and access activities from the past week for your specific site.
What Undercode Say:
- This feature fundamentally shifts the security model for file collection from a perimeter-based (granting library access) to a service-based (using a form as an API) approach, minimizing insider threat risk and external exposure.
- The elimination of a mandatory Power Automate dependency reduces architectural complexity and potential points of failure, leading to a more robust and maintainable collaboration workflow.
Analysis: SharePoint’s Document Library Forms is more than a quality-of-life improvement; it’s a strategic enhancement for IT governance. By providing a controlled, auditable, and permission-less channel for data ingestion, it allows organizations to embrace collaboration without compromising on security postures. It effectively creates a secure “airlock” through which files can enter a protected environment. This model is likely to become the standard for user-generated content in enterprise content management systems, reducing the reliance on custom-coded portals and complex integration workflows. The built-in metadata capture ensures that files are not just dumped into a repository but are intelligently categorized from the moment of creation, unlocking greater potential for AI-driven content processing and analytics in the future.
Prediction:
The introduction of Forms for Document Libraries signals a future where low-code/no-code services like Forms act as the primary secure interface for all external data interactions within the Microsoft Cloud. We predict this model will be expanded to other services, such as using Forms to submit data directly to Azure SQL or to trigger Azure Logic Apps with a file payload. This will further abstract underlying infrastructure from end-users, empowering business units to build secure data collection processes while central IT maintains firm control over data governance, security policies, and compliance auditing through the unified admin and compliance centers. This trend will accelerate the convergence of citizen development and enterprise-grade security.
🎯Let’s Practice For Free:
IT/Security Reporter URL:
Reported By: Pavithra Pavee – Hackers Feeds
Extra Hub: Undercode MoN
Basic Verification: Pass ✅


