Listen to this Post
Introduction:
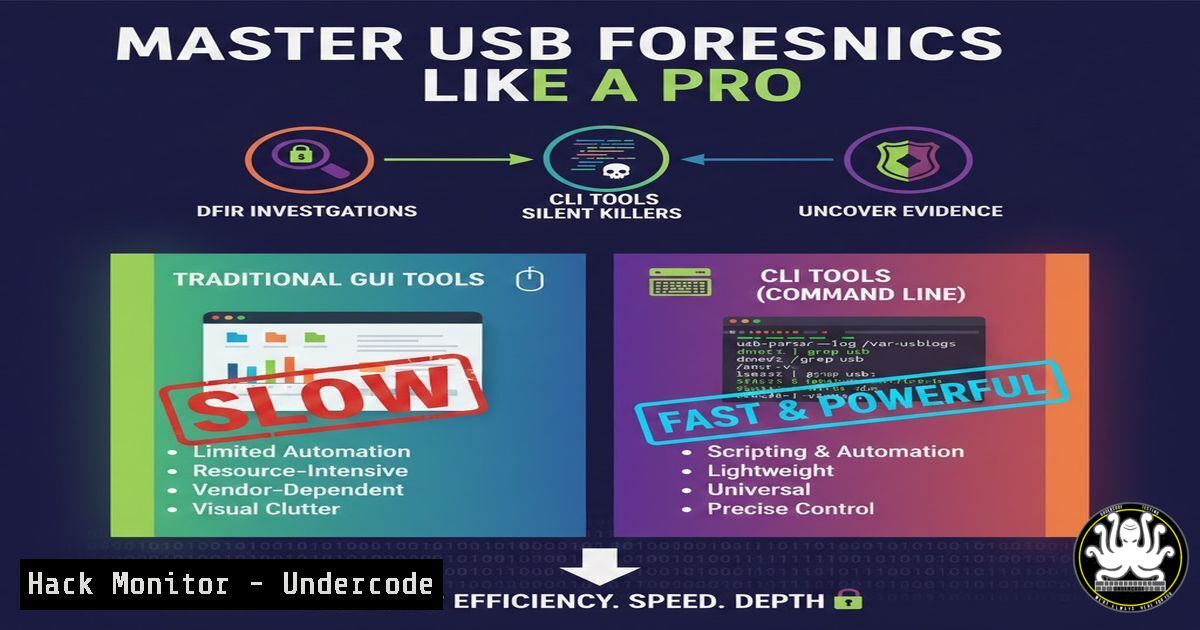
USB forensics is a critical component of Digital Forensics and Incident Response (DFIR), focusing on extracting evidence from USB devices to trace malicious activity or data exfiltration. In this article, we delve into the power of command-line interface (CLI) tools over graphical user interfaces (GUIs), as highlighted by a SOC analyst’s experience on platforms like TryHackMe and CyberDefenders. By leveraging default tools on Kali Linux, such as fls, icat, and rip, investigators can achieve faster, more efficient analyses, uncovering hidden registry artifacts and log data essential for cybersecurity incidents.
Learning Objectives:
- Understand the core CLI tools for USB forensics, including fls, icat, grep, rip, and hivexsh, and their applications in evidence extraction.
- Learn step-by-step techniques to analyze USB registry keys, file systems, and logs for indicators of compromise (IOCs) in DFIR scenarios.
- Apply these skills in practical environments like TryHackMe and CyberDefenders to enhance SOC analyst capabilities and prepare for real-world threats.
You Should Know:
- The Fundamentals of USB Forensics and Evidence Sources
USB forensics involves examining device artifacts left on systems, such as registry entries, event logs, and file system metadata, to reconstruct user activities. Evidence often resides in Windows Registry keys like `SYSTEM\ControlSet001\Enum\USBSTOR` for device history or `/mnt` mounts in Linux. Start by identifying connected USB devices using built-in OS tools. On Linux, use `lsusb` to list USB devices, and on Windows, run `reg query HKLM\SYSTEM\CurrentControlSet\Enum\USBSTOR` in Command Prompt to view stored devices. For training, platforms like TryHackMe (https://tryhackme.com) offer rooms like “Digital Forensics” and CyberDefenders (https://cyberdefenders.org) provides blue-team labs, which include USB forensic challenges to practice these concepts.
2. Using fls for File System Timeline Analysis
The `fls` tool from The Sleuth Kit (TSK) lists files and directories in a disk image, helping recover deleted entries and build timelines. In USB forensics, it can parse evidence from DD or E01 images of USB drives. First, acquire an image using `dd if=/dev/sdb1 of=usb_image.dd` on Kali Linux, where `sdb1` is the USB partition. Then, run `fls -r -m / usb_image.dd > timeline.txt` to generate a body file for timeline analysis with mactime. The `-r` flag recurses directories, and `-m` mounts the root to a path. This reveals file access times, crucial for correlating USB usage during an incident.
- Extracting Files with icat for Deep Dive Investigations
`icat` (also from TSK) extracts file contents from disk images based on inode numbers, allowing analysts to recover specific files like malicious executables or documents from USB drives. After using `fls` to identify inodes (e.g., `fls usb_image.dd` lists inodes), run `icat usb_image.dd 1234 > extracted_file.bin` to output inode 1234’s content. Combine this with `file extracted_file.bin` to determine file type, and use `strings extracted_file.bin | grep -i “keyword”` to search for IOCs. This CLI approach is lighter and faster than GUI tools like Autopsy, especially for bulk extractions. -
Searching with grep for Log and Registry Analysis
`grep` is indispensable for filtering large logs or registry dumps for USB-related artifacts. On Kali, use `grep -r “USBSTOR” /var/log/` to search system logs for USB connections, or parse Windows Registry hives extracted from evidence. For instance, if you have a `SYSTEM` hive from a Windows machine, use `rip.pl -r SYSTEM -p usbstor` to run the USBSTOR plugin in Registry Ripper (rip), which automates key extraction. Alternatively, manually search with `strings SYSTEM | grep -i “vid_”` for vendor IDs. This speeds up IOC identification in CTF challenges like those on CyberDefenders. -
Analyzing Registry with rip and hivexsh for Advanced Artifacts
Registry Ripper (rip) and hivexsh are CLI tools for parsing Windows Registry hives, vital for USB forensics on Windows systems. Rip uses plugins like `usbstor` for device history, `volinfocache` for volume information, and `mp2` for MountedDevices. On Kali, install rip viaapt install regripper, then run `rip -r /path/to/SYSTEM -p usbstor` to extract USB device details. For interactive analysis, use hivexsh: `hivexsh /path/to/SOFTWARE` to open a hive shell, then query keys with `cd` and `ls` commands. This reveals installed software and USB policies, aiding in threat hunting.
6. Practical Exercise on TryHackMe and CyberDefenders
Apply these tools in hands-on labs to solidify skills. On TryHackMe, access the “DFIR” track (https://tryhackme.com/room/dfir) which includes USB forensic scenarios; use `fls` and `icat` on provided images. On CyberDefenders, try the “USB Forensics” lab (https://cyberdefenders.org/labs/71) to analyze registry hives with rip plugins. Steps: Download the evidence file, extract it with tar -xzf usb_forensics.tar.gz, then run `rip -r registry/SYSTEM -p usbstor,devclass,mountdev` to parse multiple plugins. Document findings like device serial numbers and first connection times, which are common CTF flags.
7. Best Practices and Automation for Enterprise DFIR
To scale USB forensics in SOC environments, automate CLI commands with scripts. Create a Bash script on Kali that integrates fls, icat, and `rip` for bulk analysis. Example:
!/bin/bash
image=$1
fls -r $image > file_list.txt
rip -r $image/registry/SYSTEM -p usbstor > usb_artifacts.txt
grep -i "malware" file_list.txt | while read line; do inode=$(echo $line | awk '{print $2}'); icat $image $inode > extracted_$inode.bin; done
This extracts potential malicious files and registry data simultaneously. Additionally, harden systems by disabling USB storage via Group Policy on Windows (gpedit.msc > Computer Configuration > Administrative Templates > System > Removable Storage Access) or using udev rules on Linux (echo 'ACTION=="add", SUBSYSTEM=="usb", ATTR{idVendor}=="xxxx", ATTR{authorized}="0"' >> /etc/udev/rules.d/99-usb-restrict.rules). Regularly update training on platforms like TryHackMe to stay ahead of evolving threats.
What Undercode Say:
- Key Takeaway 1: CLI tools like fls, icat, and rip offer speed and efficiency in USB forensics, reducing resource overhead and enabling deeper artifact extraction compared to GUI tools, which is crucial for SOC analysts in fast-paced incident response.
- Key Takeaway 2: Hands-on practice through CTF platforms such as TryHackMe and CyberDefenders bridges the gap between theory and real-world DFIR, fostering proficiency in registry analysis and log parsing for cybersecurity careers.
Analysis: The shift towards CLI in DFIR, as emphasized in the post, reflects a growing trend in cybersecurity for lightweight, scriptable tools that integrate into automated pipelines. While GUIs provide accessibility, CLI commands allow for repeatability and scaling in enterprise environments, where USB-based attacks are prevalent. By mastering these tools, analysts can quickly trace data breaches involving removable media, enhancing overall security posture. However, this requires continuous learning, as evidenced by the recommendation of training courses on the mentioned platforms.
Prediction:
As USB-based threats evolve with sophisticated malware like BadUSB, the demand for CLI-driven forensic techniques will surge, leading to more integrated toolkits in SIEM solutions and cloud environments. Future DFIR workflows may incorporate AI-powered analysis of CLI outputs, automating IOC detection and reducing response times. Training courses on TryHackMe and CyberDefenders will adapt to include more real-world USB forensic scenarios, preparing the next generation of analysts for complex incidents in hybrid cloud and IoT landscapes.
▶️ Related Video (76% Match):
🎯Let’s Practice For Free:
IT/Security Reporter URL:
Reported By: Moaz Morad – Hackers Feeds
Extra Hub: Undercode MoN
Basic Verification: Pass ✅


