Listen to this Post
Introduction:
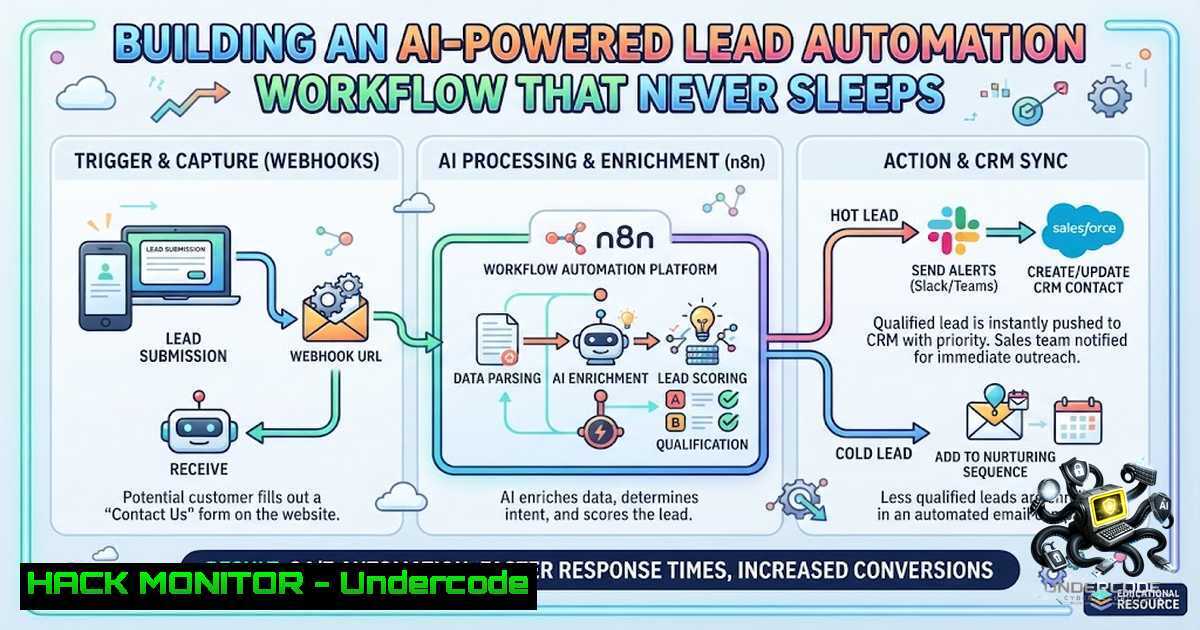
Businesses are losing hours—and revenue—to manual lead follow-up processes that belong in the pre-digital era. A prospect fills out a form, someone manually checks it, copies data into a spreadsheet, and crafts a follow-up email. That’s 10–15 minutes per lead. At scale, that translates to dozens of lost hours weekly and, more critically, leads that slip through the cracks while competitors respond in seconds. n8n, an open-source workflow automation platform with over 115,000 GitHub stars and 400+ integrations, offers a solution: a visual, node-based automation that triggers instantly when a form is submitted, populates your CRM, and dispatches personalized follow-up emails—all without a single line of custom code. This article walks through building a production-grade lead automation workflow with n8n, covering deployment, webhook security, CRM integration, AI-powered personalization, and the cybersecurity considerations that keep sensitive lead data protected.
Learning Objectives:
- Objective 1: Deploy a self-hosted n8n instance using Docker with persistent storage and production-ready configuration.
- Objective 2: Build a secure webhook-triggered workflow that captures form submissions, validates API keys, and routes data to a CRM.
- Objective 3: Integrate AI agents for lead scoring, personalized email generation, and multi-channel follow-up automation.
- Deploying n8n for Production: Docker Compose Deep Dive
Self-hosting n8n gives organizations full control over their data and infrastructure, a critical requirement for privacy-conscious businesses handling customer personal data. The recommended deployment method is Docker, which provides a clean, isolated environment and simplifies database management.
Step‑by‑step deployment guide:
Step 1: Install Docker and Docker Compose. For Linux servers without a graphical environment, install Docker Engine and Docker Compose separately. For Mac and Windows, Docker Desktop includes both.
Step 2: Create a project directory and `.env` file.
mkdir n8n-production && cd n8n-production
touch .env
Populate `.env` with:
N8N_PORT=5678
N8N_PROTOCOL=https
N8N_HOST=n8n.yourdomain.com
GENERIC_TIMEZONE=America/New_York
TZ=America/New_York
N8N_ENCRYPTION_KEY=your-32-character-encryption-key
N8N_ENFORCE_SETTINGS_FILE_PERMISSIONS=true
Step 3: Create `docker-compose.yaml` with PostgreSQL persistence.
version: '3.8'
services:
postgres:
image: postgres:15
restart: unless-stopped
environment:
- POSTGRES_USER=n8n
- POSTGRES_PASSWORD=${POSTGRES_PASSWORD}
- POSTGRES_DB=n8n
volumes:
- postgres_data:/var/lib/postgresql/data
healthcheck:
test: ["CMD-SHELL", "pg_isready -U n8n"]
interval: 10s
timeout: 5s
retries: 5

n8n:
image: docker.n8n.io/n8nio/n8n:latest
restart: unless-stopped
ports:
- "${N8N_PORT}:5678"
environment:
- N8N_DATABASE_TYPE=postgresdb
- N8N_DATABASE_POSTGRESDB_HOST=postgres
- N8N_DATABASE_POSTGRESDB_DATABASE=n8n
- N8N_DATABASE_POSTGRESDB_USER=n8n
- N8N_DATABASE_POSTGRESDB_PASSWORD=${POSTGRES_PASSWORD}
- N8N_ENCRYPTION_KEY=${N8N_ENCRYPTION_KEY}
- N8N_ENFORCE_SETTINGS_FILE_PERMISSIONS=true
- N8N_RUNNERS_ENABLED=true
- GENERIC_TIMEZONE=${GENERIC_TIMEZONE}
- TZ=${TZ}
volumes:
- n8n_data:/home/node/.n8n
depends_on:
postgres:
condition: service_healthy

volumes:
postgres_data:
n8n_data:
Step 4: Start the stack.
docker-compose up -d
n8n will be accessible at `http://localhost:5678`. For production, front it with a reverse proxy (Traefik or Caddy) with automatic SSL termination.
Step 5: Configure queue mode for horizontal scaling. For high-volume workflows, enable queue mode with Redis to distribute execution across multiple workers.
2. Securing Webhook Endpoints: Beyond the Basics
Unprotected webhooks are publicly accessible on the internet—anyone with the link can trigger your workflow, leading to spam, data corruption, or denial-of-service. n8n provides built-in authentication options (Basic Auth, Header Auth, JWT Auth), but production deployments require additional hardening.
Step‑by‑step webhook security implementation:
Step 1: Configure Header Authentication in the Webhook node. In the webhook node settings, select “Header Auth” from the Authentication dropdown. Create a credential with a header name (e.g., X-API-Key) and a strong, randomly generated value.
Step 2: Implement API key verification with an IF node. Add an HTTP Request node that queries your credential store (PostgreSQL, Supabase, or an internal API) to validate the incoming API key. The IF node routes to success (200 OK) or unauthorized (401) paths.
Step 3: Add HMAC verification for payload integrity. Built-in authentication verifies who is calling but not whether the payload has been altered. Implement HMAC-SHA256 signature verification using a shared secret to ensure requests haven’t been tampered with in transit.
Step 4: Implement rate limiting and IP policies. For production, deploy an API Gateway or WAF layer in front of n8n that validates JWT, applies rate limits, and performs basic inspection before routing to n8n. Community nodes like `@prokodo/n8n-1odes-secure-webhook` provide production-grade features including replay protection, per-IP rate limiting, and audit export.
Step 5: Enable execution data redaction for compliance. Workflows handling PII (emails, addresses, financial records) must meet GDPR, SOC 2, or internal security standards. Enable data redaction in workflow settings or enforce it instance-wide under Settings > Security > Data redaction. This preserves execution monitoring while hiding sensitive payloads.
- Building the Lead Automation Workflow: From Form to Follow-up
With n8n deployed and webhooks secured, it’s time to build the core automation. This workflow triggers on form submission, validates the lead, populates a CRM, and sends a personalized follow-up email—all within seconds.
Step‑by‑step workflow construction:
Step 1: Add a Webhook trigger. Configure the Webhook node to listen for POST requests from your form provider (Typeform, Jotform, Tally, or custom HTML form). Set the authentication method to Header Auth with your API key.
Step 2: Parse and validate incoming data. Use an IF node to validate required fields (email, name, company). Add an HTTP Request node to query an email verification API to filter out invalid or disposable email addresses.
Step 3: Normalize and enrich lead data. Use a Function node (JavaScript) to standardize data formats. For enrichment, add an HTTP Request node to call a company research API (Clearbit, Apollo, or Hunter) to append company size, industry, and LinkedIn URL.
// Example Function node code for data normalization
const lead = $input.item.json;
return {
fullName: <code>${lead.first_name} ${lead.last_name}</code>.trim(),
email: lead.email.toLowerCase().trim(),
company: lead.company || 'Unknown',
source: lead.form_source || 'website',
timestamp: new Date().toISOString(),
lead_score: 0 // Will be updated by AI agent
};
Step 4: Sync to CRM. Add a node for your CRM (HubSpot, Salesforce, Airtable, or PostgreSQL). Map the normalized fields to CRM properties. For HubSpot, use the HTTP Request node with the HubSpot API—create a contact, then associate it with a company and deal in a single transaction.
Step 5: Add AI-powered lead scoring. Insert an AI Agent node configured with your preferred LLM (OpenAI GPT-4, Anthropic Claude, or local Llama via Ollama). Provide the agent with a system prompt that defines your Ideal Customer Profile (ICP) and scoring criteria (budget, authority, need, timeline—BANT framework). The agent returns a structured JSON with a lead score, fit level, urgency, and recommended next step.
Step 6: Generate and send personalized follow-up email. Route leads based on their AI score—hot leads get immediate, personalized emails; warm leads enter a nurture sequence; cold leads are logged for future campaigns. Use an AI Agent node to generate a personalized email draft referencing the lead’s company, industry, and specific pain points. Send via Gmail, SendGrid, or your SMTP server.
Step 7: Log everything and handle errors. Add nodes to log all activities (including failures) to Google Sheets or a database. Enable “Continue On Fail” on critical nodes and implement a separate error-handling workflow that notifies your team via Slack when something breaks.
4. Advanced: Multi-Agent Orchestration and RAG
For organizations handling complex lead qualification, n8n supports multi-agent orchestration where a primary agent supervises and delegates work to specialized sub-agents.
Implementation approach: Create a main workflow with a Chat Trigger that receives lead data. The primary AI Agent decides which tools to call—a research agent that scrapes the lead’s website, a qualification agent that applies BANT criteria, and a scheduling agent that checks calendar availability. Each sub-agent runs as a separate n8n workflow called via the “Call n8n Workflow” tool.
For RAG (Retrieval-Augmented Generation), connect a vector store (Pinecone, Chroma, or PostgreSQL with pgvector) to the AI Agent node. The agent retrieves relevant product documentation, case studies, or pricing information before generating personalized outreach.
5. Cybersecurity and Compliance Considerations
Automating lead data introduces significant security and compliance responsibilities.
Data encryption at rest and in transit: n8n encrypts credentials stored in the database using the `N8N_ENCRYPTION_KEY` environment variable. Ensure this key is strong (32+ characters) and stored securely, never committed to version control. Enforce HTTPS for all webhook endpoints using a reverse proxy with automatic SSL renewal.
PII detection and sanitization: Implement PII detection using community nodes like PromptLock Guard, which identifies sensitive data patterns (email, phone, SSN, credit card numbers) and routes content based on risk assessment. This is critical for workflows that process data subject to GDPR, HIPAA, or PCI DSS.
Access control and audit logging: n8n Enterprise provides SSO/SAML, granular RBAC, and full audit logs. For self-hosted instances, implement basic team management and restrict workflow access to authorized personnel only. Regularly rotate API keys and audit webhook access patterns.
Expression injection prevention: n8n expressions can execute arbitrary code if user input is not sanitized. Always validate and escape user-supplied data before using it in expressions or Function nodes.
- n8n vs. Zapier vs. Make: The 2026 Landscape
Understanding where n8n fits in the automation ecosystem helps justify the technical investment.
| Feature | Zapier | Make | n8n |
||–||–|
| Pricing | $73–100/month for 5 workflows | ~$10.59/month Core plan | Free self-hosted; ~$20/month cloud |
| Integrations | 9,000+ | 3,000+ | 400+ native, unlimited via HTTP |
| Self-hosting | ❌ | ❌ | ✅ Full data control |
| AI Agent Nodes | Limited | Moderate | Deepest of the three |
| Technical Setup | Low | Medium | High (self-hosted) |
The verdict: n8n is the choice for technical teams requiring ultimate control, self-hosting, and deep AI integration. The cost curve is flat at scale—once deployed, adding workflows costs nothing.
What Undercode Say:
- Key Takeaway 1: The 10–15 minutes wasted on manual lead follow-up per lead is not just inefficiency—it’s a competitive disadvantage. Automating this with n8n reduces response time from minutes to milliseconds and ensures no lead falls through the cracks.
-
Key Takeaway 2: Security cannot be an afterthought in automation. Webhook authentication, payload verification, rate limiting, and data redaction are not optional—they’re table stakes for any production deployment handling customer data.
Analysis: The n8n ecosystem has matured significantly, with over 115,000 GitHub stars and active development. Its “fair-code” model (source-available with commercial features behind an enterprise license) strikes a practical balance—free for self-hosting while offering enterprise features like SSO and audit logs for organizations that need them. The AI Agent node transforms n8n from a simple workflow engine into an intelligent automation platform capable of autonomous decision-making. For small businesses and startups, the self-hosted option eliminates the per-operation costs that make Zapier prohibitively expensive at scale. The primary limitation remains technical expertise—self-hosting requires server management skills that non-technical teams lack. For those teams, n8n Cloud provides a managed alternative that removes the infrastructure burden while maintaining most of the platform’s power.
Prediction:
- +1 The democratization of AI-powered automation through platforms like n8n will accelerate the adoption of intelligent workflows across SMBs, narrowing the productivity gap between large enterprises and smaller competitors over the next 12–24 months.
-
+1 The shift toward self-hosted, open-source automation tools will intensify as organizations grow increasingly wary of vendor lock-in and the compounding costs of per-operation pricing models.
-
-1 Security incidents involving misconfigured n8n webhooks will increase as adoption outpaces security awareness, particularly among non-technical users deploying the cloud version without proper authentication and rate limiting.
▶️ Related Video (76% Match):
https://www.youtube.com/watch?v=0kpE7xjgoHc
🎯Let’s Practice For Free:
🎓 Live Courses & Certifications:
Join Undercode Academy for Verified Certifications
🚀 Request a Custom Project:
Secure, high-velocity infrastructure and disruptive technological engineering. Contact our engineering team for high-tier development and proprietary systems:
[email protected]
💎 Smart Architecture | 🛡️ Secure by Design | ⭐ Trusted by Thousands
IT/Security Reporter URL:
Reported By: Atif Khan – Hackers Feeds
Extra Hub: Undercode MoN
Basic Verification: Pass ✅


