Listen to this Post
Introduction
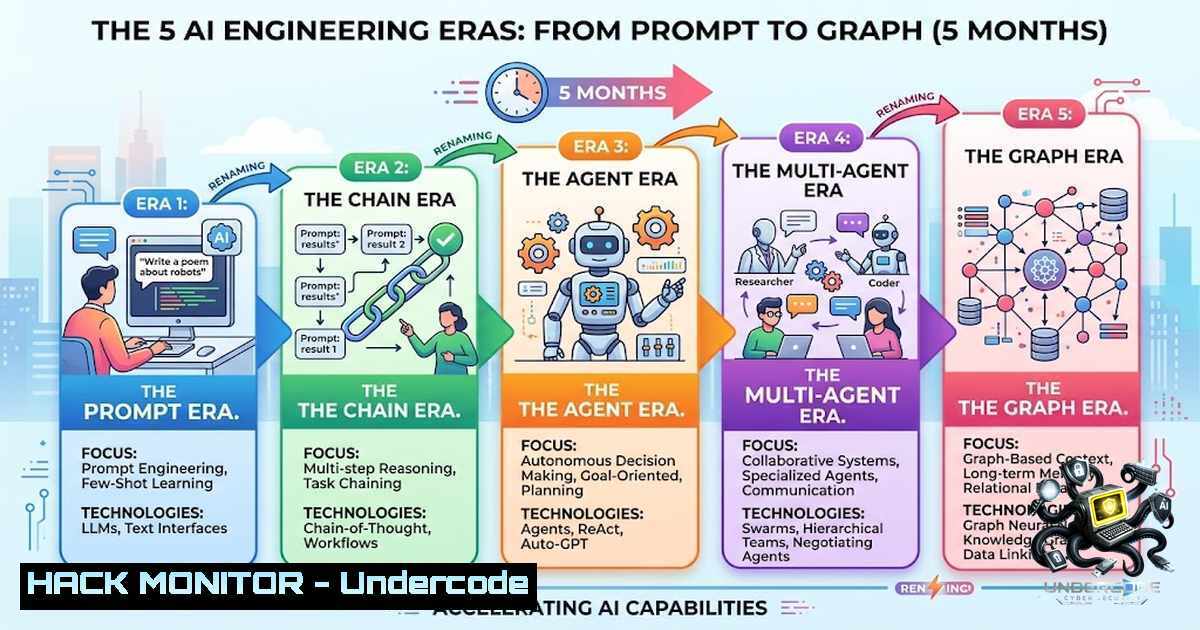
The AI industry has a naming problem. In the span of just five years, the same underlying work of getting AI systems to behave reliably has been renamed five times: Prompt Engineering (2022), Context Engineering (2025), Harness Engineering (February 2026), Loop Engineering (June 2026), and Graph Engineering (July 2026). This pace—three renamed “eras” in about five months—is unlike any other engineering discipline and raises a critical question: is this genuine architectural evolution or just a revolving door of new vocabulary? For cybersecurity and IT professionals, understanding these layers is no longer optional—it’s the difference between deploying a secure, auditable AI agent and watching an uncontrolled model rewrite your entire production codebase.
Learning Objectives
- Understand the five distinct engineering layers in modern agentic AI systems and their security implications
- Implement harness-level guardrails that provide deterministic safety controls beyond prompt-based safeguards
- Design and deploy plan-execute-verify loop patterns with circuit breakers and audit trails
- Build multi-agent graph architectures using LangGraph with proper state management and handoff protocols
- Apply least-privilege principles and isolation controls to AI agents in production environments
- Prompt Engineering (2022): The Foundation That Was Never Enough
Prompt engineering is the practice of crafting the instructions you give a model in a single exchange. It’s the earliest and most widely understood layer—essentially, learning how to talk to LLMs to get useful outputs. But here’s the uncomfortable truth that every security professional needs to internalize: prompt-based safeguards offer zero deterministic guarantees. A well-crafted system prompt might suggest that an agent shouldn’t delete files, but it cannot prevent it from doing so if the model decides otherwise.
What Prompt Engineering Actually Does:
- Structures user inputs and system instructions for optimal model comprehension
- Uses techniques like few-shot examples, role-playing, and output formatting
- Remains entirely probabilistic—the model can and will deviate
Why It Fails for Production Security:
- No enforcement mechanism—the model can ignore instructions
- No audit trail for what the model actually received
- Vulnerable to prompt injection and jailbreak attacks
- Context Engineering (2025): Managing Everything the Model Knows
Context engineering emerged as practitioners realized that a single prompt was insufficient. This layer manages everything the model knows beyond the prompt: retrieved documents, memory, tool definitions, and session history. It’s the discipline of getting the right information to the model at the right time, typically implemented via RAG (Retrieval-Augmented Generation), knowledge graphs, and memory systems.
Step-by-Step Guide to Implementing Context Engineering
Step 1: Set Up a Vector Database for Semantic Memory
 Python example using ChromaDB for context retrieval
import chromadb
from chromadb.utils import embedding_functions

Initialize embedding function
embedding_fn = embedding_functions.DefaultEmbeddingFunction()

Create client and collection
client = chromadb.PersistentClient(path="./context_store")
collection = client.get_or_create_collection(
name="agent_memory",
embedding_function=embedding_fn
)

Add documents to context store
collection.add(
documents=["Security policy: Never expose API keys in responses"],
metadatas=[{"source": "policy", "priority": "high"}],
ids=["policy_001"]
)
Step 2: Implement Context Retrieval with Token Budgeting
def retrieve_context(query, max_tokens=4000):
results = collection.query(query_texts=[bash], n_results=5)
 Token-aware assembly to stay within model limits
context_blocks = []
total_tokens = 0
for doc in results['documents'][bash]:
doc_tokens = len(doc.split())  Approximate token count
if total_tokens + doc_tokens <= max_tokens:
context_blocks.append(doc)
total_tokens += doc_tokens
return "\n".join(context_blocks)
Step 3: Implement Context Compression for Long-Running Tasks
For long-running agents, context drift is a major problem. Use summarization or sliding window techniques:
from langchain.memory import ConversationSummaryBufferMemory

memory = ConversationSummaryBufferMemory(
max_token_limit=2000,
return_messages=True
)
 Memory automatically compresses old conversations into summaries
Linux Command for Monitoring Context Usage:
 Monitor token usage in real-time for your agent
watch -1 2 'curl -s http://localhost:8000/metrics | grep "context_tokens"'
- Harness Engineering (February 2026): The Architecture That Constrains
Harness engineering represents a fundamental shift: it’s the architecture that constrains an agent to behave safely. A harness is a “cybernetic governor” combining feed-forward and feedback to regulate agent behavior toward a desired state. It’s what makes “AI generates most of the code” sustainable at scale rather than a gradual drift toward unmaintainable systems.
The Core Insight: A good prompt won’t stop an agent from rewriting your entire codebase if nothing architecturally prevents it. The harness provides that architectural prevention through deterministic execution hooks operating outside the LLM boundary.
Step-by-Step Guide to Building a Production-Grade Harness
Step 1: Define Governance Constraints (Who, What, Whose)
 Harness-MU style governance constraints
class HarnessConstraints:
def <strong>init</strong>(self):
self.authorized_operations = {
"read": ["/data/", "/configs/"],
"write": ["/output/"],
"execute": ["/scripts/approved/"]
}
self.restricted_patterns = [
r"rm\s+-rf\s+/",  Prevent destructive rm
r"DROP\s+DATABASE",  Prevent SQL injection
r"sudo\s+"  Prevent privilege escalation
]
self.instruction_precedence = ["system", "user", "agent"]
Step 2: Implement Permission Checks in the Agent Loop
def check_permission(operation, target_path):
 Deterministic check - not entrusted to the model
for pattern in harness.restricted_patterns:
if re.search(pattern, operation):
return False, f"Blocked: {pattern} matches restricted pattern"

Check path-based permissions
if operation == "write":
allowed = any(target_path.startswith(p) for p in harness.authorized_operations["write"])
return allowed, "Write permission granted" if allowed else "Write path not authorized"
return True, "Operation allowed"
Step 3: Implement Least-Privilege Isolation
The harness should assume the agent is already compromised and ask what the kernel, filesystem, and network will refuse to do on its behalf.
Linux Commands for Agent Isolation:
 Create a restricted user for the agent
sudo useradd -m -s /bin/bash -G agent_group ai_agent

Set up AppArmor profile for the agent
sudo aa-genprof /usr/local/bin/agent_executor

Use firejail for filesystem and network isolation
firejail --1oprofile --1et=eth0 --private=/opt/agent_sandbox python agent.py

Monitor agent process activity
sudo auditctl -w /etc/passwd -p wa -k agent_audit
sudo ausearch -k agent_audit --format json
Windows PowerShell Commands for Agent Isolation:
 Create a restricted PowerShell session for the agent
New-PSSession -1ame AgentSandbox -ConfigurationName Restricted

Set up AppLocker policies
Set-AppLockerPolicy -Policy "C:\Policies\AgentPolicy.xml"

Monitor file system access
Set-AuditRule -Path "C:\Sensitive" -AuditFlags Success,Failure -Principal "NT AUTHORITY\SYSTEM"
Step 4: Implement Observability and Audit Trails
import logging
import json
from datetime import datetime

class HarnessAuditor:
def <strong>init</strong>(self, log_file="agent_audit.log"):
logging.basicConfig(filename=log_file, level=logging.INFO)

def log_action(self, action, result, reason=None):
entry = {
"timestamp": datetime.utcnow().isoformat(),
"action": action,
"result": result,
"reason": reason,
"session_id": os.environ.get("AGENT_SESSION_ID")
}
logging.info(json.dumps(entry))
 Also write to structured log for SIEM integration
with open("/var/log/agent/structured.log", "a") as f:
f.write(json.dumps(entry) + "\n")
4. Loop Engineering (June 2026): The Plan-Execute-Verify Cycle
Loop engineering is the discipline of designing the plan-execute-verify cycle an agent repeats, deciding what triggers each step and what counts as done. This moves beyond one-shot prompting to iterative, goal-directed behavior with explicit verification gates.
The Five Loop Patterns for AI Agents:
| Pattern | Use Case |
||-|
| Retry | Simple, well-defined tasks with known success criteria |
| Plan-Execute-Verify | Multi-step tasks requiring planning and validation |
| Explore-1arrow | Unknown solution space—explore then converge |
| Human-in-the-Loop | High-risk decisions requiring human approval |
| Lifecycle Loop | Long-running projects with ongoing maintenance |
Step-by-Step Guide to Implementing a Production-Safe Loop
Step 1: Define the Loop with Circuit Breakers
class AgentLoop:
def <strong>init</strong>(self, max_iterations=10, max_tokens=100000, timeout_seconds=300):
self.max_iterations = max_iterations
self.max_tokens = max_tokens
self.timeout = timeout_seconds
self.circuit_breaker = False
self.audit_log = []

def run(self, task, initial_context):
iteration = 0
state = {"context": initial_context, "plan": None, "execution": None, "verified": False}

while not state["verified"] and iteration < self.max_iterations:
iteration += 1

Check circuit breakers
if self.circuit_breaker_triggered(state):
self.circuit_breaker = True
return {"status": "failed", "reason": "circuit_breaker", "iteration": iteration}

Phase 1: Plan
state["plan"] = self.plan(state["context"])

Phase 2: Execute
state["execution"] = self.execute(state["plan"])

Phase 3: Verify
state["verified"] = self.verify(state["execution"])
state["context"] = self.update_context(state)

Log the iteration
self.audit_log.append({
"iteration": iteration,
"plan": state["plan"],
"execution": state["execution"],
"verified": state["verified"]
})

return {"status": "success" if state["verified"] else "max_iterations", "iteration": iteration}
Step 2: Implement the Spec Writer (Define “Done” Before the Loop Starts)
def write_spec(task_description):
"""Force definition of success criteria before execution"""
spec = {
"objective": task_description,
"success_criteria": [],
"failure_conditions": [],
"resource_limits": {
"max_iterations": 5,
"max_tokens": 50000,
"max_cost_usd": 1.00
}
}
 Use LLM to help generate success criteria
 But the spec must be human-approved before the loop starts
return spec
Step 3: Implement Stop Conditions and Gates
def evaluate_stop_conditions(state, spec):
"""Check all stop conditions before each iteration"""
 Success check
for criterion in spec["success_criteria"]:
if evaluate_criterion(state, criterion):
return "success", f"Criterion met: {criterion}"

Failure check
for condition in spec["failure_conditions"]:
if evaluate_condition(state, condition):
return "failure", f"Failure condition: {condition}"

Resource limits
if state["total_tokens"] > spec["resource_limits"]["max_tokens"]:
return "failure", "Token limit exceeded"

if state["iterations"] >= spec["resource_limits"]["max_iterations"]:
return "failure", "Max iterations reached"

return "continue", None
Linux Commands for Loop Monitoring:
 Monitor agent loop in real-time
tail -f /var/log/agent/loop.log | jq '.iteration, .status'

Set up a heartbeat monitor
while true; do
if ! pgrep -f "agent_loop.py"; then
echo "Agent loop died at $(date)" | mail -s "Agent Failure" [email protected]
break
fi
sleep 30
done
- Graph Engineering (July 2026): Wiring Multiple Agents Together
Graph engineering is what happens when one loop isn’t enough and you need several coordinating. It involves wiring multiple agent loops together through nodes, edges, and shared state, rather than relying on one agent to handle everything sequentially. In LangGraph, agent workflows are modeled as directed graphs where nodes perform tasks and edges define the flow of control and state.
Step-by-Step Guide to Building a Multi-Agent Graph
Step 1: Define the Graph Structure with LangGraph
from langgraph.graph import StateGraph, END
from typing import TypedDict, List

Define shared state
class AgentState(TypedDict):
messages: List[bash]
current_task: str
research_results: str
code_output: str
verification_status: bool

Initialize the graph
graph = StateGraph(AgentState)
Step 2: Define Specialized Agent Nodes
 Researcher agent - gathers information
def researcher_node(state: AgentState) -> AgentState:
 Research logic here
state["research_results"] = "Research findings..."
state["messages"].append({"role": "assistant", "content": "Research complete"})
return state

Coder agent - writes code
def coder_node(state: AgentState) -> AgentState:
 Code generation logic
state["code_output"] = "def solution(): ..."
state["messages"].append({"role": "assistant", "content": "Code generated"})
return state

Reviewer agent - validates output
def reviewer_node(state: AgentState) -> AgentState:
 Review and verification logic
state["verification_status"] = True
state["messages"].append({"role": "assistant", "content": "Review passed"})
return state
Step 3: Define Edges and Routing Logic
from langgraph.graph import START

Add nodes to the graph
graph.add_node("researcher", researcher_node)
graph.add_node("coder", coder_node)
graph.add_node("reviewer", reviewer_node)

Define the flow
graph.add_edge(START, "researcher")
graph.add_edge("researcher", "coder")
graph.add_edge("coder", "reviewer")

Conditional routing - reviewer can send back to coder
def should_continue(state: AgentState):
if state["verification_status"]:
return END
return "coder"

graph.add_conditional_edges("reviewer", should_continue)

Compile the graph
app = graph.compile()
Step 4: Implement Agent Handoffs for Specialized Coordination
from langgraph.graph import Command

Coordinator agent with handoff tools
def coordinator_node(state: AgentState) -> Command:
 Determine which specialist agent should handle the task
if "research" in state["current_task"]:
return Command(goto="researcher")
elif "code" in state["current_task"]:
return Command(goto="coder")
else:
return Command(goto="reviewer")
Step 5: Run the Multi-Agent System
 Initialize the state
initial_state = {
"messages": [],
"current_task": "Build a secure authentication system",
"research_results": "",
"code_output": "",
"verification_status": False
}

Run the graph
result = app.invoke(initial_state)
print(f"Final result: {result}")
Docker Commands for Multi-Agent Deployment:
 Build a container for each agent type
docker build -t researcher-agent -f Dockerfile.researcher .
docker build -t coder-agent -f Dockerfile.coder .
docker build -t reviewer-agent -f Dockerfile.reviewer .

Run with network isolation
docker run -d --1etwork agent_network --1ame researcher researcher-agent
docker run -d --1etwork agent_network --1ame coder coder-agent
docker run -d --1etwork agent_network --1ame reviewer reviewer-agent

Monitor inter-agent communication
docker logs -f researcher-agent | grep "SENDING_TO"
6. Security Hardening Across All Layers
API Security for Agent Communication
 Implement API key rotation and secret isolation
import os
from cryptography.fernet import Fernet

class SecretManager:
def <strong>init</strong>(self):
self.key = Fernet.generate_key()
self.cipher = Fernet(self.key)

def encrypt_secret(self, secret):
return self.cipher.encrypt(secret.encode())

def decrypt_secret(self, encrypted):
return self.cipher.decrypt(encrypted).decode()

Store secrets in environment variables, never in prompts
api_key = os.environ.get("AGENT_API_KEY")
if not api_key:
raise ValueError("AGENT_API_KEY not set in environment")
Network Security for Agent Deployments
 Linux: Restrict outbound connections
iptables -A OUTPUT -m owner --uid-owner ai_agent -j DROP
iptables -A OUTPUT -m owner --uid-owner ai_agent -d 10.0.0.0/8 -j ACCEPT
iptables -A OUTPUT -m owner --uid-owner ai_agent -d 192.168.0.0/16 -j ACCEPT

Windows: Restrict using Windows Firewall
New-1etFirewallRule -DisplayName "Block Agent Outbound" -Direction Outbound -Action Block -RemoteAddress "0.0.0.0/0"
New-1etFirewallRule -DisplayName "Allow Agent Internal" -Direction Outbound -Action Allow -RemoteAddress "192.168.0.0/16"
Vulnerability Exploitation and Mitigation
| Attack Vector | Mitigation Layer |
|||
| Prompt Injection | Harness-level input sanitization and guardrails |
| Tool Misuse | Least-privilege permissions with deterministic checks |
| Context Poisoning | Token-aware context budgeting and validation |
| Infinite Loops | Circuit breakers and max iteration limits |
| Data Exfiltration | Network isolation and output filtering |
What Undercode Say:
- The naming treadmill is real, but so is the architectural progress. Prompt engineering is to harness engineering what writing a README is to building a distributed system—they’re not even in the same category of problem. The renaming reflects genuine expansion of scope, not just marketing fluff.
-
Security must be baked into the harness layer, not the prompt layer. Organizations that continue to rely on prompt-based safeguards will be the ones making headlines for AI breaches in 2027. The harness provides deterministic controls that prompts never can.
-
Graph engineering is where enterprise AI is heading. Single-agent loops are insufficient for complex workflows. The future is networks of specialized agents with clear handoff protocols, shared state, and auditable execution paths.
-
The speed of evolution is both a blessing and a curse. Three paradigm shifts in five months means the field is immature but moving fast. The winners will be those who build modular, composable systems that can adapt to the next naming “era” without rewriting everything.
-
Observability is non-1egotiable. Without comprehensive audit trails across all five layers, you cannot debug, secure, or govern agentic systems. Every action, every decision, every state transition must be logged and queryable.
Prediction:
-
+1 Organizations that adopt harness engineering as a core security practice will achieve 10x faster AI agent deployment with 90% fewer security incidents by Q1 2027. The deterministic controls will become the industry standard.
-
+1 Graph engineering will merge with traditional microservices architecture, creating a unified pattern for both human-written and AI-generated code. The distinction between “AI agent” and “service” will blur.
-
-1 Companies that continue to treat prompt engineering as sufficient for production AI will experience catastrophic failures—data breaches, code corruption, and compliance violations—leading to regulatory intervention by late 2026.
-
-1 The fragmentation of terminology will create a skills gap, making it difficult for security teams to hire qualified AI engineers. This will delay adoption for risk-averse enterprises.
-
+1 Open-source tooling for harness, loop, and graph engineering will mature rapidly, democratizing access to production-grade AI infrastructure. By mid-2027, building a secure multi-agent system will be as straightforward as building a web application is today.
-
+1 The convergence of these five layers will eventually stabilize into a recognized engineering discipline—”Agentic Systems Engineering”—with its own body of knowledge, certifications, and best practices. The naming chaos of 2026 will be remembered as the field’s awkward adolescence.
▶️ Related Video (78% Match):
https://www.youtube.com/watch?v=Joqh7Tui9B8
🎯Let’s Practice For Free:
🎓 Live Courses & Certifications:
Join Undercode Academy for Verified Certifications
🚀 Request a Custom Project:
Secure, high-velocity infrastructure and disruptive technological engineering. Contact our engineering team for high-tier development and proprietary systems:
[email protected]
💎 Smart Architecture | 🛡️ Secure by Design | ⭐ Trusted by Thousands
IT/Security Reporter URL:
Reported By: Ammarahmaddev Aiengineering – Hackers Feeds
Extra Hub: Undercode MoN
Basic Verification: Pass ✅


