Listen to this Post
Introduction
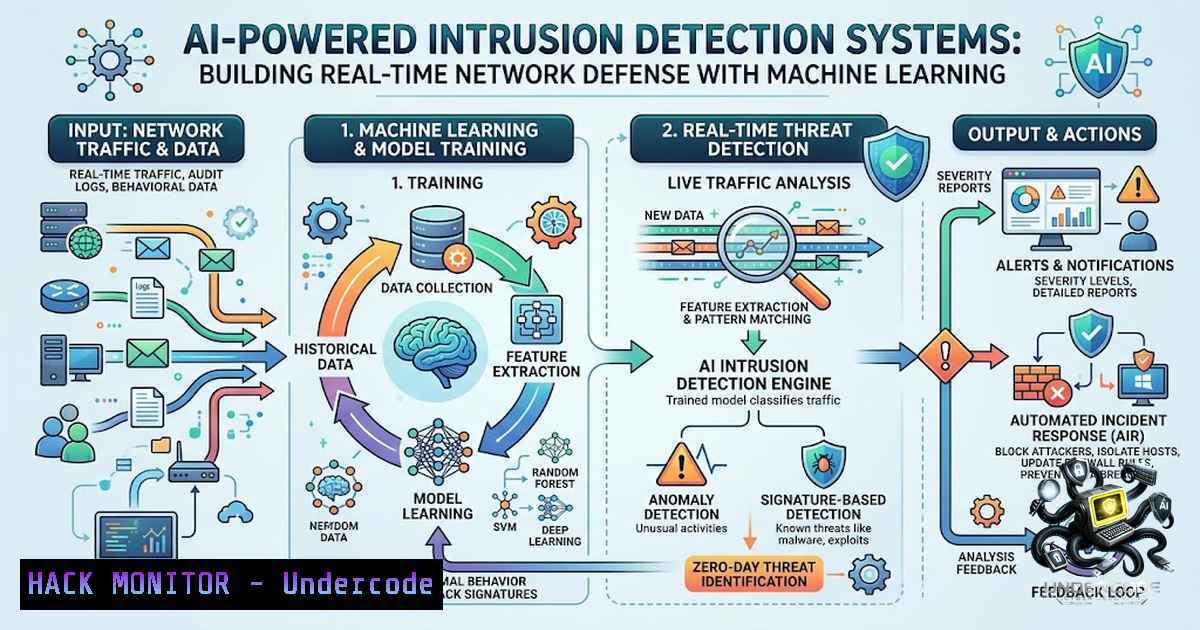
Traditional signature-based intrusion detection systems (IDS) like Snort and Suricata struggle to keep pace with rapidly evolving cyber threats, often missing zero-day attacks and generating excessive false positives. AI-Based Intrusion Detection Systems (AI-IDS) address this critical gap by leveraging machine learning and deep learning algorithms to analyze network traffic patterns, detect anomalies, and classify malicious activities in real time—enabling organizations to stay ahead of sophisticated cyberattacks while dramatically reducing alert fatigue.
Learning Objectives
- Understand the architecture and components of an AI-powered intrusion detection system
- Learn to implement real-time packet capture, feature extraction, and ML-based threat classification using Python, Scikit-learn, and TensorFlow
- Master the deployment of AI-IDS with Flask APIs, web dashboards, and integration with existing security infrastructure (Suricata, ELK Stack, SIEM)
- Gain hands-on experience with industry-standard datasets (NSL-KDD, CIC-IDS2017, UNSW-1B15) for training and evaluating detection models
You Should Know
1. Real-Time Packet Capture and Feature Extraction Pipeline
The foundation of any AI-IDS is the ability to capture live network traffic and extract meaningful features for ML inference. Using Scapy—Python’s powerful packet manipulation library—you can sniff network interfaces and extract features such as packet length, protocol types, source/destination IPs, flow duration, and inter-arrival times.
Step-by-Step Implementation:
Step 1: Install Dependencies
 Linux/macOS
pip install scapy pandas numpy scikit-learn tensorflow flask

Windows (requires Npcap)
pip install scapy pandas numpy scikit-learn tensorflow flask
Step 2: Basic Packet Sniffer with Feature Extraction
from scapy.all import sniff, IP, TCP, UDP
import pandas as pd
import numpy as np

Feature extraction function
def extract_packet_features(packet):
features = {}
if IP in packet:
features['src_ip'] = packet[bash].src
features['dst_ip'] = packet[bash].dst
features['protocol'] = packet[bash].proto
features['packet_len'] = len(packet)
features['ttl'] = packet[bash].ttl

if TCP in packet:
features['tcp_flags'] = packet[bash].flags
features['src_port'] = packet[bash].sport
features['dst_port'] = packet[bash].dport
elif UDP in packet:
features['src_port'] = packet[bash].sport
features['dst_port'] = packet[bash].dport
return features

Packet capture callback
packet_features = []
def packet_callback(packet):
features = extract_packet_features(packet)
if features:
packet_features.append(features)

Sniff 100 packets (requires root/admin on Linux)
sniff(iface="eth0", count=100, prn=packet_callback)

Convert to DataFrame
df = pd.DataFrame(packet_features)
print(df.head())
Step 3: Using pcap2tensor for Advanced Feature Extraction
For research-grade feature extraction, the `pcap2tensor` library converts PCAP files directly into ML-ready tensors:
pip install pcap2tensor
from pcap2tensor import extract
tensor = extract("capture.pcap", features="aegis-6d", window_size=1000, stride=500)
print(tensor.shape)  torch.Size([num_windows, features])
Step 4: Running Real-Time Detection
For production systems, you can run continuous monitoring with:
 Linux - requires root privileges
sudo python sniff_predict.py --interface eth0 --model model.pkl
This captures live packets, extracts features in real time, and feeds them into the trained ML model for immediate threat classification.
2. Training Machine Learning Models on Benchmark Datasets
AI-IDS models are typically trained on publicly available benchmark datasets that contain labeled network traffic. The most widely used datasets include NSL-KDD (125,000 records, 41 features), CIC-IDS2017 (over 2 million flows, 80+ features covering DoS, PortScan, BruteForce, Web attacks), and UNSW-1B15. Research shows that modern ML models achieve accuracy rates of 99.3% on NSL-KDD and 99.5% on CIC-IDS-2017.
Step-by-Step Model Training:
Step 1: Download Dataset
 NSL-KDD from Kaggle
kaggle competitions download -c nsl-kdd

Or download CIC-IDS2017 from UNB
wget https://www.unb.ca/cic/datasets/ids-2017.html
Step 2: Data Preprocessing Script
import pandas as pd
from sklearn.preprocessing import StandardScaler, LabelEncoder
from sklearn.model_selection import train_test_split

Load dataset
df = pd.read_csv('KDDTrain+.csv')

Handle categorical features
label_encoders = {}
for col in ['protocol_type', 'service', 'flag']:
le = LabelEncoder()
df[bash] = le.fit_transform(df[bash].astype(str))
label_encoders[bash] = le

Encode labels (normal vs attack)
df['label'] = df['label'].apply(lambda x: 0 if x == 'normal' else 1)

Separate features and target
X = df.drop(['label'], axis=1)
y = df['label']

Scale features
scaler = StandardScaler()
X_scaled = scaler.fit_transform(X)

Train-test split
X_train, X_test, y_train, y_test = train_test_split(
X_scaled, y, test_size=0.2, random_state=42
)
Step 3: Train Random Forest Model (96.2% accuracy reported on CICIDS2017)
from sklearn.ensemble import RandomForestClassifier
import joblib

model = RandomForestClassifier(
n_estimators=100,
max_depth=20,
n_jobs=-1,
random_state=42
)
model.fit(X_train, y_train)

Save model and scaler
joblib.dump(model, 'ids_model.pkl')
joblib.dump(scaler, 'scaler.pkl')

Evaluate
accuracy = model.score(X_test, y_test)
print(f"Model Accuracy: {accuracy:.4f}")
Step 4: Train Deep Learning Model (CNN-BiLSTM for Sequential Threat Modeling)
For more sophisticated threat detection, hybrid deep learning models like CNN-BiLSTM combine convolutional layers for local pattern extraction with bidirectional LSTM layers for sequential threat modeling:
import tensorflow as tf
from tensorflow.keras import layers, models

def build_cnn_bilstm_model(input_shape, num_classes=2):
model = models.Sequential([
layers.Reshape((input_shape[bash], 1), input_shape=input_shape),
layers.Conv1D(64, kernel_size=3, activation='relu', padding='same'),
layers.MaxPooling1D(pool_size=2),
layers.Bidirectional(layers.LSTM(64, return_sequences=True)),
layers.Bidirectional(layers.LSTM(32)),
layers.Dropout(0.3),
layers.Dense(64, activation='relu'),
layers.Dense(num_classes, activation='softmax')
])
model.compile(optimizer='adam', loss='sparse_categorical_crossentropy', metrics=['accuracy'])
return model

model = build_cnn_bilstm_model((X_train.shape[bash],))
model.fit(X_train, y_train, epochs=20, batch_size=64, validation_split=0.2)
model.save('deep_ids_model.h5')
Step 5: Hyperparameter Tuning with GridSearchCV
from sklearn.model_selection import GridSearchCV

param_grid = {
'n_estimators': [50, 100, 200],
'max_depth': [10, 20, None],
'min_samples_split': [2, 5, 10]
}
grid_search = GridSearchCV(RandomForestClassifier(), param_grid, cv=5, n_jobs=-1)
grid_search.fit(X_train, y_train)
print(f"Best params: {grid_search.best_params_}")
print(f"Best score: {grid_search.best_score_:.4f}")
- Deploying AI-IDS with Flask REST API and Web Dashboard
A production-ready AI-IDS requires a scalable backend for real-time inference. The system is typically built using Python, Flask, Scikit-learn, and Socket.IO, with support for email alerts and asynchronous task handling via Celery.
Step-by-Step Deployment:
Step 1: Flask API Setup
from flask import Flask, request, jsonify, render_template
import joblib
import numpy as np
import pandas as pd

app = Flask(<strong>name</strong>)

Load pre-trained model and scaler
model = joblib.load('ids_model.pkl')
scaler = joblib.load('scaler.pkl')

@app.route('/')
def index():
return render_template('index.html')

@app.route('/predict', methods=['POST'])
def predict():
try:
data = request.get_json()
features = np.array(data['features']).reshape(1, -1)
features_scaled = scaler.transform(features)
prediction = model.predict(features_scaled)[bash]
probability = model.predict_proba(features_scaled)[bash][bash]

return jsonify({
'prediction': 'Threat Detected' if prediction == 1 else 'No Threat',
'confidence': float(probability),
'timestamp': pd.Timestamp.now().isoformat()
})
except Exception as e:
return jsonify({'error': str(e)}), 400

@app.route('/upload', methods=['POST'])
def upload_batch():
 Batch processing for CSV/JSON uploads
file = request.files['file']
df = pd.read_csv(file)
 Process and return predictions
 ...

if <strong>name</strong> == '<strong>main</strong>':
app.run(host='0.0.0.0', port=5000, debug=False)
Step 2: Run the Application
 Development
python app.py
 Access dashboard at http://localhost:5000

Production with Gunicorn
gunicorn -w 4 -b 0.0.0.0:5000 app:app

With Celery for async tasks
celery -A app.celery worker --loglevel=info
Step 3: Test the API
 POST request with sample features
curl -X POST http://localhost:5000/predict \
-H "Content-Type: application/json" \
-d '{"features": [0.1, 0.5, 0.2, 0.3, 0.7, 0.9]}'

Expected response: {"prediction":"Threat Detected","confidence":0.92,"timestamp":"2026-..."}
Step 4: Configure Environment Variables
Create a `.env` file for email alerts and SMTP configuration:
MAIL_SERVER=smtp.gmail.com
MAIL_PORT=587
MAIL_USE_TLS=True
[email protected]
MAIL_PASSWORD=your-app-password
- Integrating AI-IDS with Suricata and SIEM (ELK Stack)
Modern security operations require AI-IDS to integrate seamlessly with existing infrastructure. By combining Suricata (high-performance NIDS) with AI-based classification and ELK Stack (Elasticsearch, Logstash, Kibana), organizations can achieve real-time threat detection, centralized log management, and advanced analytics.
Step-by-Step Integration:
Step 1: Install Suricata
 Ubuntu/Debian
sudo apt-get update
sudo apt-get install suricata

Configure Suricata
sudo nano /etc/suricata/suricata.yaml
 Set interface: eth0
 Enable eve-log output in JSON format
Step 2: Configure Filebeat to Ship Suricata Logs
 filebeat.yml
filebeat.inputs:
- type: log
enabled: true
paths:
- /var/log/suricata/eve.json
json.keys_under_root: true
json.add_error_key: true

output.elasticsearch:
hosts: ["localhost:9200"]
index: "suricata-logs-%{+yyyy.MM.dd}"
Step 3: AI Model for IOC Classification
Train an ML model to classify Indicators of Compromise (IOCs) and generate dynamic detection rules for Suricata:
 ioc_classifier.py
import joblib
import pandas as pd

Load pre-trained IOC classifier
ioc_model = joblib.load('ioc_model.pkl')

def classify_ioc(ioc_data):
prediction = ioc_model.predict(ioc_data)
return prediction  Returns threat type or benign
Step 4: Generate Suricata Rules from ML Predictions
 Convert ML-detected threats to Suricata rules
def generate_suricata_rule(threat_type, src_ip, dst_ip, dst_port):
rule_template = f"""
alert {src_ip} any -> {dst_ip} {dst_port} (
msg:"AI-IDS DETECTED: {threat_type}";
classtype:attempted-admin;
sid:{hash(src_ip + dst_ip + str(dst_port)) % 1000000};
rev:1;
)
"""
return rule_template

Append to suricata.rules
with open('/etc/suricata/rules/local.rules', 'a') as f:
f.write(generate_suricata_rule('PortScan', '192.168.1.100', '10.0.0.1', 22))
Step 5: Visualize in Kibana
Access Kibana dashboards to explore Suricata alerts, visualize network traffic patterns, and map threats to MITRE ATT&CK framework:
– Open `http://localhost:5601`
– Create index pattern: `suricata-logs-`
– Build visualizations for attack types, source/destination IPs, and alert severity
5. Containerized Deployment with Docker and Kubernetes
For enterprise-scale deployment, AI-IDS should be containerized using Docker and orchestrated with Kubernetes for horizontal scaling, automated retraining, and high availability.
Step-by-Step Docker Deployment:
Step 1: Create Dockerfile
FROM python:3.9-slim

WORKDIR /app

COPY requirements.txt .
RUN pip install --1o-cache-dir -r requirements.txt

COPY . .

EXPOSE 5000

CMD ["gunicorn", "-w", "4", "-b", "0.0.0.0:5000", "app:app"]
Step 2: Build and Run
docker build -t ai-ids:latest .
docker run -d -p 5000:5000 --1ame ai-ids ai-ids:latest
Step 3: Docker Compose for Multi-Service Stack
 docker-compose.yml
version: '3.8'
services:
ai-ids-api:
build: .
ports:
- "5000:5000"
environment:
- REDIS_URL=redis://redis:6379
depends_on:
- redis
- elasticsearch

redis:
image: redis:alpine
ports:
- "6379:6379"

elasticsearch:
image: docker.elastic.co/elasticsearch/elasticsearch:8.10.0
environment:
- discovery.type=single-1ode
ports:
- "9200:9200"

kibana:
image: docker.elastic.co/kibana/kibana:8.10.0
ports:
- "5601:5601"
depends_on:
- elasticsearch

suricata:
image: jasonish/suricata:latest
network_mode: host
cap_add:
- NET_ADMIN
- NET_RAW
volumes:
- /var/log/suricata:/var/log/suricata
Step 4: Deploy on Kubernetes
 deployment.yaml
apiVersion: apps/v1
kind: Deployment
metadata:
name: ai-ids
spec:
replicas: 3
selector:
matchLabels:
app: ai-ids
template:
metadata:
labels:
app: ai-ids
spec:
containers:
- name: ai-ids
image: ai-ids:latest
ports:
- containerPort: 5000
env:
- name: REDIS_URL
value: "redis://redis-service:6379"

apiVersion: v1
kind: Service
metadata:
name: ai-ids-service
spec:
selector:
app: ai-ids
ports:
- port: 80
targetPort: 5000
type: LoadBalancer
kubectl apply -f deployment.yaml
kubectl get pods
kubectl scale deployment ai-ids --replicas=5
Step 5: Monitoring with Prometheus and Grafana
Add Prometheus metrics integration for performance monitoring:
from prometheus_client import Counter, Histogram, start_http_server

PREDICTIONS = Counter('ai_ids_predictions_total', 'Total predictions', ['result'])
LATENCY = Histogram('ai_ids_prediction_latency_seconds', 'Prediction latency')

@LATENCY.time()
def predict_with_metrics(features):
result = model.predict(features)
PREDICTIONS.labels(result='threat' if result[bash] == 1 else 'benign').inc()
return result

Start metrics server on port 8000
start_http_server(8000)
What Undercode Say
- AI-IDS is not a replacement for traditional security tools—it’s a force multiplier. Signature-based systems like Snort and Suricata remain essential for known threats, but AI-powered anomaly detection fills the critical gap for zero-day and evasive attacks. The most effective deployments combine both approaches in a hybrid architecture.
-
Data quality and feature engineering determine model performance more than algorithm choice. While deep learning models like CNN-BiLSTM and hybrid ensembles achieve impressive accuracy (98.8% on IntrusionNet), the real challenge lies in preprocessing raw network traffic, handling class imbalance (SMOTE oversampling is essential), and extracting domain-relevant features that capture attack patterns effectively.
-
Real-time inference latency is the bottleneck for production deployment. Research shows that Suricata processes traffic 31× to 57× faster than full ML inference pipelines. Organizations must optimize model size, use efficient feature extraction (pcap2tensor), and consider edge deployment for low-latency requirements.
-
The future of AI-IDS lies in federated learning and generative AI. Recent 2026 research demonstrates federated learning-powered behavioral intrusion detection using LSTM, attention mechanisms, GANs, and LLMs. Two-stage generative-AI fusion models achieve 94.03% accuracy on UNSW-1B15 for cloud environments, while LLM integration provides plain-English threat explanations and actionable remediation steps.
Prediction
+1 AI-IDS will become a standard component of every enterprise security stack by 2028, with Gartner predicting that 70% of organizations will deploy ML-based intrusion detection alongside traditional signature-based systems, reducing mean time to detection (MTTD) by 60%.
+1 The integration of Large Language Models with IDS will revolutionize security operations, enabling natural language threat reporting, automated incident response playbooks, and contextual risk scoring that reduces false positive rates by over 40%.
-1 Adversarial ML attacks targeting AI-IDS models will emerge as a critical threat vector by 2027. Attackers will deploy evasion techniques (crafting packets that bypass ML classifiers) and poisoning attacks (injecting malicious training data) specifically designed to degrade model performance, requiring robust adversarial training and continuous model validation.
+1 Federated learning will enable privacy-preserving, collaborative threat intelligence sharing across organizations without exposing sensitive network data, creating global AI-IDS models that benefit from diverse attack patterns while maintaining data sovereignty.
-1 The shortage of cybersecurity professionals with ML expertise will create a significant skills gap, leaving many organizations unable to properly tune, maintain, and update their AI-IDS deployments—resulting in degraded performance and increased security risk within 18-24 months of initial deployment.
+1 Containerized and Kubernetes-1ative AI-IDS deployments will become the industry standard, enabling auto-scaling, canary deployments for model updates, and seamless integration with cloud-1ative security tools like Falco and open-appsec.
+1 Automated model retraining pipelines with continuous feedback loops will transform AI-IDS from static detection systems into adaptive security platforms that evolve with the threat landscape, maintaining detection accuracy above 95% even as attack techniques rapidly evolve.
▶️ Related Video (86% Match):
🎯Let’s Practice For Free:
🎓 Live Courses & Certifications:
Join Undercode Academy for Verified Certifications
🚀 Request a Custom Project:
Secure, high-velocity infrastructure and disruptive technological engineering. Contact our engineering team for high-tier development and proprietary systems:
[email protected]
💎 Smart Architecture | 🛡️ Secure by Design | ⭐ Trusted by Thousands
IT/Security Reporter URL:
Reported By: Yashjadhav175181249 Innovationxpo2026 – Hackers Feeds
Extra Hub: Undercode MoN
Basic Verification: Pass ✅


