Listen to this Post
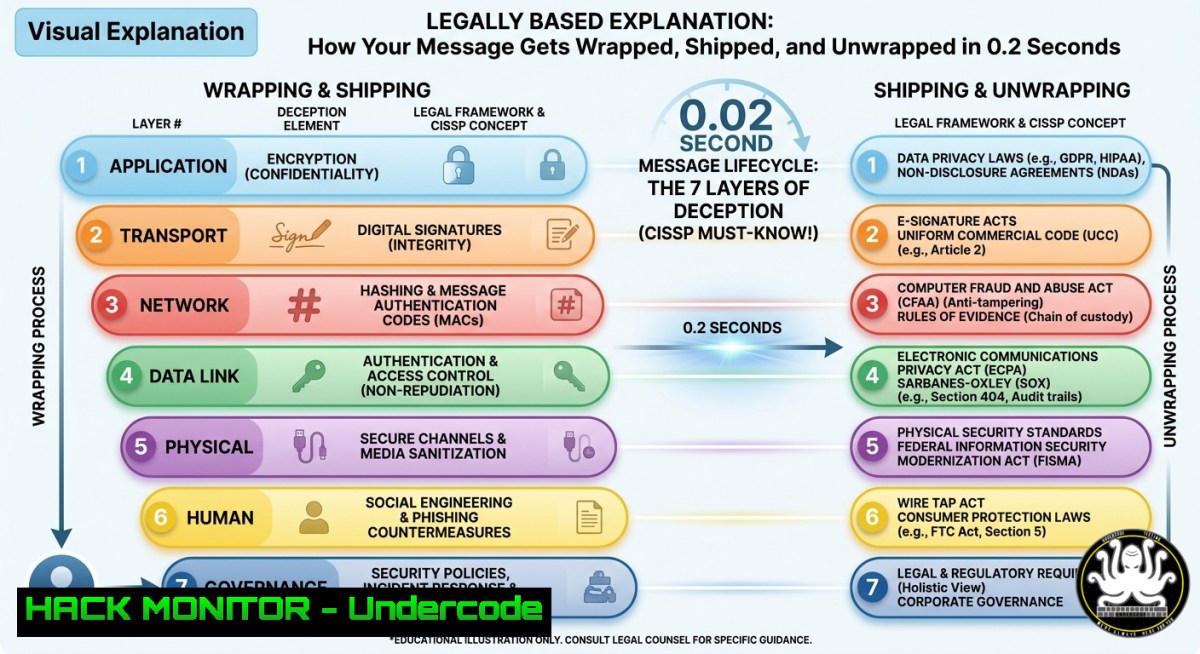
Introduction:
Every time you click “Send” on a web form, your message doesn’t just vanish into the cloud – it undergoes a rapid-fire transformation across the seven layers of the OSI model. From encryption at Layer 6 to bit-level travel on physical cables, this encapsulation process wraps your data like a Russian doll, while each receiving device unwraps it in reverse. For cybersecurity professionals, understanding exactly where protocols like IPSec, TLS, and ARP operate is the difference between acing the CISSP and falling for layer confusion on exam day.
Learning Objectives
- Visualize and explain the OSI encapsulation/de-encapsulation process from application to physical layer and back.
- Identify at which OSI layer key security controls and attack techniques function (IPSec – Layer 3, TLS – Layer 6, WAF – Layer 7, ARP spoofing – Layer 2).
- Apply Linux and Windows commands to inspect network traffic, detect layer‑specific anomalies, and harden each layer against common exploits.
You Should Know
- Layer 2 Exposed: ARP Spoofing & How to Stop It
ARP (Address Resolution Protocol) resolves IP addresses to MAC addresses on a local network. Because ARP has no authentication, attackers can send fake replies, becoming a man-in-the-middle. This attack operates purely at Layer 2 – the Data Link layer.
Step‑by‑step detection and mitigation (Linux):
- View the ARP cache – `arp -a` or `ip neigh show`
- Detect spoofing – Use `arp-scan –local` to list all active MACs, then compare with gateway MAC (
arp -n | grep <gateway_ip>). Multiple IPs with the same MAC indicate an attack. - Prevent statically – `arp -s
` (Linux)
On Windows: `netsh interface ipv4 add neighbors “Ethernet”` - Enable dynamic detection – Install `arpon` or use `tcpdump -i eth0 arp` to monitor for gratuitous ARP replies.
For enterprise hardening, implement DAI (Dynamic ARP Inspection) on managed switches – this validates ARP packets against DHCP snooping bindings.
2. Layer 3 Lockdown: IPSec and Network Segmentation
IPSec operates at the Network layer, protecting entire IP packets with authentication and encryption. It secures site‑to‑site VPNs and host‑to‑host communications, regardless of upper‑layer protocols.
Step‑by‑step IPSec troubleshooting (Linux – strongSwan):
1. Check IPSec status – `sudo ipsec statusall`
- View Security Associations (SAs) – `sudo ip xfrm state`
- Capture encrypted traffic – `tcpdump -i eth0 esp` (ESP protocol = 50)
- Test tunnel connectivity – `ping -I 10.0.0.1 10.0.0.2` from inside the tunnel
Windows native IPSec: Use `Get-NetIPsecRule` in PowerShell to list configured rules. To block all non‑IPSec traffic to a critical server:
New-NetIPsecRule -DisplayName "Block Non-IPSec" -InboundSecurity Require -OutboundSecurity Require -RemoteAddress 192.168.1.10 -Action Block
3. Layer 4: TCP Session Hijacking and Mitigation
The Transport layer segments data and adds sequence numbers. An attacker who predicts these numbers can inject malicious packets into an established session – a classic session hijack.
Step‑by‑step detection (Linux):
- Watch for out‑of‑window sequence numbers – `tcpdump -i eth0 ‘tcp
 & 4 != 0'` (RST flag filtering) </li>
<li>Analyze TCP streams – `tshark -r capture.pcap -Y "tcp.stream eq 5"` </li>
<li>Enable TCP timestamps and SACK to make prediction harder. On Linux: </li>
</ol>

<h2 style="color: yellow;">`sysctl -w net.ipv4.tcp_timestamps=1`</h2>

<h2 style="color: yellow;">`sysctl -w net.ipv4.tcp_sack=1`</h2>

Windows mitigation: Enable TCP SYN attack protection via `netsh int tcp set global synattackprotect=normal`

For API security, always use TLS (Layer 6) – it renders session hijacking attempts useless because the attacker cannot decrypt the stream.

<ol>
<li>Layer 6 Deep Dive: TLS Cipher Suites and Certificate Validation
TLS operates at the Presentation layer – it encrypts, compresses, and formats data just before it leaves the sending host. Misconfigured TLS exposes applications to downgrade attacks and weak ciphers. </li>
</ol>

<h2 style="color: yellow;">Step‑by‑step TLS audit using OpenSSL:</h2>

<ol>
<li>Test supported ciphers – `openssl s_client -connect example.com:443 -cipher 'ECDHE-RSA-AES128-GCM-SHA256' -tls1_2` </li>
<li>Check certificate chain – `openssl s_client -connect example.com:443 -showcerts -servername example.com` </li>
<li>Verify against CRL/OCSP – `openssl ocsp -issuer ca.crt -cert server.crt -url http://ocsp.example.com`
4. Test for TLS 1.0/1.1 – `openssl s_client -connect example.com:443 -tls1` (will fail if properly disabled) </li>
</ol>

Cloud hardening: In AWS, enforce TLS 1.2+ on ALBs with a security policy like <code>ELBSecurityPolicy-TLS-1-2-2017-01</code>. In Azure, configure Application Gateway with trusted root certificates and disable weak ciphers via PowerShell.

<h2 style="color: yellow;">5. Layer 7: WAF Bypass and API Security</h2>

Web Application Firewalls inspect HTTP/HTTPS traffic – but they can be bypassed using encoding tricks, path confusion, or protocol smuggling.

<h2 style="color: yellow;">Step‑by‑step testing a WAF (authorized environment only):</h2>

<ol>
<li>Detect WAF fingerprint – Use `wafw00f https://target.com`
2. Test SQLi with case randomization – `curl -k "https://target.com/page?id=1'+OR+'1'='1"` </li>
<li>Try HTTP pipelining to confuse layer 7 inspection – Use `curl --http1.1 --header "Connection: keep-alive" -H "X-Forwarded-For: 127.0.0.1"` </li>
<li>Bypass using Unicode normalization – Send `%u0027` instead of a single quote. </li>
</ol>

<h2 style="color: yellow;">To harden a WAF itself:</h2>

<ul>
<li>Enable rate limiting on the WAF (not just the app). </li>
<li>Use positive security models (allowlist) rather than blocklists. </li>
<li>Deploy the WAF in front of an API gateway that validates OpenAPI schemas. </li>
</ul>

<h2 style="color: yellow;">Example API security header (NGINX):</h2>

[bash]
add_header X-Content-Type-Options "nosniff";
add_header Strict-Transport-Security "max-age=31536000; includeSubdomains; preload";
add_header Content-Security-Policy "default-src 'self'";
6. Encapsulation Forensics: Tcpdump + Wireshark Walkthrough
To truly see encapsulation in action, capture traffic and unwrap it manually.
Step‑by‑step:
- Start capture on Linux – `sudo tcpdump -i eth0 -w capture.pcap -s 1500`
- Send a simple HTTP request – `curl http://example.com`
3. Open in Wireshark – `wireshark capture.pcap
</h2>http`
<h2 style="color: yellow;">4. Apply display filter – - Follow the layers – Click on any packet; expand Ethernet II (Layer 2), then IP (Layer 3), then TCP (Layer 4), then HTTP (Layer 7). Notice that TLS (Layer 6) would sit between TCP and HTTP if HTTPS were used.
- Examine encapsulation overhead – Compare frame size (L1) to payload size (L7).
Windows alternative: Use `netsh trace start capture=yes` then `netsh trace stop` to generate an `.etl` file, which can be opened in Microsoft Message Analyzer or converted to pcap.
- OSI Layer Cheatsheet for CISSP and SOC Analysts
| Security Control / Attack | OSI Layer | Key Command to Inspect |
||–||
| IPSec (AH/ESP) | 3 (Network) | `ip xfrm state` (Linux) |
| TLS / SSL | 6 (Presentation) | `openssl s_client` |
| WAF / SQLi | 7 (Application) | `curl` + SQL payloads |
| ARP spoofing | 2 (Data Link) |arp -a, `tcpdump arp` |
| TCP SYN flood | 4 (Transport) | `netstat -s \| grep SYN` |
| VLAN hopping | 2 (Data Link) | `show vlan` (switch) |
| DNS over HTTPS | 7 (Application) | `dig +https` |Windows command to show all layers: `Get-NetAdapterStatistics -Name | fl` (provides L2 stats). For L3/L4, use `netstat -anob` and
Get-NetTCPConnection.What Bastien Biren Says
- Encapsulation is your mental map – Without visualizing each layer adding and removing headers, you will consistently misdiagnose whether a firewall, IDS, or encryption issue lies at L3, L4, or L7.
- Layer confusion kills exam points – On the CISSP, questions asking “where does TLS operate?” or “which protocol is vulnerable to ARP spoofing?” are freebies if you’ve internalized the 7‑layer wrapping process.
Analysis: Bastien’s infographic analogy of seven envelopes is more than a teaching trick – it directly maps to how packet analyzers and security tools present data. When a SOC analyst sees “TCP out‑of‑order,” they are witnessing a Layer 4 issue that could be caused by a Layer 3 routing change or Layer 2 congestion. Professionals who cannot mentally unwrap each layer waste hours chasing false positives. Moreover, modern zero‑trust architectures still rely on layer‑specific controls (e.g., L7 microsegmentation with proxies, L2 MAC filtering, L3 VXLAN). Mastering encapsulation is not academic nostalgia – it is the foundation of network defense.
Prediction
As network functions increasingly virtualize and move into the cloud (SD‑WAN, service meshes, eBPF), the physical boundaries between OSI layers blur – but the logical encapsulation model becomes more critical, not less. Attackers will continue to exploit layer‑agnostic blind spots, such as encapsulating malicious payloads inside legitimate L2 GRE tunnels or abusing L6 compression to evade DLP. Future CISSP exams will likely add questions on encapsulation in container networks (e.g., overlay vs. underlay) and encrypted L3 VPNs. Security engineers who internalize the seven‑layer unwrapping process will debug breaches in minutes, while others will drown in packet captures. The message is clear: learn encapsulation now, or spend 0.2 seconds per click forever guessing.
▶️ Related Video (70% Match):
🎯Let’s Practice For Free:
IT/Security Reporter URL:
Reported By: Biren Bastien – Hackers Feeds
Extra Hub: Undercode MoN
Basic Verification: Pass ✅🔐JOIN OUR CYBER WORLD [ CVE News • HackMonitor • UndercodeNews ]
📢 Follow UndercodeTesting & Stay Tuned:


