Listen to this Post
Introduction:
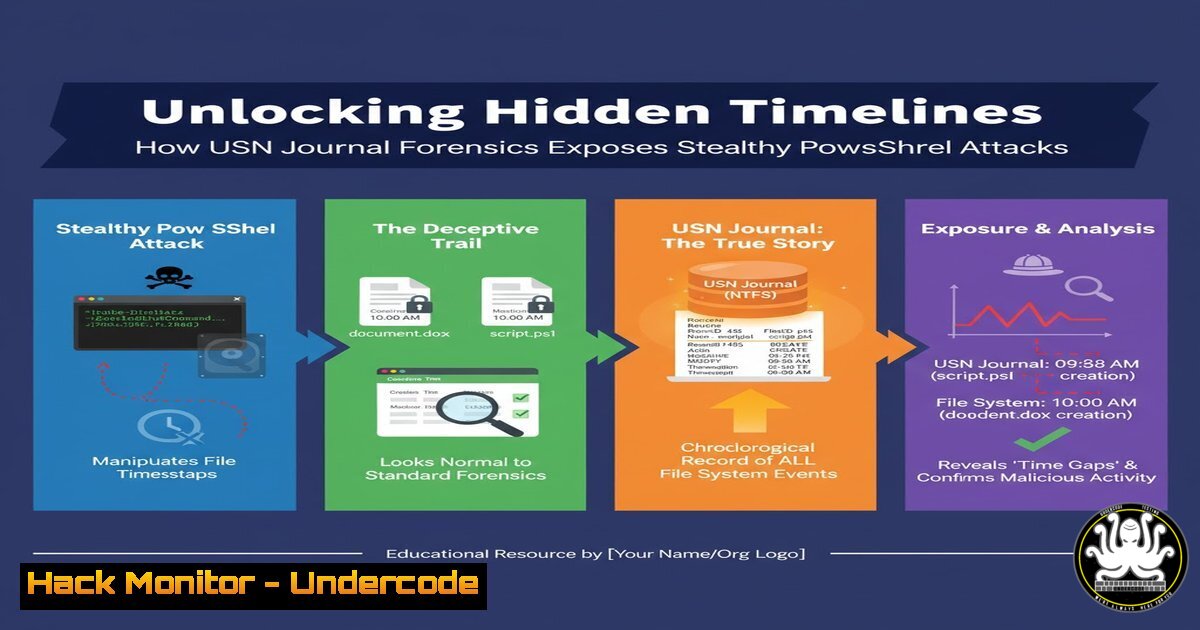
In digital forensics and incident response (DFIR), establishing an accurate timeline of attacker activity is paramount. While analysts often locate the commands an attacker executed via the PowerShell console history file, this data lacks intrinsic timestamps. A powerful technique, as highlighted by DFIR experts, leverages the USN (Update Sequence Number) Journal to correlate command entries with precise system events, transforming a simple command log into a chronological record of malicious action.
Learning Objectives:
- Understand the relationship between the PSReadLine history file and the USN Journal.
- Learn the step-by-step process to acquire and parse USN Journal data for timestamp correlation.
- Apply command-line tools on both Windows and Linux to build a definitive timeline of PowerShell execution.
You Should Know:
1. The Foundation: PSReadLine and the USN Journal
The `ConsoleHost_history.txt` file, maintained by the PSReadLine module, is a treasure trove for DFIR investigators. It records commands typed in a PowerShell console session. However, it is a simple text file appended to as commands are entered; it contains no metadata about when each command was run. This is where the USN Journal becomes critical. The USN Journal is a feature of the NTFS file system that logs all changes to files and directories. Every time a new command is appended to the history file, the USN Journal records a `DATA_EXTEND` or `DATA_ADDED` event. By extracting these records, we can determine the exact time each command was written to disk.
Step-by-Step Guide:
- Locate the History File: The typical path for a user’s PowerShell history is
%APPDATA%\Microsoft\Windows\PowerShell\PSReadLine\ConsoleHost_history.txt. - Conceptual Understanding: The USN Journal entry for a `DATA_EXTEND` operation on this file corresponds to a command being appended. The journal records these events in sequence, allowing you to align the last command in the file with the most recent USN record, the second-to-last with the previous record, and so on.
2. Acquiring the USN Journal Data
To perform this analysis, you first need to extract the USN Journal data for the volume containing the user’s profile. This requires elevated privileges. The native Windows tool for this is fsutil.
Step-by-Step Guide:
1. Open an Administrator Command Prompt or PowerShell.
- Identify the target drive. The user profile is typically on the C: drive.
- Use `fsutil` to generate a current snapshot of the USN Journal for a directory or file. To get all records for the history file, you can query its parent directory.
Query the USN Journal for the PSReadLine directory and output to a file
fsutil usn readjournal C: > C:\temp\usn_journal_c_drive.log
This command exports the entire journal for the C: drive, which can be very large. For a more targeted approach, third-party tools or scripts are often used.
-
Parsing USN Journal Entries for the History File
The raw output from `fsutil` is complex. You need to filter it for the specific File Reference Number (FRN) of the `ConsoleHost_history.txt` file. A more practical approach involves using PowerShell or a dedicated forensic tool to parse the journal.
Step-by-Step Guide with PowerShell:
A common method involves using the `Get-WinEvent` cmdlet to query the Microsoft-Windows-Ntfs/Operational log, which contains USN Journal events, though often disabled by default. Therefore, using a script or tool like `Parse-Evtx` or the raw `fsutil` output with `findstr` is common.
 A basic filter to find relevant entries in the exported USN log
findstr /i "ConsoleHost_history.txt" C:\temp\usn_journal_c_drive.log
Each resulting line will contain a timestamp and the type of change (e.g., DATA_EXTEND).
4. Correlating Commands with USN Timestamps
This is the core analytical step. You will have two lists: the list of commands from the history file (from last to first) and the list of `DATA_EXTEND` USN records for that file (from most recent to oldest).
Step-by-Step Guide:
1. Read the History File: `Get-Content .\ConsoleHost_history.txt`
- Extract USN Timestamps: From your parsed USN data, extract the System Time for each `DATA_EXTEND` event related to the history file.
- Align the Data: The last line of the history file corresponds to the most recent `DATA_EXTEND` USN timestamp. The first line of the history file corresponds to the oldest `DATA_EXTEND` timestamp you have for it. Create a simple table:
– Command 1 (Oldest) -> USN Timestamp 1
– Command 2 -> USN Timestamp 2
– …
– Command N (Most Recent) -> USN Timestamp N
5. Leveraging Linux Tools for Forensic Analysis
Forensic analysis is often performed on a captured disk image using Linux tools like The Sleuth Kit (TSK). The `ils` (inode list) command can list USN Journal entries if the journal is extracted as a file system artifact.
Step-by-Step Guide:
1. Process your disk image with TSK.
- Use `fls` with the `-r` and `-u` flags to recursively list deleted files and include USN Journal data.
fls -r -u /path/to/disk/image > timeline_body.txt
- Use `icat` to extract the history file itself.
icat /path/to/disk/image [inode-of-history-file] > ConsoleHost_history.txt
- Parse the `timeline_body.txt` file to find the USN records for the history file’s inode, filtering for “DATA_EXTEND” actions, and correlate the timestamps with the commands as previously described.
6. Advanced Scenario: Detecting Anti-Forensics
Sophisticated attackers may attempt to delete the history file or clear the USN Journal. The absence of the history file or a cleared journal in the context of other indicators of PowerShell use is itself a significant finding.
Step-by-Step Guide:
- Check for Journal Deletion: The USN Journal has a `$Max` and `$MaxChange` attribute. A sudden, significant change in these values can indicate the journal was recreated (cleared). This can be checked via
fsutil usn queryjournal C:. - File System Slack & Shadow Copies: If the history file was deleted, its contents might reside in unallocated space or file system slack. Tools like `foremost` or `scalpel` can attempt a carve. Additionally, check Volume Shadow Copies (VSS) for previous versions of the history file using the `vssadmin` command.
What Undercode Say:
- Timeline is Everything: This technique moves PowerShell command analysis from “what happened” to “when it happened,” which is critical for understanding the attack chain, establishing dwell time, and identifying the initial access vector.
- Evidence of Life: The USN Journal provides objective, system-level evidence of file activity that is difficult for an attacker to manipulate completely without leaving other traces, making it a highly reliable source for timeline construction.
The ability to tie a specific PowerShell command, such as a credential dumping invocation or a lateral movement attempt, to a precise moment in time is a game-changer for SOC and DFIR teams. It turns a basic indicator into a solid piece of evidence that can be directly linked to other events in the investigation, such as network connections or authentication logs. While not a simple “one-click” solution, mastering USN Journal correlation is a mark of a advanced investigator, providing a definitive method to reconstruct attacker actions that would otherwise remain obscured.
Prediction:
As attackers become more aware of forensic techniques like USN Journal analysis, we will see a rise in live-off-the-land anti-forensics. This will include not just deleting command history but also employing methods to directly tamper with or disable the USN Journal via native OS utilities or custom drivers. Furthermore, the increased adoption of EDR solutions that log command-line execution at the kernel level will force attackers to develop new methods that operate beneath this logging threshold, potentially leveraging memory-only execution or exploiting trusted application workflows to evade detection. The cat-and-mouse game will escalate from file system artifacts to the kernel and memory analysis realm.
🎯Let’s Practice For Free:
IT/Security Reporter URL:
Reported By: 0xhasanm Sundfirday – Hackers Feeds
Extra Hub: Undercode MoN
Basic Verification: Pass ✅


