Listen to this Post
Introduction:
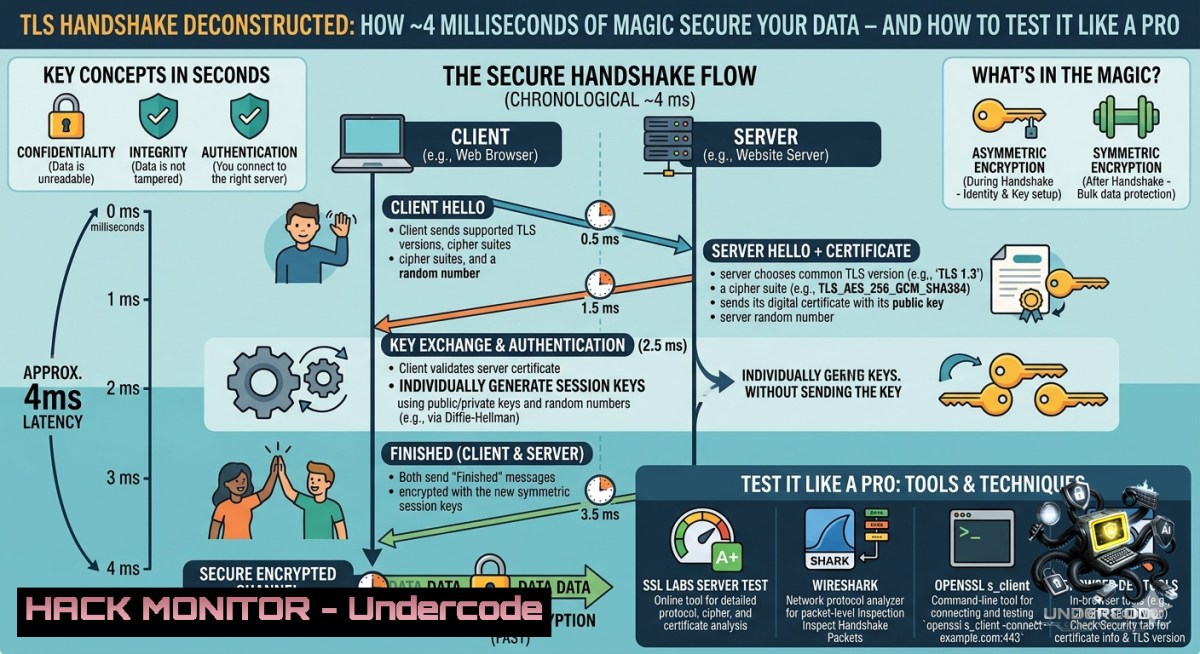
Every time you visit an HTTPS website, your browser and the server perform a silent cryptographic dance known as the TLS handshake – completing in under 4 milliseconds. This handshake authenticates the server, negotiates encryption algorithms, and establishes a shared session key, ensuring that all subsequent data remains private and tamper-proof. Understanding this process is critical for cybersecurity professionals, as misconfigurations or protocol vulnerabilities can expose sensitive information to attackers.
Learning Objectives:
- Understand the step-by-step flow of TLS 1.2 and 1.3 handshakes, including certificate validation and key exchange.
- Use OpenSSL,
curl, and native Windows tools to inspect certificates, test cipher suites, and diagnose handshake failures. - Identify and mitigate common TLS vulnerabilities (e.g., weak ciphers, expired certificates, protocol downgrade attacks) with practical hardening commands.
You Should Know:
- The 4-Step TLS Handshake – What Happens Behind the Scenes
The classic TLS 1.2 handshake proceeds as follows:
- ClientHello: Client sends supported TLS versions, cipher suites, and a random number.
- ServerHello + Certificate: Server chooses protocol/cipher, sends its digital certificate (containing its public key) and a random number.
- Client Key Exchange: Client verifies the certificate, generates a Pre-Master Secret, encrypts it with the server’s public key, and sends it.
- ChangeCipherSpec + Finished: Both sides derive the same session keys, switch to encrypted communication, and verify integrity.
Step‑by‑step simulation using OpenSSL (Linux/macOS/WSL):
 Simulate a client connecting to a TLS server and capture full handshake details
openssl s_client -connect google.com:443 -tls1_2 -debug -state

To see only the certificate chain
openssl s_client -connect google.com:443 -showcerts </dev/null

For Windows (using OpenSSL for Windows or WSL)
 Alternatively, use PowerShell's .NET classes:
$req = [System.Net.WebRequest]::Create("https://google.com")
$req.GetResponse()
$req.ServicePoint.Certificate
2. Inspecting Server Certificates – Validation and Troubleshooting
Certificates are the backbone of identity verification. You can extract and analyze them manually to detect expiration, mismatched CN/SAN, or weak signature algorithms.
Step‑by‑step guide:
Linux/macOS:
 Retrieve certificate from a server and decode it
echo | openssl s_client -connect example.com:443 -servername example.com 2>/dev/null | openssl x509 -text -1oout

Check certificate expiry date
echo | openssl s_client -connect example.com:443 2>/dev/null | openssl x509 -1oout -dates

Validate a certificate against a trusted CA bundle
openssl verify -CAfile /etc/ssl/certs/ca-certificates.crt server.crt
Windows (native):
 Use certutil to view remote certificate details
certutil -urlfetch -verify https://example.com

Export certificate from browser (manual) or use PowerShell
[System.Net.ServicePointManager]::ServerCertificateValidationCallback = {$true}
$web = New-Object System.Net.WebClient
$web.DownloadString("https://example.com")
- Testing TLS Vulnerabilities – Cipher Strength and Protocol Downgrade
Weak cipher suites (e.g., export-grade, RC4, CBC mode with MAC-then-Encrypt) and outdated protocols (SSLv3, TLS 1.0) are common entry points for attacks like POODLE, BEAST, and FREAK.
Step‑by‑step with `nmap` and testssl.sh:
 Enumerate supported TLS versions and ciphers using nmap
nmap --script ssl-enum-ciphers -p 443 example.com

Advanced scanning with testssl.sh (download from https://testssl.sh)
git clone https://github.com/drwetter/testssl.sh.git
cd testssl.sh
./testssl.sh --html --file output.html example.com

Check for specific weak ciphers manually with openssl
openssl s_client -connect example.com:443 -cipher 'RC4' -tls1_2
Windows alternative: Use PowerShell to test TLS versions:
try { Invoke-WebRequest -Uri "https://example.com" -ErrorAction Stop } catch { $_.Exception.Message }
4. Hardening TLS Configurations on Web Servers
To protect against known attacks, disable legacy protocols and weak ciphers, enable HSTS, and prefer forward secrecy ciphers.
Step‑by‑step for Nginx (Linux):
Edit `/etc/nginx/nginx.conf` or site-specific config:
server {
listen 443 ssl http2;
ssl_protocols TLSv1.2 TLSv1.3;
ssl_ciphers ECDHE-ECDSA-AES128-GCM-SHA256:ECDHE-RSA-AES128-GCM-SHA256:ECDHE-ECDSA-AES256-GCM-SHA384:ECDHE-RSA-AES256-GCM-SHA384;
ssl_prefer_server_ciphers off;  For TLS 1.3, prefer client order is fine
ssl_session_cache shared:SSL:10m;
ssl_session_timeout 1d;
add_header Strict-Transport-Security "max-age=31536000; includeSubDomains" always;
}
For Apache (Linux):
Edit `/etc/apache2/conf-available/ssl.conf`:
SSLProtocol -all +TLSv1.2 +TLSv1.3
SSLCipherSuite ECDHE-ECDSA-AES128-GCM-SHA256:ECDHE-RSA-AES128-GCM-SHA256:ECDHE-ECDSA-AES256-GCM-SHA384:ECDHE-RSA-AES256-GCM-SHA384
SSLHonorCipherOrder on
Header always set Strict-Transport-Security "max-age=31536000"
Verify configuration:
sudo nginx -t && sudo systemctl reload nginx
 or
sudo apache2ctl configtest && sudo systemctl reload apache2
5. Troubleshooting TLS Handshake Failures
Common errors include certificate name mismatch, expired CA, unsupported protocol, or firewall interference.
Step‑by‑step diagnostics:
- Check connectivity and protocol support:
curl -vI https://example.com --tlsv1.2
For Windows: curl.exe -vI https://example.com (using curl bundled with Win10/11)
-
Simulate a full handshake with debug output:
openssl s_client -connect example.com:443 -debug -msg -state
-
On Windows, check Schannel event logs:
Get-WinEvent -LogName "Microsoft-Windows-Schannel/Analytic" | Where-Object {$_.Id -in 36888,36874} -
Test with different TLS versions:
openssl s_client -connect example.com:443 -tls1_1  Should fail if disabled
openssl s_client -connect example.com:443 -tls1_2
6. Automating TLS Health Checks with Scripts
Regular scanning ensures configurations stay secure and certificates don’t expire unnoticed.
Bash script example (Linux):
!/bin/bash
HOST=$1
PORT=${2:-443}
echo "Checking $HOST:$PORT"
EXPIRY=$(echo | openssl s_client -servername $HOST -connect $HOST:$PORT 2>/dev/null | openssl x509 -1oout -enddate | cut -d= -f2)
DAYS_LEFT=$(( ($(date -d "$EXPIRY" +%s) - $(date +%s)) / 86400 ))
if [ $DAYS_LEFT -lt 7 ]; then echo "WARNING: Certificate expires in $DAYS_LEFT days"; else echo "OK: $DAYS_LEFT days left"; fi
PowerShell script (Windows):
$uri = "https://example.com"
$req = [Net.WebRequest]::Create($uri)
$req.GetResponse() | Out-1ull
$cert = $req.ServicePoint.Certificate
$daysLeft = ($cert.GetExpirationDateString() - (Get-Date)).Days
if ($daysLeft -lt 7) { Write-Warning "Certificate expires in $daysLeft days" } else { Write-Host "OK: $daysLeft days left" }
What Undercode Say:
- Key Takeaway 1: The TLS handshake is often oversimplified as “4 steps,” but each step involves complex cryptographic operations (certificate chain validation, ephemeral key exchange, PRF) that security teams must audit regularly.
- Key Takeaway 2: Dhari A.’s focus on “Identity verified, Secure key exchanged, Encrypted communication starts” perfectly captures the trust triad – but real-world attacks (e.g., TLS renegotiation, CRIME) target the handshake implementation, not just the protocol.
Analysis (10 lines):
The LinkedIn post effectively demystifies TLS for a broad audience, but cybersecurity professionals require deeper operational knowledge. For instance, step 3 (“Client verifies the certificate and securely exchanges a session key”) glosses over OCSP stapling, certificate revocation, and the difference between RSA and Diffie-Hellman key exchange. Moreover, TLS 1.3 streamlined the handshake to 1-RTT (0-RTT with session resumption), reducing latency – a detail critical for performance-sensitive applications. The post rightly emphasizes that this happens in milliseconds, yet misconfigured servers often fall back to TLS 1.0 or export ciphers, nullifying security. Practical takeaways: always disable SSLv3/TLSv1.0/TLSv1.1, enforce HSTS, and use tools like `testssl.sh` quarterly. Finally, never rely solely on certificate expiry alerts – automate validation with scripts to catch mis-issued or compromised certificates.
Prediction:
- +1 Wider adoption of TLS 1.3 will reduce handshake latency and eliminate obsolete cryptographic primitives, making encryption faster and more secure by default.
- +1 Automated certificate lifecycle management (e.g., Let’s Encrypt, ACME) will become mandatory for enterprises, reducing manual renewal failures.
- -1 Quantum computing advances threaten RSA and ECDSA within the next decade, forcing a migration to post-quantum TLS (e.g., KEM-based key exchange) – a costly transition.
- -1 As more organizations move to zero-trust architectures, TLS decryption at proxies will introduce new risks (weak ephemeral keys, performance bottlenecks) and attacker surfaces (e.g., private key theft from decryption appliances).
▶️ Related Video (68% Match):
🎯Let’s Practice For Free:
🎓 Live Courses & Certifications:
Join Undercode Academy for Verified Certifications
🚀 Request a Custom Project:
Secure, high-velocity infrastructure and disruptive technological engineering. Contact our engineering team for high-tier development and proprietary systems:
[email protected]
💎 Smart Architecture | 🛡️ Secure by Design | ⭐ Trusted by Thousands
IT/Security Reporter URL:
Reported By: Dhari Alobaidi – Hackers Feeds
Extra Hub: Undercode MoN
Basic Verification: Pass ✅


