Listen to this Post
Introduction:
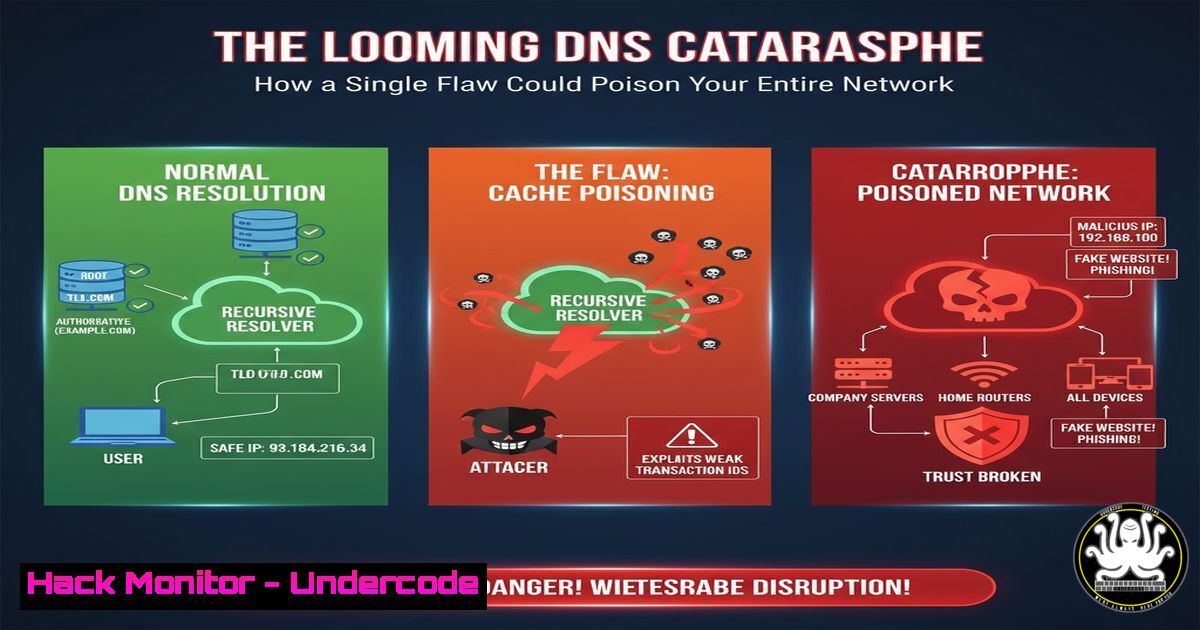
A critical new vulnerability, CVE-2025-40780, exposes fundamental weaknesses in the Domain Name System (DNS), the internet’s phonebook. This cache poisoning flaw allows attackers to corrupt DNS resolvers, redirecting legitimate traffic to malicious servers and enabling widespread data theft, financial fraud, and espionage. Understanding and mitigating these DNS threats is no longer optional for any organization operating online.
Learning Objectives:
- Understand the mechanics of DNS cache poisoning attacks and their business impact.
- Learn to implement immediate hardening techniques for common DNS resolvers like BIND and Unbound.
- Develop a proactive strategy for DNS security monitoring and management to prevent future incidents.
You Should Know:
1. Understanding the CVE-2025-40780 Threat Vector
The core of this vulnerability lies in the resolver’s transaction ID and source port predictability. An attacker who can spoof responses from a legitimate DNS server can poison the cache if these values are guessable.
Command to Check Your Resolver’s Cache:
 On a Linux system using systemd-resolved
sudo systemd-resolve --statistics | grep -A 10 "Cache"
 On a system running BIND
sudo rndc stats && sudo grep "cache" /var/named/data/named_stats.txt
Step-by-step guide:
The first command queries `systemd-resolved` for its cache statistics, allowing you to see the current size and hit rate. The second command dumps the statistics for the BIND name server; you then grep for cache entries to see its usage. Monitoring cache size anomalies can be an indicator of poisoning attempts or malicious activity.
2. Hardening BIND Against Cache Poisoning
BIND is the most widely used DNS software. Hardening its configuration is critical.
Key BIND Configuration Snippets (`/etc/bind/named.conf.options`):
options {
// Use a random source port for queries
query-source port random;
// Use a random transaction ID
random-device "/dev/urandom";
// Implement Response Rate Limiting (RRL) to mitigate flood attacks
rate-limit {
responses-per-second 10;
window 5;
};
// Restrict queries to legitimate clients only
allow-query { trusted-acls; };
// Use DNSSEC validation to ensure response authenticity
dnssec-validation auto;
};
Step-by-step guide:
Edit your BIND configuration file, typically located at /etc/bind/named.conf.options. The `query-source port random` directive forces BIND to use a random high-numbered port for outgoing queries, making it harder for an attacker to spoof the source. The `random-device` ensures strong entropy for transaction IDs. RRL helps prevent an attacker from flooding your server with fake responses. After making changes, always check the configuration with `sudo named-checkconf` and restart the service with sudo systemctl restart bind9.
3. Securing Unbound DNS Resolver
Unbound is a modern, security-focused recursive resolver. Its default configuration is often more robust, but it can be further hardened.
Unbound Configuration Snippets (`/etc/unbound/unbound.conf`):
server:
 Increase the number of outgoing ports to make spoofing harder
outgoing-range: 4096
 Use DNSSEC
auto-trust-anchor-file: "/var/lib/unbound/root.key"
 Prefetch DNS records to improve performance and resilience
prefetch: yes
 Aggressively use minimal responses to reduce data leakage
minimal-responses: yes
 Restrict access
access-control: 10.0.0.0/8 allow
access-control: 192.168.0.0/16 allow
Step-by-step guide:
The `outgoing-range` directive is crucial; it specifies how many random ports Unbound can use, dramatically increasing the difficulty of a poisoning attack. The `prefetch` option helps keep the cache fresh with valid data, leaving less room for poisoned entries. `minimal-responses` reduces the amount of information in responses, which can help mitigate certain attack vectors. Apply changes with `sudo unbound-checkconf` and sudo systemctl restart unbound.
4. Windows DNS Server Hardening
Windows Server DNS roles are equally vulnerable and require specific hardening steps.
PowerShell Commands for Windows DNS:
 Check DNS Server Cache
Get-DnsServerCache
 Set DNS Socket Pool Size to increase source port randomness
Set-DnsServerSetting -SocketPoolSize 2500
 Enable DNS Cache Locking to prevent overwrite of cached records
Set-DnsServerCacheSetting -LockingPercent 70
Step-by-step guide:
The `Get-DnsServerCache` cmdlet allows you to inspect the current cache entries. The `Set-DnsServerSetting -SocketPoolSize` command increases the pool of source ports the DNS server uses, analogous to the BIND and Unbound settings. A larger pool (e.g., 2500) makes spoofing harder. `Set-DnsServerCacheSetting -LockingPercent` enables cache locking; a value of 70 means a cached record cannot be overwritten for 70% of its Time-To-Live (TTL), effectively blocking most poisoning attempts until the record nears expiration.
5. Network-Level Mitigations with Firewall Rules
Beyond the DNS software itself, network controls can provide a strong defense layer.
iptables Rules to Rate-Limit DNS Traffic:
 Rate limit incoming DNS responses to prevent flooding
sudo iptables -A INPUT -p udp --dport 53 -m state --state NEW -m recent --set --name DNS
sudo iptables -A INPUT -p udp --dport 53 -m state --state NEW -m recent --update --seconds 10 --hitcount 5 --name DNS -j DROP
Step-by-step guide:
These `iptables` rules create a simple but effective rate limiter for new UDP connections on port 53 (DNS). The first rule adds the source IP of a new packet to a “DNS” list. The second rule checks if that same IP has sent more than 5 new packets in 10 seconds; if so, it drops the packet. This helps mitigate the flood of spoofed packets used in a cache poisoning attack. These rules should be applied on the firewall protecting your DNS resolver.
6. Validating DNS Health with Dig and Drill
Continuous validation is key. Use command-line tools to test your resolver’s integrity.
DNS Diagnostic Commands:
 Check for DNSSEC validation on a specific domain
dig example.com +dnssec
 Or using the newer 'drill' tool
drill example.com DNSKEY
 Test for cache poisoning by querying from multiple locations/recursors
dig @your-resolver-ip google.com A
 Compare the result with a known good resolver
dig @8.8.8.8 google.com A
Step-by-step guide:
The `dig +dnssec` command will return an `AD` (Authentic Data) flag in the header if DNSSEC validation was successful, confirming the response was not tampered with. Using `drill` to check for `DNSKEY` records is a more direct way to inspect the DNSSEC chain of trust. Regularly querying your own resolver for common domains and comparing the IP results with a known good resolver like Google’s (8.8.8.8) can help you detect if your cache has been poisoned.
7. Leveraging Threat Intelligence Feeds
Proactive security involves blocking known malicious domains before a query is even made.
Integrating Feeds with Unbound:
server:
 Include a list of blocklists
include: "/etc/unbound/blocklists.conf"

Inside blocklists.conf
server:
local-zone: "malicious-domain.com" redirect
local-data: "malicious-domain.com A 127.0.0.1"
 For a large list, use:
 include-toplevel: "/path/to/feeds/domains.list"
Step-by-step guide:
You can subscribe to threat intelligence feeds that provide lists of known malicious domains. By integrating these into your Unbound configuration using `local-zone` and `local-data` directives, you force the resolver to return a loopback address (127.0.0.1) for any query to these domains, effectively blocking access. For large lists, use the `include-toplevel` directive to reference a file containing thousands of blocked domains. This prevents internal clients from communicating with known bad actors.
What Undercode Say:
- The Cost of Complacency is Staggering: As referenced in the LinkedIn post, the financial damage from a single DNS-based attack can run into the billions, while the cost of prevention through expert consultation and proper hardening is a fraction of a percent of that potential loss. The Jaguar case is a stark reminder that no organization is immune.
- Automation is a Double-Edged Sword: The push for automation in cloud platforms (like AWS) can sometimes come at the expense of security, as standard, hardened configurations may not be the default. Relying solely on a single hyperscaler creates a dangerous single point of failure, contrary to the distributed DNA of the internet itself.
The analysis from the original post highlights a critical tension in modern IT: the drive for efficiency and automation versus the foundational requirements of security. The comments correctly point out that state-level actors and criminals are highly skilled at finding and exploiting these gaps. The revelation that even the NSA has recognized the danger of deliberately weakened systems (backdoors) underscores that security must be built-in, not bolted on. Relying on third-party DNS providers, while convenient, also introduces risks related to metadata collection and centralization. The ultimate takeaway is that DNS security cannot be an afterthought; it requires deliberate, expert-led configuration and continuous monitoring to protect against evolving threats like CVE-2025-40780.
Prediction:
The successful exploitation of vulnerabilities like CVE-2025-40780 will catalyze a paradigm shift in how organizations approach network-level trust. We will see a rapid, mandatory adoption of DNSSEC across all critical domains and a move away from relying on single, cloud-provider DNS services towards multi-vendor, anycast DNS architectures. In the next 3-5 years, AI-driven anomaly detection for DNS traffic will become a standard SIEM feature, automatically flagging and mitigating poisoning attempts in real-time. Furthermore, regulatory frameworks like NIS-2 will begin explicitly mandating and auditing for specific DNS hardening controls, making it a compliance requirement rather than a best practice.
🎯Let’s Practice For Free:
IT/Security Reporter URL:
Reported By: Bernhard Biedermann – Hackers Feeds
Extra Hub: Undercode MoN
Basic Verification: Pass ✅


