Listen to this Post
Introduction:
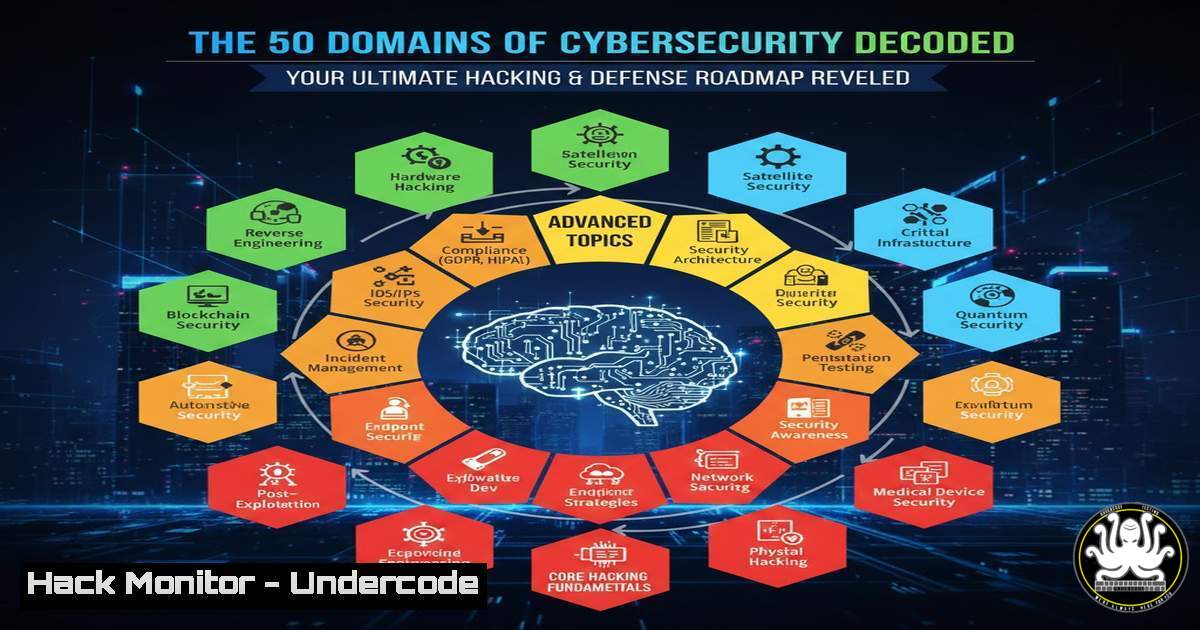
The modern cybersecurity landscape is a vast, interconnected battlefield spanning from network perimeters to AI-powered threat vectors. Understanding its 50+ specialized domains is no longer optional; it’s critical for building effective defense-in-depth strategies and advancing your career. This guide deconstructs the ecosystem into actionable pillars, providing the technical context and hands-on commands needed to navigate from core infrastructure to emerging tech security.
Learning Objectives:
- Map the six core pillars of cybersecurity to specific tools, technologies, and operational procedures.
- Execute fundamental commands and configurations across key domains including SIEM, PKI, and Cloud Security.
- Develop a structured learning path by selecting a primary specialization domain and identifying adjacent skill expansion opportunities.
You Should Know:
- Core Cyber Defense & Infrastructure: SIEM Deployment & Log Ingestion
Mastering Security Information and Event Management (SIEM) is foundational for any SOC. A SIEM aggregates and analyzes log data to identify anomalies. Here’s how to set up a basic ELK Stack (Elasticsearch, Logstash, Kibana) SIEM for log ingestion.
Step‑by‑step guide:
- Deploy Elasticsearch: This is the search and analytics engine.
On Ubuntu/Debian
wget -qO - https://artifacts.elastic.co/GPG-KEY-elasticsearch | sudo apt-key add -
sudo apt-get install apt-transport-https
echo "deb https://artifacts.elastic.co/packages/7.x/apt stable main" | sudo tee -a /etc/apt/sources.list.d/elastic-7.x.list
sudo apt-get update && sudo apt-get install elasticsearch
sudo systemctl start elasticsearch
sudo systemctl enable elasticsearch
- Install Logstash: This processes and pipes logs into Elasticsearch.
sudo apt-get install logstash
- Create a Logstash Config (
/etc/logstash/conf.d/syslog.conf) to ingest system logs:input { file { path => "/var/log/syslog" start_position => "beginning" } } filter { grok { match => { "message" => "%{SYSLOGTIMESTAMP:timestamp} %{SYSLOGHOST:hostname} %{DATA:program}(?:[%{POSINT:pid}])?: %{GREEDYDATA:message}" } } } output { elasticsearch { hosts => ["localhost:9200"] } }
4. Install Kibana: The visualization dashboard.
sudo apt-get install kibana
sudo systemctl start kibana
sudo systemctl enable kibana
5. Access Kibana at `http://your-server-ip:5601` to visualize the ingested syslog data.
- Identity, Access & Encryption: Building a Private PKI with OpenSSL
Public Key Infrastructure (PKI) underpins trust for TLS, code signing, and digital certificates. Setting up a root and issuing Certificate Authority (CA) is a critical skill.
Step‑by‑step guide:
- Create your Root CA Private Key and Self-Signed Certificate.
Generate private key for root CA
openssl genrsa -aes256 -out rootCA.key 4096
Create and self-sign the root certificate (valid for 10 years)
openssl req -x509 -new -nodes -key rootCA.key -sha256 -days 3650 -out rootCA.crt -subj "/C=US/ST=State/L=City/O=Org/CN=My Root CA"
2. Create an Issuing (Intermediate) CA.
 Generate intermediate CA key
openssl genrsa -out intermediateCA.key 4096
 Create CSR for intermediate
openssl req -new -key intermediateCA.key -out intermediateCA.csr -subj "/C=US/ST=State/L=City/O=Org/CN=My Issuing CA"
 Sign the intermediate cert with the root CA (requires a config file for v3 extensions)
openssl x509 -req -in intermediateCA.csr -CA rootCA.crt -CAkey rootCA.key -CAcreateserial -out intermediateCA.crt -days 1825 -sha256 -extfile openssl.cnf -extensions v3_ca
3. Issue a Server Certificate.
 Generate web server key
openssl genrsa -out server.key 2048
 Create CSR for server
openssl req -new -key server.key -out server.csr -subj "/C=US/ST=State/L=City/O=Org/CN=server.example.com"
 Sign the server cert with the intermediate CA
openssl x509 -req -in server.csr -CA intermediateCA.crt -CAkey intermediateCA.key -CAcreateserial -out server.crt -days 825 -sha256 -extfile openssl.cnf -extensions server_cert
Use `server.crt` and `server.key` on your web server (e.g., in Nginx/Apache configuration).
- Threat Intelligence & Operations: Mapping to MITRE ATT&CK with Atomic Red Team
Threat hunting requires understanding adversary behavior. The MITRE ATT&CK framework is the taxonomy. Use Atomic Red Team to execute simulated attacks and test your detection.
Step‑by‑step guide:
- Install Atomic Red Team on a test Windows system (requires PowerShell).
Install the Atomic Red Team module from PowerShell Gallery
Install-Module -Name AtomicRedTeam -Force -AllowPrerelease
Import the module
Import-Module AtomicRedTeam
Initialize to download atomics
Initialize-AtomicFolder
- Execute a specific atomic test (e.g., T1059.001 – Command-Line Interface: PowerShell).
List all available tests for a technique
Get-AtomicTechnique -Technique T1059.001
Execute a specific test by GUID
Invoke-AtomicTest T1059.001 -TestGuids 12345678-1234-1234-1234-123456789012
- Monitor your SIEM (like the ELK stack from Section 1) for the corresponding process creation events (
Process.Create), command-line logging, and PowerShell script block logging to build your detection rule. -
Digital Forensics & Data Security: Disk Image Acquisition & Analysis with `dd` & `autopsy`
Forensic integrity starts with proper disk imaging. The `dd` command is a standard for creating bit-for-bit copies.
Step‑by‑step guide:
- Identify the source disk (e.g., a compromised server’s disk
/dev/sdb).sudo fdisk -l
- Acquire a raw image to a secure external drive (
/mnt/evidence/).Basic acquisition. if=input file, of=output file, bs=block size. sudo dd if=/dev/sdb of=/mnt/evidence/case_001_image.dd bs=4M status=progress
3. Generate a hash for integrity verification.
 Hash the source disk
sudo sha256sum /dev/sdb > /mnt/evidence/source_hash.sha256
 Hash the image file
sha256sum /mnt/evidence/case_001_image.dd > /mnt/evidence/image_hash.sha256
 Compare the two hashes - they must match.
4. Analyze the image using a tool like Autopsy.
 Install Autopsy (Kali Linux)
sudo apt install autopsy
 Launch and point it to your `.dd` image file via the GUI.
Use Autopsy to browse the file system timeline, recover deleted files, and examine registry hives (Windows) or bash history (Linux).
- Emerging Tech & Advanced Controls: Hardening a Kubernetes Cluster (CKS Level)
Container orchestration security is non-negotiable. Key actions include enforcing Pod Security Standards and network policies.
Step‑by‑step guide:
- Enable Pod Security Admission (PSA) on your cluster. Edit the API server manifest (e.g., `/etc/kubernetes/manifests/kube-apiserver.yaml` on control plane nodes) to add:
</li>
</ol>

- --enable-admission-plugins=NodeRestriction,PodSecurity
2. Apply a restrictive Pod Security Standard namespace-wide. Create a namespace and label it.
kubectl create ns production
kubectl label ns production pod-security.kubernetes.io/enforce=restricted
Any pod violating the “restricted” standard will be blocked from starting.
3. Deploy a NetworkPolicy to deny all ingress traffic by default (whitelist model).apiVersion: networking.k8s.io/v1 kind: NetworkPolicy metadata: name: default-deny-ingress namespace: production spec: podSelector: {} Selects all pods in the namespace policyTypes: - Ingress ingress: [] Empty rule means no inbound traffic allowed4. Now, explicitly allow necessary traffic. For example, allow ingress to a web app from a specific front-end service.
What Undercode Say:
- Specialization is the Entry Point, Breadth is the Career Accelerator. Depth in one domain (e.g., reversing malware) gets you in the door. Understanding adjacent domains (like network forensics or threat intel) makes you indispensable and primes you for architectural or leadership roles.
- Theory Without Tooling is Just Philosophy. The cybersecurity domains are conceptual maps, but their value is realized only through hands-on execution. Proficiency is defined by your ability to configure the SIEM, break the encryption, or harden the cluster, not just name the concepts.
Analysis: The visual guide correctly frames cybersecurity as an ecosystem, not a monolith. The critical mistake newcomers make is attempting a horizontal, shallow learning path across all 50 domains simultaneously, leading to burnout and lack of employable depth. The prescribed strategy—”pick one path, go deep, then expand sideways”—is the optimal learning algorithm for this field. It mirrors the T-shaped skillset model: the vertical bar represents deep technical expertise in one pillar (e.g., Cloud Security), while the horizontal bar represents the collaborative literacy needed to interface with other pillars (e.g., understanding IAM when securing an AWS S3 bucket, or GRC when implementing controls). This approach directly combats imposter syndrome by providing a clear, milestone-driven path to competence and confidence.
Prediction:
The convergence of AI/ML Security, Supply Chain Security, and Cloud-Native technologies (Kubernetes, Service Meshes) will define the next frontline. AI will democratize advanced attack capabilities, making sophisticated phishing and vulnerability discovery accessible to lower-skilled threat actors. Conversely, AI-powered defense (automated threat hunting, anomaly detection) will become mandatory, collapsing the mean time to detection (MTTD). Professionals who build their deep specialization within one of the “Emerging Tech” domains, while maintaining strong connective tissue to foundational principles in encryption and secure architecture, will be positioned to lead the security transformations of the next decade. The “Purple Teaming” mindset will evolve from a nice-to-have to a baseline operational requirement, blurring the lines between the six pillars into a continuous, automated security feedback loop.
▶️ Related Video (82% Match):
🎯Let’s Practice For Free:
IT/Security Reporter URL:
Reported By: Umerazizrana Cybersecurity – Hackers Feeds
Extra Hub: Undercode MoN
Basic Verification: Pass ✅🔐JOIN OUR CYBER WORLD [ CVE News • HackMonitor • UndercodeNews ]
📢 Follow UndercodeTesting & Stay Tuned:


