Listen to this Post
Introduction:
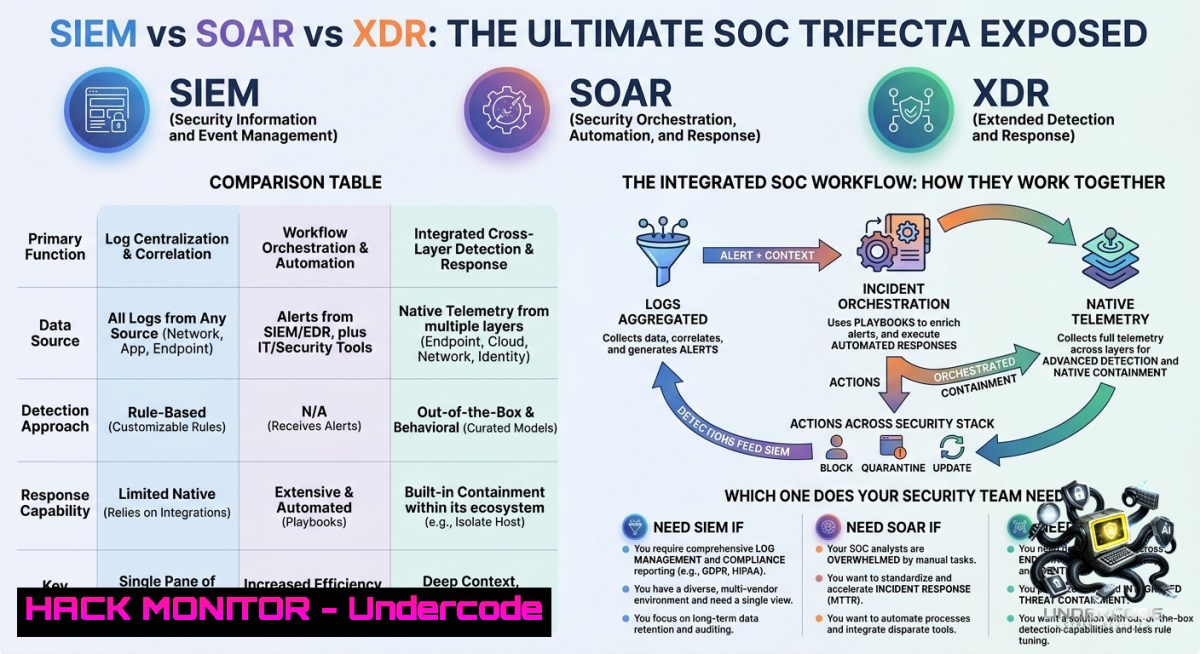
In modern security operations, organizations face an avalanche of alerts from endpoints, networks, and cloud environments. Security Information and Event Management (SIEM), Security Orchestration Automation and Response (SOAR), and Extended Detection and Response (XDR) are three distinct pillars that work together to provide visibility, automation, and cross‑layer threat detection. Understanding their differences and integration is crucial for building an efficient Security Operations Center (SOC) that can detect and stop attacks in real time.
Learning Objectives:
– Differentiate between SIEM (log collection and alerting), SOAR (playbook automation), and XDR (unified detection and response across endpoints, networks, and cloud).
– Implement basic SIEM log aggregation using open‑source tools, and write automated SOAR response scripts to block malicious IPs.
– Configure XDR‑style telemetry collection on Linux and Windows hosts, and correlate alerts in a simulated attack scenario.
You Should Know:
1. Building a Lightweight SIEM for Log Visibility
SIEM aggregates logs from firewalls, servers, applications, and cloud services to provide centralised visibility. A practical starting point is the ELK Stack (Elasticsearch, Logstash, Kibana) on an Ubuntu server.
Step‑by‑step guide to set up a basic SIEM collector:
 On Ubuntu 22.04 – install Elastic Stack
wget -qO - https://artifacts.elastic.co/GPG-KEY-elasticsearch | sudo apt-key add -
echo "deb https://artifacts.elastic.co/packages/7.x/apt stable main" | sudo tee /etc/apt/sources.list.d/elastic-7.x.list
sudo apt update && sudo apt install elasticsearch logstash kibana
 Start services
sudo systemctl enable elasticsearch kibana logstash
sudo systemctl start elasticsearch kibana logstash
Forward Linux system logs to Logstash (filebeat):
sudo apt install filebeat
sudo filebeat modules enable system
sudo filebeat setup --index-management -E output.logstash.enabled=false -E 'output.elasticsearch.hosts=["localhost:9200"]'
sudo systemctl start filebeat
Windows equivalent – forward Event Logs using Winlogbeat:
 Download and install Winlogbeat
Invoke-WebRequest -Uri "https://artifacts.elastic.co/downloads/beats/winlogbeat/winlogbeat-7.17.0-windows-x86_64.zip" -OutFile winlogbeat.zip
Expand-Archive .\winlogbeat.zip -DestinationPath C:\ProgramData\
 Configure to send to your SIEM server's Logstash (port 5044)
 Then start: .\install-service-winlogbeat.ps1; Start-Service winlogbeat
Now your SIEM collects logs – use Kibana dashboards to search for failed logins (`event.outcome: failure`) or suspicious process creations.
2. Automating Responses with SOAR – Python Playbook to Block an Attacker
SOAR turns SIEM alerts into actions without manual intervention. The example below polls a SIEM alert index (Elasticsearch) and executes a firewall block on Linux.
Step‑by‑step SOAR automation script:
!/usr/bin/env python3
 soar_blocker.py - Polls SIEM for high‑severity alerts and blocks source IPs
import requests, json, subprocess
from time import sleep

ELASTIC_URL = "http://localhost:9200/siem_alerts/_search"
QUERY = { "query": { "bool": { "must": [ { "term": { "severity": "high" } }, { "term": { "status": "new" } } ] } } }
HEADERS = {"Content-Type": "application/json"}

def block_ip(ip):
 Linux iptables rule
subprocess.run(["sudo", "iptables", "-A", "INPUT", "-s", ip, "-j", "DROP"])
 For Windows: netsh advfirewall firewall add rule name="Block_{ip}" dir=in action=block remoteip={ip}
print(f"[bash] Blocked {ip}")

while True:
resp = requests.get(ELASTIC_URL, json=QUERY, headers=HEADERS)
alerts = resp.json().get("hits", {}).get("hits", [])
for alert in alerts:
src_ip = alert["_source"]["source_ip"]
block_ip(src_ip)
 Mark as handled (update status)
doc_id = alert["_id"]
update = {"doc": {"status": "handled"}}
requests.post(f"http://localhost:9200/siem_alerts/_update/{doc_id}", json=update)
sleep(30)
Deploy as a systemd service to run continuously. This reduces mean time to respond (MTTR) from hours to seconds.
3. XDR‑Style Telemetry – Collecting Cross‑Layer Data with Sysmon and osquery
XDR unifies endpoint, network, and cloud signals. On Windows, Sysmon provides deep process, network, and file creation events. On Linux, osquery exposes system state as a relational database.
Install Sysmon on Windows (PowerShell as Admin):
 Download Sysmon from Microsoft
Invoke-WebRequest -Uri "https://live.sysinternals.com/Sysmon64.exe" -OutFile "$env:TEMP\Sysmon64.exe"
 Download a recommended configuration (SwiftOnSecurity)
Invoke-WebRequest -Uri "https://raw.githubusercontent.com/SwiftOnSecurity/sysmon-config/master/sysmonconfig-export.xml" -OutFile "$env:TEMP\sysmonconfig.xml"
 Install
& "$env:TEMP\Sysmon64.exe" -accepteula -i "$env:TEMP\sysmonconfig.xml"
Verify events in Windows Event Viewer under “Applications and Services Logs/Microsoft/Windows/Sysmon/Operational”.
On Linux, install osquery and schedule file integrity monitoring:
sudo apt install osquery
 Create a pack to monitor /etc/passwd changes
echo '{"queries":{"passwd_changes":{"query":"SELECT  FROM file WHERE path = \"/etc/passwd\";","interval":60}}}' | sudo tee /etc/osquery/packs/hardening.conf
sudo osqueryd --flagfile=/etc/osquery/osquery.flags --config_path=/etc/osquery/osquery.conf
Now your XDR layer can detect a modified `/etc/passwd` or a suspicious new process (e.g., `powershell.exe -enc …`) across all endpoints.
4. Integrating the Triad – Simulate a Ransomware Attack and Respond
Combine SIEM (logs), SOAR (automation), and XDR (telemetry) in a realistic scenario: a workstation downloads a malicious payload.
Step‑by‑step SOC workflow:
1. XDR detects `powershell.exe` making an outbound connection to a known C2 IP (via Sysmon event ID 3).
2. SIEM collects the event from the Windows host, correlates with surrounding process tree, and raises a `high` alert.
3. SOAR playbook (as in section 2) triggers and executes:
– Isolate the host via Windows Defender Firewall:
netsh advfirewall firewall add rule name="Isolate_Host" dir=out action=block remoteip=any
– Kill the malicious process:
taskkill /PID <ProcessID> /F
– Log the incident to a ticketing system via API.
Manual verification commands on Linux (if attacker uses Linux):
 Find processes connecting to suspect IP
sudo lsof -i @185.130.5.253
 Block with iptables
sudo iptables -A OUTPUT -d 185.130.5.253 -j DROP
5. Cloud Hardening and API Security – Extending SIEM to AWS
Modern SIEM must ingest cloud logs. AWS CloudTrail provides API call logs – essential to detect misconfigured S3 buckets or leaked keys.
Send AWS CloudTrail to your SIEM (ELK) via S3 and Lambda:
 Enable CloudTrail in AWS CLI
aws cloudtrail create-trail --1ame SIEM-Trail --s3-bucket-1ame my-security-logs --is-multi-region-trail
aws cloudtrail start-logging --1ame SIEM-Trail
Use a Lambda function to forward new log files to Logstash (HTTP output). Alternatively, configure a Logstash input with S3 plugin:
input {
s3 {
bucket => "my-security-logs"
prefix => "AWSLogs/"
region => "us-east-1"
codec => "json"
}
}
Monitor for API security events – search SIEM for `eventName: “GetObject”` without MFA, or `errorCode: “AccessDenied”` spikes.
6. Vulnerability Mitigation Commands – From SIEM Alert to Patch
When a SIEM alert shows an exploit attempt (e.g., Log4j JNDI injection), immediate commands can stop the bleeding.
On Linux (block exploitation patterns at the network layer):
 Drop packets containing JNDI strings (crude but fast)
sudo iptables -A INPUT -m string --string "\${jndi:" --algo bm -j DROP
 Or use fail2ban to parse SIEM logs and ban IPs
sudo fail2ban-client set log4j-ban addignoreip <attacker_ip>
On Windows (disable vulnerable service temporarily):
 Stop and disable a vulnerable Tomcat service
Stop-Service -1ame "Tomcat9" -Force
Set-Service -1ame "Tomcat9" -StartupType Disabled
 Use Windows Defender ATP to isolate machine via PowerShell cmdlet (if XDR enabled)
Start-DeviceIsolation -DeviceName "CompromisedPC"
Hardening the SIEM itself – apply TLS to Elasticsearch:
 Generate CA and certificates (using openssl)
sudo /usr/share/elasticsearch/bin/elasticsearch-certutil cert --ca --pem --out config/certs.zip
 Unzip and set permissions, then enable xpack.security.http.ssl.enabled in elasticsearch.yml
What Undercode Say:
– Key Takeaway 1: SIEM alone creates alert fatigue; SOAR reduces manual work by automating repetitive responses, while XDR provides the deeper context needed to distinguish real threats from noise.
– Key Takeaway 2: The “Simple SOC Flow” in the post – data to SIEM, then SOAR, then XDR – works only when tools are integrated via APIs; otherwise they remain silos.
– Analysis: The post brilliantly distills three overhyped acronyms into actionable roles. Many vendors blur the lines (e.g., SIEM with SOAR add-ons), but the core value remains: visibility without automation is slow, automation without quality detection is dangerous. XDR’s cross‑layer visibility prevents attackers from pivoting from endpoint to server undetected. A missing piece is the need for metrics – mean time to detect (MTTD) and respond (MTTR) should guide which tool to invest in first. For small teams, a cloud‑native XDR with built‑in SOAR capabilities (like Microsoft 365 Defender or CrowdStrike Falcon) often yields faster ROI than cobbling together open‑source SIEM. However, for compliance‑driven industries (PCI‑DSS, HIPAA), a full SIEM with long‑term log storage remains mandatory. The post’s one‑sentence summary is a perfect cheat sheet for any security leader.
Prediction:
– +1 The convergence of SIEM, SOAR, and XDR will accelerate toward “SXO” platforms by 2027 – AI‑driven solutions that automatically ingest logs, recommend playbooks, and execute responses without human tuning, dramatically reducing average incident response time from hours to seconds.
– -1 As XDR adoption grows, many legacy SIEM vendors will struggle to provide real‑time detection across cloud and on‑prem, leading to a rise in “Franken‑stacks” where disconnected tools increase complexity and blind spots, potentially causing missed breaches during the migration phase.
– +1 Open‑source SOAR frameworks (like Shuffle or TheHive/Cortex) will gain enterprise traction, lowering the barrier for small SOC teams to automate responses against commodity malware, leveling the playing field against well‑funded adversaries.
– -1 Over‑automation without proper validation loops could allow attackers to abuse SOAR playbooks – e.g., flooding SIEM with fake alerts to trigger blocking of legitimate IPs (denial of service). Future SOAR must incorporate trust scoring and human‑in‑the‑loop fallbacks.
▶️ Related Video (72% Match):
🎯Let’s Practice For Free:
🎓 Live Courses & Certifications:
[Join Undercode Academy for Verified Certifications](https://undercode.co.uk/certifications/)
🚀 Request a Custom Project:
Secure, high-velocity infrastructure and disruptive technological engineering. Contact our engineering team for high-tier development and proprietary systems:
[[email protected]](mailto:[email protected])
💎 Smart Architecture | 🛡️ Secure by Design | ⭐ Trusted by Thousands
IT/Security Reporter URL:
Reported By: [Dhari Alobaidi](https://www.linkedin.com/posts/dhari-alobaidi_cybersecurity-soc-siem-ugcPost-7467766364003323904-dz2f/) – Hackers Feeds
Extra Hub: Undercode MoN
Basic Verification: Pass ✅
🔐JOIN OUR CYBER WORLD [ CVE News • HackMonitor • UndercodeNews ]
[💬 Whatsapp](https://undercode.help/whatsapp) | [💬 Telegram](https://t.me/UndercodeCommunity)
📢 Follow UndercodeTesting & Stay Tuned:
[𝕏 formerly Twitter 🐦](https://x.com/undercodeupdate) | [@ Threads](https://www.threads.net/@undercodetesting) | [🔗 Linkedin](https://www.linkedin.com/company/undercodetesting/) | [🦋BlueSky](https://bsky.app/profile/undercode.bsky.social)


