Listen to this Post
Introduction
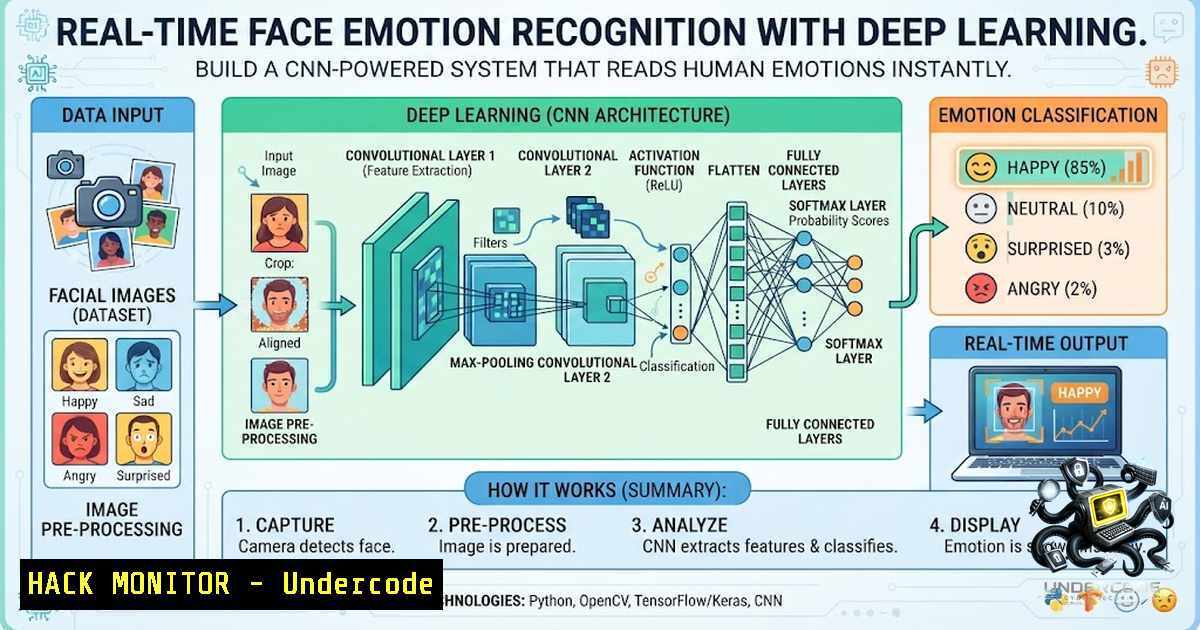
Facial emotion recognition is one of the most compelling applications of computer vision and deep learning, sitting at the intersection of artificial intelligence, psychology, and human-computer interaction. By leveraging Convolutional Neural Networks (CNNs) and real-time video processing, developers can build systems that detect human faces from a webcam feed and classify emotional states—such as happiness, sadness, anger, surprise, fear, and neutrality—with impressive accuracy. This article walks through the complete workflow of building an end-to-end real-time face emotion recognition system using Python, TensorFlow/Keras, and OpenCV, covering everything from dataset preparation and model architecture to live deployment and performance optimization.
Learning Objectives
- Understand the end-to-end deep learning pipeline for image classification, from data preprocessing to real-time inference.
- Build and train a Convolutional Neural Network (CNN) using TensorFlow/Keras for facial emotion recognition.
- Integrate the trained model with OpenCV for real-time face detection and emotion prediction via webcam.
- Apply regularization techniques such as dropout and batch normalization to improve model generalization.
- Deploy the emotion recognition system as a standalone application and explore pathways to web-based deployment.
You Should Know
1. Understanding the CNN Architecture for Emotion Recognition
The core of any modern emotion recognition system is a well-designed Convolutional Neural Network. CNNs are particularly effective for image classification because they automatically learn hierarchical features—from simple edges and textures to complex facial structures like eyes, eyebrows, and mouth positions.
A typical CNN architecture for this task includes:
- Convolutional Layers – Extract spatial features using learnable filters.
- ReLU Activation – Introduce non-linearity to help the network learn complex patterns.
- Max Pooling Layers – Reduce spatial dimensions, decreasing computational load and providing translational invariance.
- Batch Normalization – Stabilize and accelerate training by normalizing activations.
- Dropout Layers – Prevent overfitting by randomly deactivating a fraction of neurons during training.
- Fully Connected (Dense) Layers – Perform high-level reasoning based on extracted features.
- Softmax Output Layer – Produce probability scores for each emotion class.
Code Snippet – Building a CNN in TensorFlow/Keras:
import tensorflow as tf
from tensorflow.keras import layers, models

def build_emotion_cnn(input_shape=(48, 48, 1), num_classes=7):
model = models.Sequential([
layers.Conv2D(32, (3, 3), activation='relu', input_shape=input_shape),
layers.BatchNormalization(),
layers.MaxPooling2D((2, 2)),
layers.Dropout(0.25),

layers.Conv2D(64, (3, 3), activation='relu'),
layers.BatchNormalization(),
layers.MaxPooling2D((2, 2)),
layers.Dropout(0.25),

layers.Conv2D(128, (3, 3), activation='relu'),
layers.BatchNormalization(),
layers.MaxPooling2D((2, 2)),
layers.Dropout(0.25),

layers.Flatten(),
layers.Dense(256, activation='relu'),
layers.BatchNormalization(),
layers.Dropout(0.5),
layers.Dense(num_classes, activation='softmax')
])
return model

model = build_emotion_cnn()
model.compile(optimizer='adam', loss='categorical_crossentropy', metrics=['accuracy'])
model.summary()
2. Dataset Preparation and Preprocessing Pipeline
The quality of your training data directly determines model performance. The most widely used dataset for facial emotion recognition is FER2013, which contains 35,887 grayscale images of 48×48 pixels, labeled across seven emotion categories: Angry, Disgust, Fear, Happy, Sad, Surprise, and Neutral. However, many implementations (including the reference project) use a subset of emotions such as Happy, Sad, Angry, Fear, Neutral, and Surprise.
Critical preprocessing steps:
- Organize data into emotion-wise folders – TensorFlow’s `image_dataset_from_directory` can automatically assign labels based on folder names.
- Resize all images to a consistent input size (e.g., 48×48 or 64×64).
- Normalize pixel values to the range [0, 1] by dividing by 255.0 – this helps the model converge faster.
- Apply data augmentation (rotation, zoom, horizontal flip) to increase dataset diversity and reduce overfitting.
- Split data into training and validation sets (typically 80/20).
> Code Snippet – Loading and Preprocessing Data:
from tensorflow.keras.preprocessing.image import ImageDataGenerator

train_datagen = ImageDataGenerator(
rescale=1./255,
rotation_range=20,
zoom_range=0.2,
horizontal_flip=True,
validation_split=0.2
)

train_generator = train_datagen.flow_from_directory(
'dataset/train',
target_size=(48, 48),
color_mode='grayscale',
batch_size=64,
class_mode='categorical',
subset='training'
)

validation_generator = train_datagen.flow_from_directory(
'dataset/train',
target_size=(48, 48),
color_mode='grayscale',
batch_size=64,
class_mode='categorical',
subset='validation'
)
3. Model Training: Strategies for Accuracy and Generalization
Training a deep learning model requires careful monitoring to avoid overfitting—a scenario where the model performs well on training data but fails to generalize to unseen examples. The reference project emphasizes several challenges encountered during training, including inconsistent predictions due to lighting variations and face positioning.
Key training strategies:
- Use Early Stopping – Halt training when validation performance stops improving.
- Apply Dropout and Batch Normalization – These regularization techniques force the network to learn robust, generalizable features.
- Monitor both training and validation accuracy/loss to detect overfitting early.
- Experiment with learning rate scheduling – Reduce the learning rate when validation loss plateaus.
- Save the best model during training using `ModelCheckpoint` callback.
> Code Snippet – Training with Callbacks:
from tensorflow.keras.callbacks import EarlyStopping, ModelCheckpoint, ReduceLROnPlateau

callbacks = [
EarlyStopping(monitor='val_loss', patience=10, restore_best_weights=True),
ModelCheckpoint('emotion_model.keras', monitor='val_accuracy', save_best_only=True),
ReduceLROnPlateau(monitor='val_loss', factor=0.2, patience=5, min_lr=1e-6)
]

history = model.fit(
train_generator,
epochs=100,
validation_data=validation_generator,
callbacks=callbacks
)
After training, the model is saved as `emotion_model.keras` for later use in real-time prediction.
4. Real-Time Webcam Integration with OpenCV
The most exciting part of this project is deploying the trained model for live emotion recognition. The integration pipeline uses OpenCV to capture video frames, detect faces, and feed cropped face images to the CNN for prediction.
Step-by-step real-time prediction pipeline:
1. Capture frame from webcam using OpenCV’s `VideoCapture`.
- Detect faces – OpenCV’s Haar Cascade classifier or a more accurate deep learning-based detector can be used.
- Crop the detected face region from the frame.
- Preprocess the cropped image – resize to the model’s expected input size (e.g., 48×48), convert to grayscale, and normalize pixel values.
- Pass the preprocessed image to the trained CNN model.
- Obtain emotion probabilities from the softmax output layer.
- Display the predicted emotion with confidence score on the webcam frame.
> Code Snippet – Real-Time Emotion Recognition:
import cv2
import numpy as np
from tensorflow.keras.models import load_model

Load the trained model
model = load_model('emotion_model.keras')
emotion_labels = ['Angry', 'Disgust', 'Fear', 'Happy', 'Sad', 'Surprise', 'Neutral']

Initialize webcam
cap = cv2.VideoCapture(0)
face_cascade = cv2.CascadeClassifier(cv2.data.haarcascades + 'haarcascade_frontalface_default.xml')

while True:
ret, frame = cap.read()
gray = cv2.cvtColor(frame, cv2.COLOR_BGR2GRAY)
faces = face_cascade.detectMultiScale(gray, scaleFactor=1.3, minNeighbors=5)

for (x, y, w, h) in faces:
roi_gray = gray[y:y+h, x:x+w]
roi_gray = cv2.resize(roi_gray, (48, 48))
roi_gray = roi_gray / 255.0
roi_gray = np.expand_dims(roi_gray, axis=0)
roi_gray = np.expand_dims(roi_gray, axis=-1)

predictions = model.predict(roi_gray, verbose=0)
emotion = emotion_labels[np.argmax(predictions)]
confidence = np.max(predictions)  100

cv2.rectangle(frame, (x, y), (x+w, y+h), (0, 255, 0), 2)
cv2.putText(frame, f'{emotion}: {confidence:.2f}%', (x, y-10),
cv2.FONT_HERSHEY_SIMPLEX, 0.9, (0, 255, 0), 2)

cv2.imshow('Emotion Recognition', frame)
if cv2.waitKey(1) & 0xFF == ord('q'):
break

cap.release()
cv2.destroyAllWindows()
> Linux/Windows Setup Commands:
 Clone the repository
git clone https://github.com/archisharma158-cmd/Face-Emotion-Recognition-System.git
cd Face-Emotion-Recognition-System

Create a virtual environment (recommended)
python -m venv venv
source venv/bin/activate  Linux/macOS
venv\Scripts\activate  Windows

Install dependencies
pip install -r requirements.txt

Run the webcam prediction
python webcam_prediction.py
5. Common Pitfalls and Troubleshooting
The reference project documents several practical challenges that developers frequently encounter:
- Shape Mismatch Errors – Ensure that images passed during prediction have the exact same dimensions as those used during training. Consistent resizing is critical.
- Preprocessing Inconsistencies – Always apply the same normalization (e.g., dividing by 255.0) during both training and inference.
- TensorFlow/Keras Version Conflicts – Use compatible versions across all dependencies. A `requirements.txt` file helps maintain consistency.
- Poor Webcam Predictions – Lighting conditions, face angles, and image quality significantly affect accuracy. Improved preprocessing and data augmentation during training enhance robustness.
- GitHub Repository Organization – Maintain a clean project structure with separate folders for datasets, models, source code, and documentation.
6. Deployment Pathways: From Local to Web Application
While running the system locally is impressive, deploying it as a web application significantly expands its accessibility. Common deployment approaches include:
- Flask Web Framework – Create a web interface that captures video from the user’s camera and streams it to the backend for emotion prediction.
- Streamlit – A lightweight option for building data science web apps with minimal code.
- Docker Containerization – Package the application with all dependencies for consistent deployment across environments.
- Cloud Platforms – Deploy on AWS, Google Cloud, or Azure using services like AWS SageMaker or Google AI Platform.
> Flask Deployment Snippet (Backend Endpoint):
from flask import Flask, request, jsonify
import cv2
import numpy as np
from tensorflow.keras.models import load_model

app = Flask(<strong>name</strong>)
model = load_model('emotion_model.keras')

@app.route('/predict', methods=['POST'])
def predict():
file = request.files['image']
img = cv2.imdecode(np.frombuffer(file.read(), np.uint8), cv2.IMREAD_GRAYSCALE)
img = cv2.resize(img, (48, 48)) / 255.0
img = np.expand_dims(img, axis=(0, -1))
pred = model.predict(img, verbose=0)
emotion = emotion_labels[np.argmax(pred)]
return jsonify({'emotion': emotion, 'confidence': float(np.max(pred))})
7. Future Enhancements and Industry Applications
The foundational system described here opens the door to numerous enhancements:
- Support for More Emotions – Expand the dataset to include additional emotional states.
- Improved Face Detection – Replace Haar Cascade with more accurate models like MTCNN or YuNet.
- Higher Accuracy – Fine-tune pre-trained models (e.g., ResNet, Mini-Xception) for better performance.
- Mobile Deployment – Convert the model to TensorFlow Lite for on-device inference on Android/iOS.
- Emotion Tracking Over Time – Log and visualize emotional trends for applications in mental health monitoring, education, and customer feedback analysis.
What Undercode Say
- End-to-End Deep Learning Mastery – This project exemplifies the complete deep learning workflow: data preparation, model architecture design, training with regularization, and real-time deployment. It’s an ideal portfolio piece for aspiring AI/ML engineers.
-
Practical Computer Vision Integration – The seamless integration of OpenCV for face detection with TensorFlow/Keras for emotion classification demonstrates how to bridge computer vision and deep learning in production-ready applications.
The real strength of this system lies not just in its ability to recognize emotions, but in the structured, methodical approach to solving a complex computer vision problem. By addressing challenges like preprocessing consistency, overfitting, and real-time performance, the developer has built a robust foundation that can be extended to more sophisticated applications—from mental health monitoring and driver fatigue detection to personalized marketing and human-robot interaction. The project also highlights the importance of clean code, proper documentation, and version control, making it a valuable learning resource for the broader developer community.
Prediction
- +1 The demand for real-time emotion recognition systems will continue to grow across industries including healthcare (mental health monitoring), automotive (driver state detection), education (student engagement analysis), and retail (customer experience optimization). Developers with hands-on experience in this domain will be highly sought after.
-
+1 As edge computing and on-device AI mature, we can expect to see lightweight versions of these models deployed directly on smartphones and IoT devices, enabling privacy-preserving emotion analysis without sending video data to the cloud.
-
-1 Ethical and privacy concerns surrounding facial emotion recognition—particularly regarding consent, bias, and surveillance—will likely lead to increased regulatory scrutiny. Developers must prioritize transparent data handling, fairness in model training, and user opt-in mechanisms.
-
+1 Transfer learning and foundation models will further accelerate progress in this field, allowing developers to achieve state-of-the-art accuracy with smaller datasets and shorter training times, democratizing access to advanced emotion recognition capabilities.
▶️ Related Video (76% Match):
https://www.youtube.com/watch?v=-q2u0Xd2oCA
🎯Let’s Practice For Free:
🎓 Live Courses & Certifications:
Join Undercode Academy for Verified Certifications
🚀 Request a Custom Project:
Secure, high-velocity infrastructure and disruptive technological engineering. Contact our engineering team for high-tier development and proprietary systems:
[email protected]
💎 Smart Architecture | 🛡️ Secure by Design | ⭐ Trusted by Thousands
IT/Security Reporter URL:
Reported By: Archi Sharma – Hackers Feeds
Extra Hub: Undercode MoN
Basic Verification: Pass ✅


