Listen to this Post
Introduction:
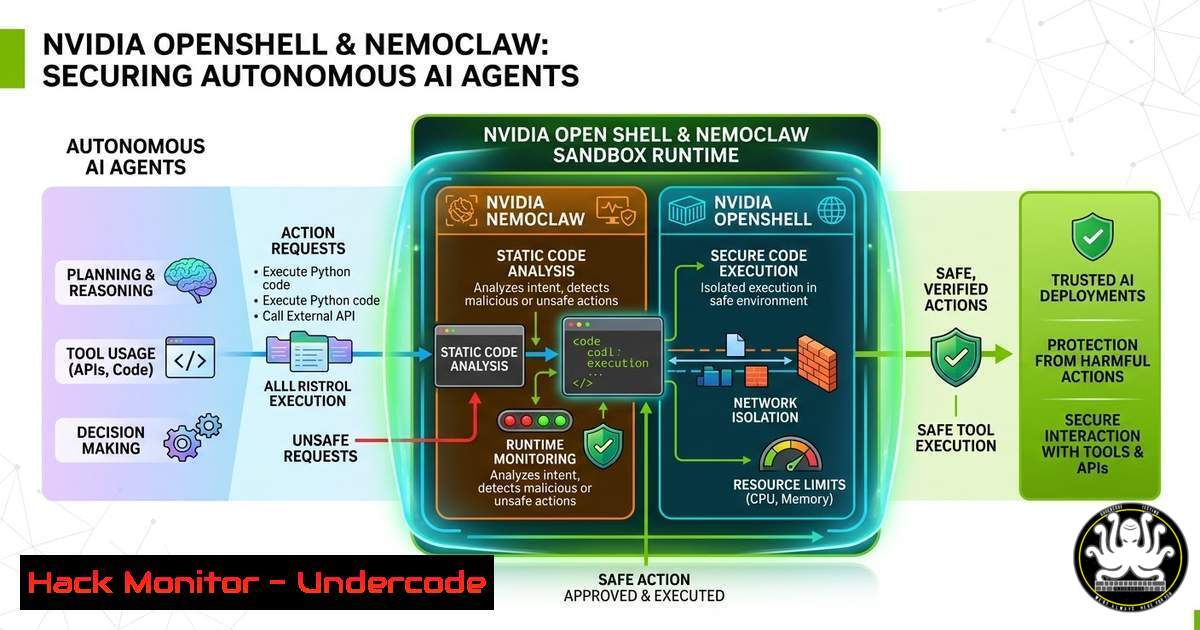
The proliferation of autonomous AI agents like Code, Codex, and OpenClaw has introduced a critical security paradox: how do we harness their productivity without granting them unfettered access to our infrastructure? NVIDIA has addressed this challenge head-on with the release of OpenShell, an open-source security runtime, and NemoClaw, a plugin stack designed to sandbox these agents. These tools provide a “defense-in-depth” strategy by isolating agents in a K3s cluster running inside a Docker container, enforcing strict YAML-based policies on file systems, networks, and processes to prevent data exfiltration and unauthorized access .
Learning Objectives:
- Understand the four-layer defense architecture (Filesystem, Network, Process, Inference) implemented by NVIDIA OpenShell.
- Learn how to install and deploy a sandboxed AI agent using NemoClaw and OpenShell with single-command execution.
- Configure declarative YAML policies to control agent behavior, manage credentials securely, and integrate with enterprise security platforms like CrowdStrike.
You Should Know:
1. Understanding OpenShell’s Defense-in-Depth Architecture
OpenShell operates on a “deny-by-default” principle, meaning an AI agent starts with zero permissions. It applies security controls at four distinct layers, combining static locks with dynamic hot-reloadable policies to balance security with operational flexibility .
The architecture runs as a K3s cluster inside a single Docker container, which simplifies deployment while maintaining strong isolation. The Filesystem and Process policies are locked at sandbox creation time. This means an agent cannot suddenly attempt to read `/etc/passwd` or escalate privileges after it starts running. Conversely, the Network and Inference policies are hot-reloadable, allowing administrators to adjust outbound connections or model routing without stopping the agent .
Step‑by‑step guide explaining what this does and how to use it:
To understand how these layers interact, consider the lifecycle of a command. When an agent tries to write a file:
1. Sandbox Creation: You define a policy restricting writes to /sandbox/output.
2. Execution: The agent executes `write /etc/shadow`.
3. Interception: OpenShell’s kernel-level interceptors block the syscall.
- Logging: The action is logged in the TUI, and the agent is denied.
If the agent attempts a network call, the Privacy Router can intercept it, strip the agent’s credentials, and inject managed backend credentials to route the request to an approved model or block it entirely .
2. Installing and Deploying NemoClaw for OpenClaw
NVIDIA has streamlined the installation process to a single command, making it accessible for developers who want immediate security without complex configuration. NemoClaw acts as the bridge between the OpenClaw assistant and the OpenShell runtime, handling the orchestration of the sandbox, blueprint, and inference provider .
This setup requires a Linux environment (Ubuntu 22.04 LTS or later), Docker, and Node.js 20+. The installer handles the heavy lifting, pulling the necessary container images and setting up the K3s cluster automatically. For optimal performance, NVIDIA recommends at least 8GB of RAM and 20GB of free disk space, as the sandbox image is approximately 2.4GB compressed .
Step‑by‑step guide explaining what this does and how to use it:
1. Run the Installer: Execute the following in your terminal to download and run the NemoClaw installation script:
curl -fsSL https://nvidia.com/nemoclaw.sh | bash
2. Onboard Your Agent: The installer will launch an interactive wizard (nemoclaw onboard). You will be prompted to provide API keys (e.g., NVIDIA cloud keys) and select your base model. The wizard creates a versioned “blueprint” artifact that orchestrates the sandbox .
3. Create and Connect: Once onboarded, create a sandbox instance:
nemoclaw my-assistant create
nemoclaw my-assistant connect
4. Launch the TUI: Inside the sandbox, you can chat with the agent using the OpenClaw TUI:
openclaw tui
This interface will display real-time policy violations (e.g., blocked network requests) for operator approval .
3. Declarative Policy Enforcement and Credential Management
The core of OpenShell’s security lies in its declarative YAML policies. Unlike traditional security tools that rely on static rules, OpenShell allows granular control over HTTP methods, paths, and specific syscalls. The policy is split into static sections (filesystem, process) that are locked at creation and dynamic sections (network, inference) that can be updated on the fly .
A critical security feature is the credential injection system. Instead of storing API keys (like ANTHROPIC_API_KEY) inside the sandbox filesystem where a compromised agent might read them, OpenShell manages them as “Providers.” These credentials are injected as environment variables or routed via the gateway, ensuring the agent can use the keys without ever having direct filesystem access to them .
Step‑by‑step guide explaining what this does and how to use it:
1. View Current Policy: Check the running policy to understand the current restrictions.
openshell policy get demo
2. Apply a Custom Policy: Create a `policy.yaml` file to define allowed outbound connections. For example, to allow the agent to only call a specific internal API and a specific model endpoint:
network:
allow:
- destination: api.internal.com
ports: [bash]
- destination: build.nvidia.com
ports: [bash]
inference:
route:
- model: -sonnet-
provider: nvidia-cloud
Apply it using:
openshell policy set demo --policy policy.yaml --wait
3. Manage Credentials Securely: Add a credential provider without exposing the key to the sandbox filesystem.
openshell provider add anthropic --key $ANTHROPIC_API_KEY
The agent can now use the key, but a `cat` command inside the sandbox will reveal nothing .
4. Enterprise Integration: Secure-by-Design with CrowdStrike
Recognizing that enterprise adoption requires integration with existing Security Operations Centers (SOCs), NVIDIA has collaborated with CrowdStrike to embed the Falcon platform into the OpenShell runtime. This transforms OpenShell from a simple sandbox into a continuous monitoring and governance solution for AI agents .
This integration treats prompts, responses, and agent actions as signals to be monitored in real-time rather than assessed after the fact. It combines OpenShell’s isolation with CrowdStrike’s endpoint detection and response (EDR) and identity governance, creating a “Secure-by-Design” architecture that spans development and runtime .
Step‑by‑step guide explaining what this does and how to use it:
Note: This integration is typically handled at the enterprise infrastructure level, but understanding the flow is crucial.
1. Endpoint Protection: When an OpenShell sandbox runs on a local NVIDIA DGX Spark or DGX Station, CrowdStrike Falcon Endpoint Security monitors the host system for behavioral anomalies related to the agent’s process .
2. Identity Controls: Falcon Next-Gen Identity Security enforces dynamic access controls. If an agent attempts to access a data source outside its defined privilege boundaries, the identity layer blocks the action and alerts the SOC .
3. Unified Visibility: Security teams can view AI agent activity alongside traditional workload activity in the CrowdStrike console, allowing for a unified incident response workflow for both human and AI-driven actions.
5. Commands and Troubleshooting Reference
To effectively manage a sandboxed AI environment, administrators need a set of commands to inspect health, stream logs, and manage the underlying infrastructure. OpenShell and NemoClaw provide distinct command sets for host-level control and sandbox-level interaction .
Command Reference Table:
| Command | Description | Usage Context |
| : | : | : |
| `openshell sandbox create — ` | Creates a new sandbox and launches Code inside it. | Host (Linux/macOS) |
| `openshell sandbox list` | Lists all running sandboxes and their statuses. | Host |
| `openshell term` | Launches the OpenShell TUI for monitoring and policy approvals. | Host |
| `nemoclaw
| `nemoclaw
| `openclaw agent –local -m “test”` | Sends a test message to the agent inside the sandbox to verify connectivity. | Inside Sandbox |
What Undercode Say:
- Isolation is the new authentication: Granting AI agents direct access to API keys is a security disaster waiting to happen. OpenShell’s provider model, where credentials are injected rather than stored, sets a new standard for securing agentic workflows.
- Runtime policies are critical: As AI agents become more autonomous, the ability to hot-reload network policies without restarting the agent allows security teams to respond to threats in real-time without disrupting productivity.
- The shift to “Secure-by-Design”: The partnership with CrowdStrike signals a major industry shift. Security cannot be an afterthought bolted onto AI; it must be embedded at the infrastructure layer (OpenShell) and monitored via traditional SOC tools (Falcon) to provide the visibility required for enterprise adoption.
Prediction:
As autonomous AI agents become the primary interface for interacting with digital infrastructure, sandboxing technologies like OpenShell will evolve from niche tools to mandatory compliance requirements. We will likely see the rise of “AI Firewalls” that sit between agents and critical cloud infrastructure, using intent-based policies to validate every action—from code commits to API calls—against predefined business rules before execution. The battle for enterprise AI will not be won by the smartest model, but by the most secure runtime.
▶️ Related Video (82% Match):
🎯Let’s Practice For Free:
IT/Security Reporter URL:
Reported By: Clintgibler If – Hackers Feeds
Extra Hub: Undercode MoN
Basic Verification: Pass ✅


