Listen to this Post
Introduction:
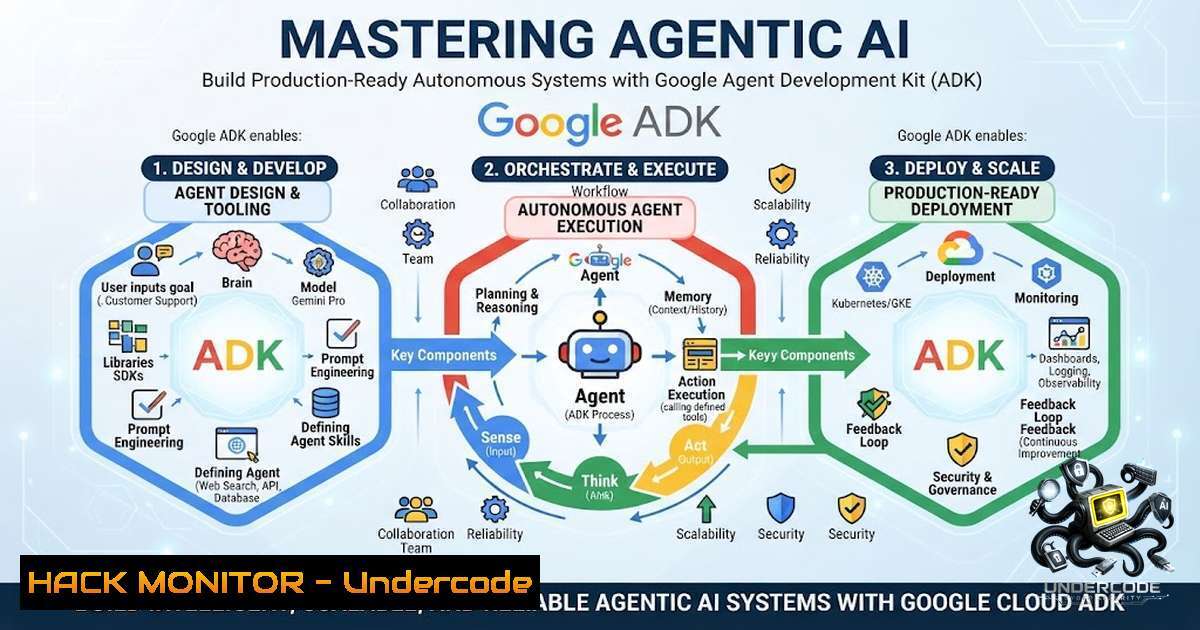
The evolution from simple conversational chatbots to intelligent, autonomous systems marks a paradigm shift in artificial intelligence. Today, building an AI agent extends far beyond crafting the perfect prompt; it involves architecting a system that can reason, plan, utilize external tools, retain long-term memory, and execute complex tasks with minimal human intervention. The Google Agent Development Kit (ADK) is an open-source, code-first Python framework designed to empower developers to build, evaluate, and deploy these sophisticated AI agents at an enterprise scale.
This hands-on guide delves into the core building blocks of the Google ADK, drawing from insights shared at the “Give Your Agent a Brain” workshop organized by NxtWave and AI House. We will explore the architecture of agentic AI, the integration of tools via the Model Context Protocol (MCP), the implementation of persistent memory, and the orchestration of multi-agent workflows—transforming a static Large Language Model (LLM) into a dynamic, problem-solving digital worker.
Learning Objectives:
- Understand the architecture of an AI agent, distinguishing between a simple LLM and an autonomous system with reasoning and tool-use capabilities.
- Learn to set up a development environment, install the Google ADK, and build a foundational agent with custom tools.
- Master the integration of external tools and services using the Model Context Protocol (MCP) to expand agent capabilities.
- Implement persistent, long-term memory to enable agents to maintain context across sessions and execute long-running workflows.
- Explore advanced multi-agent design patterns to build scalable, specialized, and production-ready agent teams.
1. The Architecture of an Agentic AI System
Building an AI agent with Google ADK is about creating a system where an LLM acts as the “brain,” but is augmented with the ability to interact with the world. The core architecture revolves around several key components:
- Agents: The fundamental unit, often an
LlmAgent, which is defined by a name, a model (likegemini-2.5-flash), an instruction that shapes its behavior, and a list of tools it can use. - Tools: These are how an agent performs actions beyond generating text. In ADK, a plain Python function can be a tool. Its name, type hints, and docstring tell the agent what it does and how to use it.
- Workflows: For complex tasks, ADK 2.0 introduces a graph-based execution engine. This allows for deterministic flows with routing, fan-out/fan-in, loops, and human-in-the-loop capabilities.
- Runners & Sessions: The `Runner` manages the execution loop of an agent, while `Session` objects store conversation history and state, ensuring continuity.
Step‑by‑Step: Setting Up Your First ADK Agent
This guide will walk you through creating a simple agent from scratch.
Step 1: Environment Setup
The ADK requires Python 3.10 or later. It’s best practice to use a virtual environment.
 Create a project directory
mkdir my_first_agent
cd my_first_agent

Create and activate a virtual environment
python3 -m venv .venv
source .venv/bin/activate  On Windows use `.venv\Scripts\activate`
Step 2: Install Google ADK
Install the core ADK package using pip.
pip install google-adk
For additional integrations, you can install optional extensions:
pip install "google-adk[bash]"
Step 3: Create Your Agent Project
The ADK provides a convenient CLI tool to scaffold a new agent project.
adk create my_agent
This command creates a folder structure with an `agent.py` file, where you will define your agent’s logic, and a `.env` file for environment variables like your API key.
Step 4: Configure Your API Key
To power your agent, you need a Gemini API key from Google AI Studio.
1. Navigate to https://aistudio.google.com/app/apikey.
2. Create a new API key. The key typically starts with AIza....
3. In your project’s `.env` file, add your key: GOOGLE_API_KEY=your_api_key_here.
Step 5: Write Your First Agent
Open the `agent.py` file. The scaffolded code will look similar to this:
from google.adk.agents import Agent

root_agent = Agent(
name="greeting_agent",
model="gemini-2.5-flash",  Or another Gemini model
instruction="You are a helpful assistant. Greet the user warmly and ask how you can help them today.",
)
Step 6: Run Your Agent Locally
You can interact with your agent in two ways. The interactive CLI is great for quick tests, while the web UI offers a more visual experience with tracing capabilities.
Terminal (CLI):
adk run my_agent
Web UI:
adk web .
This will start a local server, and you can open the provided URL in your browser to chat with your agent and view its internal reasoning.
2. Expanding Capabilities with MCP and Custom Tools
The true power of an agent lies in its ability to use tools. The Model Context Protocol (MCP) is an open standard that simplifies connecting AI agents to a vast ecosystem of external tools and services. Instead of writing custom integrations for every new data source or API, MCP provides a unified interface.
Step‑by‑Step: Integrating an MCP Tool
ADK provides built-in support for MCP through the `McpToolset` class.
- Install an MCP Server: For this example, we’ll use the `mcp-use` Python package, which provides a simple MCP client.
pip install mcp-use
-
Define the Connection: You need to specify how to connect to the MCP server. For a local server, you might use
StdioConnectionParams. -
Add the Toolset to Your Agent: You can integrate an MCP toolset just like any other tool. The ADK will handle the underlying communication.
from google.adk.agents import Agent
from google.adk.tools.mcp_tool import McpToolset
from google.adk.tools.mcp_tool.mcp_session_manager import StdioConnectionParams

Define the connection to an MCP server (e.g., a weather API server)
weather_connection = StdioConnectionParams(
command="python",  Or the command to run your MCP server
args=["-m", "my_mcp_weather_server"],  Path to your server script
)

Create the toolset
weather_toolset = McpToolset(
connection_params=weather_connection,
tool_filter=["get_weather", "get_forecast"],  Optionally, filter tools
)

Add the toolset to your agent
root_agent = Agent(
name="weather_assistant",
model="gemini-2.5-flash",
instruction="You are a weather assistant. Use the provided tools to answer user questions.",
tools=[bash],
)
This approach makes your agent modular and scalable. You can add new capabilities simply by connecting to new MCP servers, without modifying the agent’s core logic.
3. Building Multi-Agent Systems for Complex Tasks
Monolithic agents, tasked with too many responsibilities, often become brittle and prone to errors. Just as microservices revolutionized software architecture, Multi-Agent Systems (MAS) bring the same benefits of modularity, specialization, and reliability to AI. The ADK provides first-class support for building, orchestrating, and managing teams of specialized agents.
Step‑by‑Step: Creating a Sequential Pipeline
The Sequential Pipeline pattern is ideal for data processing tasks. Agent A completes its task, passes the output to Agent B, and so on.
from google.adk.agents import Agent
from google.adk.workflows import SequentialAgent

Step 1: Research Agent - Finds a topic
researcher = Agent(
name="Researcher",
model="gemini-2.5-flash",
instruction="Find an interesting topic about artificial intelligence.",
output_key="research_topic",  Store output for the next agent
)

Step 2: Writer Agent - Writes about the topic
writer = Agent(
name="Writer",
model="gemini-2.5-flash",
instruction="Write a short, engaging paragraph about {research_topic}.",  Access previous output
output_key="draft_paragraph",
)

Step 3: Editor Agent - Refines the content
editor = Agent(
name="Editor",
model="gemini-2.5-flash",
instruction="Proofread and refine the following text: {draft_paragraph}",
)

Orchestrate the pipeline
pipeline = SequentialAgent(
name="ContentCreationPipeline",
sub_agents=[researcher, writer, editor],
)
This demonstrates how the ADK’s `SequentialAgent` primitive manages state, passing data between agents via `output_key` and session state.
For more complex scenarios, the Coordinator/Dispatcher pattern uses a central agent to intelligently route user requests to specialized sub-agents, akin to a concierge. Alternatively, using the Agent-as-a-Tool pattern allows a root agent to treat other agents as tools in its arsenal, enabling it to reason and use multiple specialists to complete a larger project.
4. Giving Your Agent Persistent Memory
A major limitation of stateless agents is their inability to retain information across sessions, acting like a “digital goldfish.” True production agents need persistent memory to remember user preferences, past interactions, and the state of long-running workflows.
ADK addresses this through a robust session and memory architecture. The `InMemoryMemoryService` is useful for prototyping, but for production, you would use a persistent backend like the Vertex AI Memory Bank, a fully managed service that uses Gemini to intelligently handle memory operations.
Step‑by‑Step: Enabling Persistent Sessions
- Set Up a Database Session Service: For local development, you can start with the
DatabaseSessionService. The ADK documentation provides examples for setting this up with Cloud SQL or other databases. -
Configure Your Agent: When you run your agent, you can specify a session service to use. If you’re using the ADK web UI, you can configure this in your application.
-
Using the `adk web` Command: By default, the `adk web` command uses local storage. For persistent sessions, you can migrate to a
DatabaseSessionService, which ensures that agent memory persists across application restarts and separate conversation sessions.
Long-running agents that pause and resume are critical for enterprise workflows like HR onboarding or invoice processing, which can span days or weeks. With durable sessions, an agent can send a welcome packet, pause for days while a user signs documents, and then resume the workflow without losing context.
5. Deploying and Scaling Your Agent
Once built and tested, your agent needs to be deployed to serve real users. The ADK is deployment-agnostic, offering flexibility.
- Vertex AI Agent Engine: This is the recommended managed runtime for production. It provides a scalable, serverless environment to host your agents, with built-in integrations for memory, monitoring, and versioning.
- Cloud Run or Other Container Runtimes: You can containerize your ADK agent and deploy it to Cloud Run or any standard container orchestration platform, giving you control over the infrastructure.
- Command Line & Web UI: For testing and internal tools, the `adk run` and `adk web` commands provide simple deployment options.
Step‑by‑Step: Deploying to Vertex AI Agent Engine (Conceptual)
While a full deployment tutorial is extensive, the high-level steps are:
- Containerize Your Agent: Create a `Dockerfile` that installs your agent’s dependencies and runs the ADK server.
- Push to a Registry: Push the container image to Google Container Registry (GCR) or Artifact Registry.
- Deploy with Agent Engine: Use the Google Cloud CLI or the Python SDK to deploy your agent. You will specify the container image and configuration (e.g., model, memory settings).
 Example gcloud command (conceptual)
gcloud alpha vertex-ai agent-engine agents create \
--agent-id="my-production-agent" \
--display-1ame="My ADK Agent" \
--image-uri="gcr.io/my-project/my-adk-agent:latest" \
--location="us-central1"
What Undercode Say:
- Key Takeaway 1: The evolution from chatbots to autonomous agents demands a shift in mindset from prompt engineering to software engineering. Google ADK empowers developers to build agents as robust, testable, and modular software systems.
- Key Takeaway 2: The synergy between the ADK and Vertex AI services, particularly Memory Bank and Agent Engine, provides a clear path from development to production, solving the undifferentiated heavy lifting of memory management and infrastructure scaling.
Analysis: The workshop highlighted that building AI agents is no longer an experimental activity but a structured engineering discipline. The Google ADK is not just a library; it is a comprehensive framework that brings best practices from software engineering—like microservices, state management, and deterministic workflows—to the world of AI. The focus on MCP as a standard for tool integration is particularly significant, as it promises to create an interoperable ecosystem where agents can seamlessly leverage a wide array of tools. As these frameworks mature and become more accessible, we can expect a surge in sophisticated, real-world AI applications that go beyond simple question-answering to actively automating complex business processes.
Prediction:
- +1 The adoption of frameworks like Google ADK will democratize the creation of advanced AI agents, enabling a broader range of developers to build sophisticated, production-grade AI applications that were previously out of reach.
- +1 The standardization of tool integration via MCP will catalyze the growth of an “agent economy,” where specialized AI agents and tool providers can interoperate seamlessly, unlocking new levels of automation and efficiency.
- -1 As agents become more autonomous and capable, there is a growing risk of “agent sprawl” and increased complexity in debugging and monitoring multi-agent systems. The industry will need to invest heavily in observability and governance tools to manage these complex, self-organizing systems.
▶️ Related Video (82% Match):
🎯Let’s Practice For Free:
🎓 Live Courses & Certifications:
Join Undercode Academy for Verified Certifications
🚀 Request a Custom Project:
Secure, high-velocity infrastructure and disruptive technological engineering. Contact our engineering team for high-tier development and proprietary systems:
[email protected]
💎 Smart Architecture | 🛡️ Secure by Design | ⭐ Trusted by Thousands
IT/Security Reporter URL:
Reported By: Baddam Harshith – Hackers Feeds
Extra Hub: Undercode MoN
Basic Verification: Pass ✅


