Listen to this Post
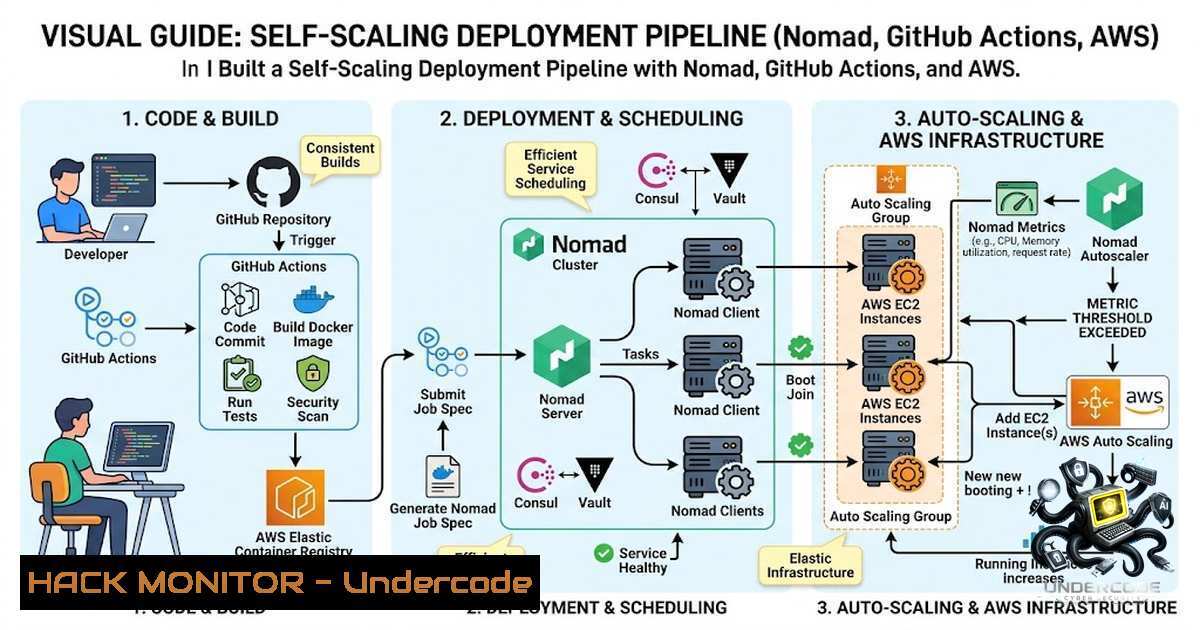
Introduction:
HashiCorp Nomad is quietly winning over engineers who are tired of Kubernetes’ operational complexity. While Kubernetes dominates the container orchestration conversation, it brings along a heavy control plane, etcd, CNI plugins, and a configuration surface area that takes months to master. Nomad, by contrast, is a single binary with an HCL job spec that reads naturally from day one. This article walks through building a production-ready, self-scaling deployment pipeline that combines Nomad’s lightweight scheduling with GitHub Actions CI/CD and AWS infrastructure autoscaling — and more importantly, it covers the hard-earned lessons from things that broke along the way.
Learning Objectives:
- Deploy a multi-1ode Nomad cluster on AWS EC2 with proper server-client architecture
- Build a complete CI/CD pipeline using GitHub Actions with self-hosted runners that builds, tags, validates, and deploys containerized applications
- Configure application-level autoscaling using the Nomad Autoscaler with CPU and memory utilization policies
- Implement cluster-level autoscaling that dynamically adjusts the underlying EC2 infrastructure via AWS Auto Scaling Groups
- Troubleshoot common scaling anti-patterns including policy conflicts, cooldown misconfigurations, and phantom load issues
- Standing Up the Nomad Cluster: From Zero to Scheduling
The foundation of any deployment pipeline is the cluster itself. Starting with a handful of EC2 instances — one set as a server, the rest as clients — the first step is getting them to communicate reliably.
Server configuration (`/opt/nomad/config/server.hcl`):
datacenter = "dc1"
data_dir = "/opt/nomad/data"
bind_addr = "0.0.0.0"

server {
enabled = true
bootstrap_expect = 3
}
The `bootstrap_expect = 3` tells Nomad to wait for three server nodes before electing a leader, which is the minimum for production-grade fault tolerance.
Client configuration (`/opt/nomad/config/client.hcl`):
client {
enabled = true
servers = ["<server-ip>:4647"]
}
Clients simply need to know where to find the servers.
Verification commands:
 Check server membership and leader election
nomad server members

Verify all clients have checked in
nomad node status

Deploy a test job to validate scheduling
nomad job run test-job.nomad.hcl
Once `nomad server members` shows a healthy leader and `nomad node status` lists all clients, the cluster is ready.
Security consideration: For production, never expose the Nomad API publicly. Use a self-hosted GitHub Actions runner within your VPC rather than making the Nomad API internet-facing. The IAM instance profile attached to EC2 clients should have minimal permissions — only what’s needed for the Nomad Autoscaler to function.
- CI/CD Pipeline: Automating Builds and Deployments with GitHub Actions
Manually building Docker images and hand-editing job files becomes unsustainable within days. The solution is a GitHub Actions workflow with a self-hosted runner that handles the full lifecycle.
Critical pipeline decisions that mattered:
Image tagging with commit SHA:
- name: Build and push Docker image
run: |
IMAGE_TAG=$(git rev-parse --short HEAD)
docker build -t myapp:$IMAGE_TAG .
docker push myapp:$IMAGE_TAG
Tagging every image with the short commit SHA instead of `:latest` is essential for debugging — `:latest` will lie to you eventually.
Dynamic job spec patching:
- name: Patch Nomad job with image tag
run: |
sed -i "s|image = \"myapp:.\"|image = \"myapp:$IMAGE_TAG\"|" nomad/app.nomad.hcl
Validation gates before deployment:
- name: Validate job spec
run: nomad job validate nomad/app.nomad.hcl

<ul>
<li>name: Plan deployment
run: nomad job plan nomad/app.nomad.hcl</p></li>
<li><p>name: Deploy to Nomad
run: nomad job run -detach nomad/app.nomad.hcl
Catching a typo in a job file before it touches the cluster is far less painful than catching it afterward.
Health verification polling (the most important fix):
- name: Wait for healthy deployment
run: |
for i in $(seq 1 18); do
STATUS=$(nomad job status -short my-app | grep Status | awk '{print $3}')
[ "$STATUS" = "running" ] && exit 0
sleep 10
done
exit 1
Without this polling step, the pipeline would report “success” even when Nomad failed to place the allocation. A green checkmark with a broken deployment is not automation — it’s automated hoping.
3. Application-Level Autoscaling: Making the App Scale Itself
With deployment automated, the next challenge is autoscaling — starting with the application layer since it’s the more approachable of the two. The Nomad Autoscaler plugs in neatly, and the policy lives right inside the job specification.
Application scaling policy (`nomad/app.nomad.hcl`):
scaling {
enabled = true
min = 1
max = 5

policy {
check "cpu_utilization" {
source = "nomad-apm"
query = "avg_cpu=taskgroup_cpu_allocated_percentage"
strategy "target-value" {
target = 70
}
}

check "memory_utilization" {
source = "nomad-apm"
query = "avg_mem=taskgroup_memory_allocated_percentage"
strategy "target-value" {
target = 80
}
}

cooldown = "2m"
evaluation_interval = "30s"
}
}
Lessons learned the hard way:
- Don’t set targets near 100%. Setting CPU at 70% and memory at 80% ensures new capacity arrives before requests start dropping.
- Cooldowns matter more than they sound. Without a cooldown, the autoscaler adds a replica, the average dips, it removes the replica, the average spikes again, and the cycle repeats forever — like a thermostat with no deadband.
- The resource block isn’t just for scheduling — it’s the denominator. If you don’t reserve CPU and memory on the task, the “percentage utilized” math has nothing to divide by, and the policy won’t do anything sensible.
Testing the policy:
 Generate artificial load to trigger scaling
nomad job run load-generator.nomad.hcl

Monitor scaling events
nomad job status my-app

Watch the autoscaler logs
nomad logs -f <autoscaler-allocation-id>
- Cluster-Level Autoscaling: The Part That Actually Humbles You
Here’s the thing nobody tells you clearly enough: scaling your application replicas is pointless if there’s no physical node capacity to put them on. Eventually you hit a wall where the cluster itself needs to grow — and this is a completely different beast.
Required infrastructure components:
- Launch Template — defines the AMI, instance type, IAM instance profile, and a user-data script that installs Nomad and joins the cluster automatically on boot.
- Auto Scaling Group — built on the launch template, living in the same VPC and subnets as the existing servers.
- IAM Permissions — so the Nomad Autoscaler can talk to the ASG API:
{
"Effect": "Allow",
"Action": [
"autoscaling:DescribeAutoScalingGroups",
"autoscaling:UpdateAutoScalingGroup",
"autoscaling:TerminateInstanceInAutoScalingGroup",
"ec2:DescribeInstances"
],
"Resource": ""
}
Cluster-level scaling policy:
scaling "cluster_policy" {
enabled = true
min = 1
max = 5

policy {
cooldown = "2m"
evaluation_interval = "30s"

check "cpu_allocated_percentage" {
source = "nomad-apm"
query = "percentage-allocated_cpu"
strategy "target-value" {
target = 70
}
}

target "aws-asg" {
aws_asg_name = "<your-asg-1ame>"
node_drain_deadline = "5m"
node_selector_strategy = "least_busy"
}
}
}
The `aws-asg` target plugin allows scaling of Nomad cluster clients by manipulating AWS Auto Scaling Groups.
The mental model that finally clicked: application-level autoscaling changes how many copies of your job are running. Cluster-level autoscaling changes how many machines exist for those copies to live on. They solve completely different problems, and you genuinely need both dialed in for the whole system to breathe properly under load.
5. Troubleshooting: The Stuff That Actually Went Wrong
Problem 1: The Autoscaler Kept Fighting Itself
The autoscaler kept scaling back up right after scaling down, like it had a grudge. The root cause: the policy was using `max_cpu` — the single highest CPU reading across all allocations — with a target set way too low. One noisy container was enough to trip it constantly.
Fix: Switch to avg_cpu, raise the target to something realistic, and add a real cooldown.
Problem 2: The “Fixed” Bug That Wasn’t Actually Fixed
While testing, a synthetic load-generating process had been left running inside a container from an earlier test. The autoscaler kept scaling out because, as far as it could tell, the load was completely real.
Fix: Before declaring a scale-down test a failure, double-check that you didn’t leave a stress test quietly running in the background.
Problem 3: Docker and App Dependency Mismatches
Version drift between the base image and what the app expected at runtime caused intermittent build failures.
Fix: Pin versions explicitly instead of trusting defaults.
Problem 4: The Pipeline Lied About Deployments Succeeding
A pipeline that exits 0 without confirming the deployment is actually healthy isn’t really automation — it’s automated hoping.
Fix: Implement the polling health check shown in Section 2.
6. Linux and Windows Commands Reference
Linux (Nomad server/client nodes):
 Start Nomad as a service
sudo systemctl start nomad
sudo systemctl enable nomad

Check Nomad service status
sudo systemctl status nomad

View Nomad logs
sudo journalctl -u nomad -f

List all jobs
nomad job status

Inspect a specific job
nomad job status my-app

Stop and purge a job
nomad job stop -purge my-app

Check cluster node utilization
nomad node status -stats

Drain a node for maintenance
nomad node drain -enable -deadline 5m <node-id>

Force evaluation of scaling policies
nomad scaling policy list
nomad scaling policy info <policy-id>
AWS CLI (for ASG management):
 Describe Auto Scaling Group
aws autoscaling describe-auto-scaling-groups --auto-scaling-group-1ames <asg-1ame>

Manually adjust desired capacity (for testing)
aws autoscaling set-desired-capacity --auto-scaling-group-1ame <asg-1ame> --desired-capacity 3

View ASG activity history
aws autoscaling describe-scaling-activities --auto-scaling-group-1ame <asg-1ame>
Windows (if running Nomad clients on Windows):
 Start Nomad as a Windows service
nomad.exe agent -config=config.hcl

Check node status (same commands work)
nomad.exe node status
nomad.exe job status
What Undercode Say:
- Application scaling and cluster scaling are two separate problems living at two separate layers — they need to be tuned independently. Solving one doesn’t solve the other.
- Percentage-based scaling policies are only as trustworthy as the resource reservations underneath them. The resource block is the denominator — without it, the math breaks.
- A CI/CD pipeline isn’t finished until it can prove a deployment actually worked — not just that a command didn’t error out. Green checkmarks mean nothing if the application isn’t running.
- Nomad’s simplicity is a real, tangible advantage if your team doesn’t need the full weight of Kubernetes. You trade some ecosystem maturity — fewer prebuilt operators, a smaller community — but you get back a system that’s dramatically easier to understand end to end.
- Cooldowns are not optional. Without them, you create a thermostat with no deadband that oscillates forever.
Prediction:
- +1 Nomad is positioned to capture significant market share from Kubernetes in the small-to-medium team segment over the next 2–3 years. Its single-binary architecture and HCL-based job specs lower the barrier to entry dramatically. Teams spending 3–6 months mastering Kubernetes can be productive with Nomad in days.
- +1 The trend toward “frugal DevOps” — where teams optimize for operational simplicity over feature completeness — will accelerate Nomad adoption, particularly in edge computing and hybrid cloud environments where Kubernetes’ overhead is prohibitive.
- -1 The ecosystem gap remains real. Kubernetes has thousands of operators, a massive community, and deep integration with every major cloud provider. Nomad’s smaller community means fewer prebuilt solutions and more custom engineering. Teams must weigh this trade-off carefully.
- -1 As organizations grow, the simplicity that made Nomad attractive can become a limitation. The lack of built-in service discovery (requiring Consul integration) and the smaller talent pool of Nomad-experienced engineers could create scaling challenges down the road.
- +1 The autoscaling patterns documented here — particularly the two-layer approach of application replicas plus underlying infrastructure — will become a reference architecture for Nomad practitioners. The troubleshooting lessons (cooldowns, resource reservations, health polling) are universally applicable and will save countless engineering hours.
▶️ Related Video (74% Match):
🎯Let’s Practice For Free:
🎓 Live Courses & Certifications:
Join Undercode Academy for Verified Certifications
🚀 Request a Custom Project:
Secure, high-velocity infrastructure and disruptive technological engineering. Contact our engineering team for high-tier development and proprietary systems:
[email protected]
💎 Smart Architecture | 🛡️ Secure by Design | ⭐ Trusted by Thousands
IT/Security Reporter URL:
Reported By: Manjuappu I – Hackers Feeds
Extra Hub: Undercode MoN
Basic Verification: Pass ✅


