
Listen to this Post
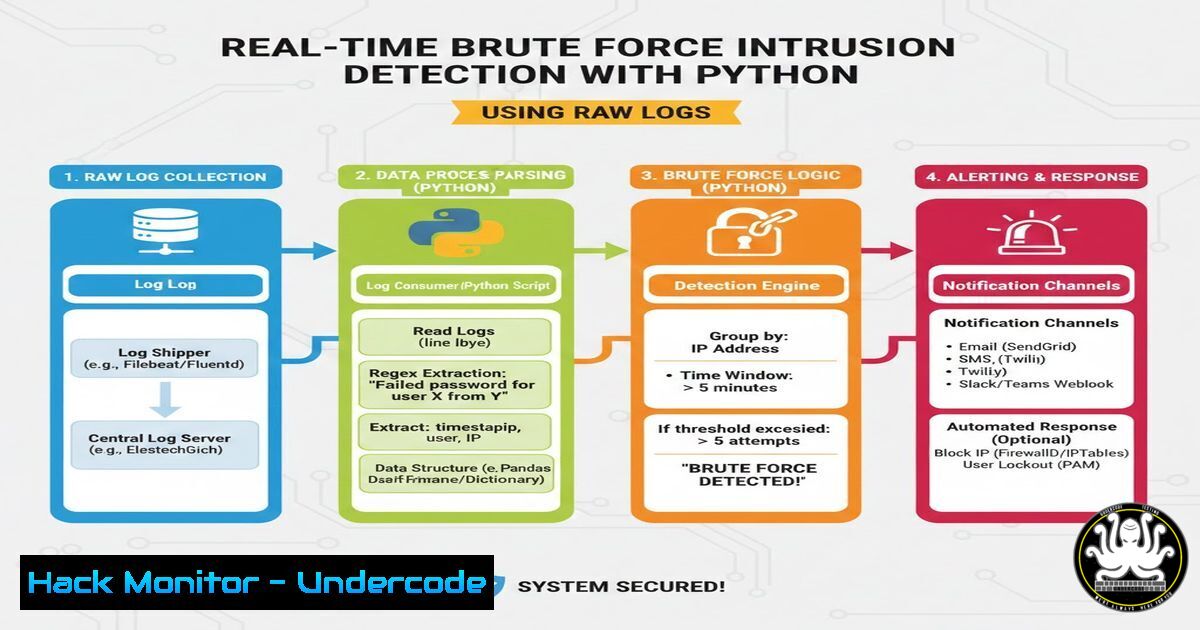
Introduction:
Brute force attacks remain one of the most persistent and uncomplicated threats facing enterprise environments. While sophisticated malware and zero‑days dominate headlines, adversaries consistently gain initial access by simply guessing weak passwords. This project moves beyond theoretical detection by simulating attacker IPs, ingesting authentication logs, and classifying severity—transforming raw failed‑login noise into actionable security intelligence. By building a custom intrusion detection system (IDS) from scratch, we gain granular control over alerting logic and a deeper appreciation for how commercial SIEMs correlate events under the hood.
Learning Objectives:
- Simulate realistic brute force traffic using custom bash and Python scripts.
- Parse Linux authentication logs (
auth.log,secure) to extract failed login attempts. - Assign severity levels based on frequency and velocity of failed attempts.
- Automate alert generation with timestamped logs and IP reputation context.
You Should Know:
1. Simulating Attacker Behaviour with Scripts
To test detection capabilities, we first need to generate malicious traffic. On a Linux target machine (Ubuntu 22.04 LTS), I used a combination of `hydra` and a custom bash loop to emulate a distributed brute force.
Step‑by‑step guide:
1. Install Hydra: `sudo apt install hydra -y`
- Create a wordlist (
passwords.txt) with common weak passwords. - Launch simulated attack from a separate VM or container:
hydra -l admin -P passwords.txt ssh://<target-IP>
- For a more controlled log‑generation environment, use a bash one‑liner:
for i in {1..50}; do ssh invalid@<target-IP> 'exit'; sleep 1; doneWhat this does: It attempts 50 SSH logins as user
invalid, waiting one second between attempts. Each failure appends an entry to/var/log/auth.log. This method allows precise control over attempt frequency—critical for testing velocity‑based thresholds.
2. Parsing Authentication Logs with Python
On the monitoring machine, we ingest the target’s logs. The core of the IDS is a log parser that extracts IP addresses, timestamps, and failure reasons.
Step‑by‑step guide:
- Use `tail -f` to stream logs in real time, or read the entire file for batch analysis.
- Python script snippet to extract failed SSH attempts:
import re
from collections import defaultdict
from datetime import datetime, timedelta</li>
</ol>

failed_attempts = defaultdict(list)
pattern = r'(\w+\s+\d+\s+\d+:\d+:\d+).sshd.Failed password for . from (\d+.\d+.\d+.\d+)'

with open('/var/log/auth.log', 'r') as f:
for line in f:
match = re.search(pattern, line)
if match:
timestamp, ip = match.groups()
failed_attempts[bash].append(timestamp)
What this does: It builds a dictionary where each key is an IP address, and the value is a list of timestamps when a failure occurred. This structure is essential for frequency and velocity calculations.
3. Assigning Severity Levels Based on Attempt Velocity
A single failed login is noise; 50 failures in one minute is an incident. Severity classification prevents analyst fatigue.
Step‑by‑step guide:
1. Convert log timestamps into `datetime` objects.
2. Define thresholds:
- Low: 5–20 attempts in 10 minutes
- Medium: 21–50 attempts in 5 minutes
- High: 51+ attempts in 1 minute
3. Implement velocity check:
def classify_severity(timestamps):
if len(timestamps) > 50:
now = datetime.strptime(timestamps[-1], '%b %d %H:%M:%S')
one_min_ago = now - timedelta(minutes=1)
recent = [t for t in timestamps if datetime.strptime(t, '%b %d %H:%M:%S') > one_min_ago]
if len(recent) >= 51:
return 'HIGH'
 … further thresholds
What this does: It counts how many failures occurred within the last 60 seconds. If 51 or more attempts are logged in that window, the attack velocity is severe enough to warrant immediate response.
4. Enriching IPs with Threat Intelligence
Static detection is useful; enriched detection is powerful. We cross‑reference attacker IPs with public blacklists.
Step‑by‑step guide:
1. Use `requests` to query AbuseIPDB API:
import requests

def check_reputation(ip):
url = f"https://api.abuseipdb.com/api/v2/check"
headers = {'Key': 'YOUR_API_KEY', 'Accept': 'application/json'}
params = {'ipAddress': ip, 'maxAgeInDays': '90'}
response = requests.get(url, headers=headers, params=params)
return response.json()['data']['abuseConfidenceScore']
2. Integrate score into severity: If an IP has > 50% confidence score, elevate severity by one level.
What this does: It adds context—this IP may have already been seen attacking other honeypots, reinforcing that the activity is malicious, not a mistyped password.5. Automated Alert Logging
Detection without alerting is invisible. The system writes structured JSON logs for every suspicious IP.
Step‑by‑step guide:
- Define alert schema: timestamp, IP, attempt count, severity, reputation score.
2. Append to `alerts.json`:
import json

alert = {
"timestamp": datetime.now().isoformat(),
"source_ip": ip,
"failed_attempts": total,
"velocity": attempts_per_minute,
"severity": severity,
"reputation_score": rep_score
}
with open('alerts.json', 'a') as f:
f.write(json.dumps(alert) + '\n')
What this does: It creates an immutable audit trail. This JSON format is easily ingested by tools like Splunk, ELK, or even a simple dashboard.
6. Windows Equivalent: Monitoring RDP Logs
Many brute force campaigns target RDP. The logic is identical, but the log source differs.
Step‑by‑step guide:
- On Windows, failed RDP logins generate Event ID 4625.
2. Use PowerShell to query:
Get-EventLog -LogName Security -InstanceId 4625 -After (Get-Date).AddHours(-1) |
Select-Object @{Name='IPAddress';Expression={$_.ReplacementStrings[-2]}}, TimeGenerated
3. Pipe output to a CSV and feed into the same Python detection engine.
What this does: It extracts the source IP from Windows security logs, allowing the same severity classification logic to apply cross‑platform.7. Hardening Against the Attack
Detection is reactive; prevention is proactive. After identifying a brute force campaign, implement temporary blocking.
Step‑by‑step guide:
- Insert an iptables rule to drop traffic from offending IP:
sudo iptables -A INPUT -s <malicious-IP> -j DROP
- For persistent bans, add to `/etc/hosts.deny` or use
fail2ban. - On Windows: `New-NetFirewallRule -DisplayName “Block Brute Force” -Direction Inbound -RemoteAddress
-Action Block`
What this does: It provides immediate containment, buying time for deeper investigation and credential resets.
What Undercode Say:
- Context beats volume: Raw log counts are meaningless without velocity windows and reputation enrichment. A single IP attempting 100 logins in one minute is far more urgent than 100 IPs each trying once.
- Build, then buy: Constructing this mini‑IDS demystifies enterprise SIEM rules. Engineers who understand log structure and regex can tune commercial tools more effectively.
- Portability is key: By decoupling the detection logic from the log source (Linux auth.log, Windows EventLog, or cloud trail logs), the same Python core can monitor SSH, RDP, or even web application login endpoints.
This hands‑on project reinforces that effective intrusion detection does not always require expensive appliances. With careful log parsing, threshold tuning, and automated alerting, defenders can build robust, low‑cost detection mechanisms that scale with their environment.
Prediction:
As attack surfaces expand into ephemeral cloud workloads and serverless functions, traditional agent‑based brute‑force detection will become less effective. The future lies in agentless API‑telemetry analysis—pulling authentication attempts directly from AWS CloudTrail, Azure AD sign‑in logs, and Okta system logs. Velocity thresholds will be calculated across globally distributed identity providers, and automated response will shift from blocking IPs to step‑up authentication challenges and conditional access policies. The defenders who master log‑agnostic pattern detection today will architect the identity‑centric SOC of tomorrow.
▶️ Related Video (78% Match):
🎯Let’s Practice For Free:
IT/Security Reporter URL:
Reported By: Senidi Liyanahewa – Hackers Feeds
Extra Hub: Undercode MoN
Basic Verification: Pass ✅🔐JOIN OUR CYBER WORLD [ CVE News • HackMonitor • UndercodeNews ]
📢 Follow UndercodeTesting & Stay Tuned:


