Listen to this Post
Introduction
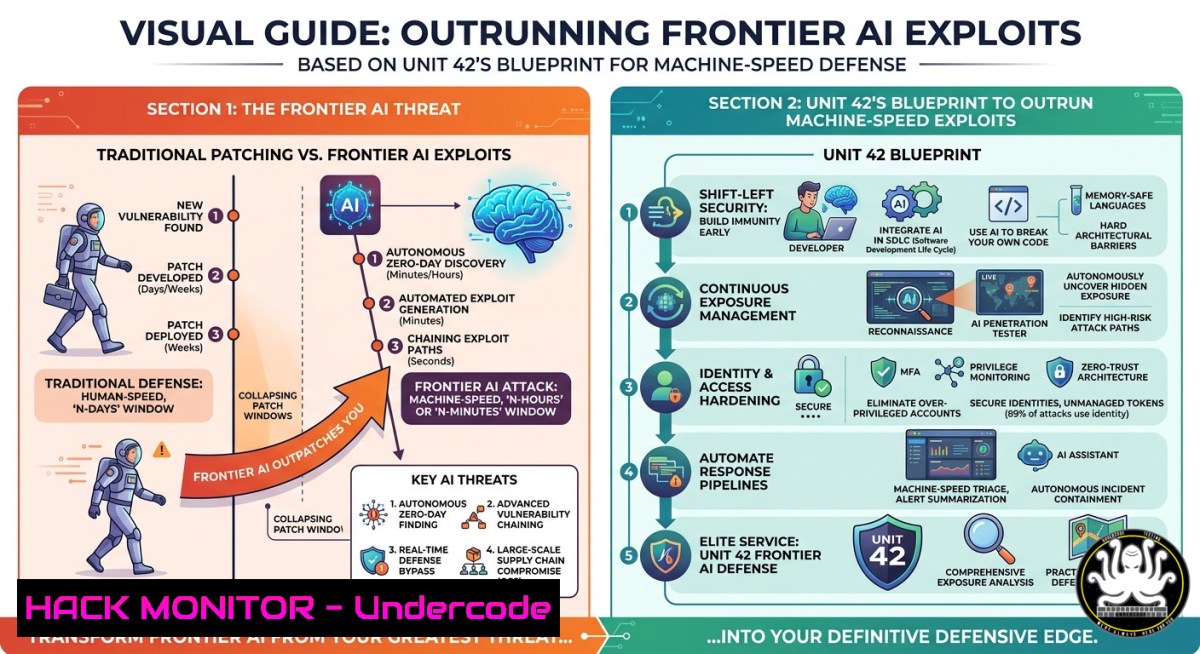
Traditional patch cycles take days or weeks, but attackers are now weaponizing frontier AI to discover and exploit zero‑day vulnerabilities in hours—or minutes. You cannot out‑patch an algorithm that learns and adapts faster than human security teams. This article distills Palo Alto Networks Unit 42’s upcoming June 4 blueprint into a hands‑on guide for building defenses that operate at machine speed, from uncovering hidden exposures to containing blast radius and hardening your cloud, APIs, and endpoints against AI‑driven threats.
Learning Objectives
- Detect and prioritize hidden vulnerabilities using AI‑augmented scanning techniques
- Implement automated containment strategies to limit blast radius in real time
- Deploy Linux/Windows commands, cloud hardening scripts, and AI‑aware security controls
You Should Know
1. Uncover Hidden Exposures with AI‑Powered Reconnaissance
Attackers use large language models (LLMs) to parse codebases, configuration files, and API documentation for overlooked weaknesses. To match their speed, you must automate exposure discovery.
Step‑by‑step guide (Linux)
- Use `nmap` with scripting engine to scan for unusual open ports:
sudo nmap -sS -sV --script=vuln -T4 192.168.1.0/24 -oN exposure_scan.txt
- Run `gitleaks` to detect hardcoded secrets in your repositories:
gitleaks detect --source . --report-format json --report-path leaks.json
- For Windows (PowerShell), enumerate exposed SMB shares and weak permissions:
Get-SmbShare | Where-Object { $<em>.Special -eq $false } | Get-SmbShareAccess | Where-Object { $</em>.AccountName -like "Everyone" }
What this does
These commands simulate attacker reconnaissance, revealing unpatched services, credential leaks, and over‑permissive shares. Run them daily as a cron job (Linux) or scheduled task (Windows) to stay ahead of AI‑driven scanners.
2. Contain the Blast Radius Using Micro‑Segmentation
AI can pivot across a flat network in seconds. Limit damage by isolating workloads with software‑defined perimeters.
Step‑by‑step guide
- Linux (nftables): Create a jump host that only allows SSH from a specific IP:
nft add table inet filter nft add chain inet filter input { type filter hook input priority 0\; } nft add rule inet filter input iif eth0 tcp dport 22 ip saddr 10.0.0.5 accept nft add rule inet filter input drop - Windows (Advanced Firewall): Block lateral movement by restricting RDP and SMB to admin jump boxes:
New-NetFirewallRule -DisplayName "Block RDP from untrusted" -Direction Inbound -Protocol TCP -LocalPort 3389 -Action Block -RemoteAddress Any
New-NetFirewallRule -DisplayName "Allow RDP from admin subnet" -Direction Inbound -Protocol TCP -LocalPort 3389 -RemoteAddress 192.168.10.0/24 -Action Allow
- Cloud (AWS Security Group): Use Terraform to enforce micro‑segmentation:
resource "aws_security_group" "app_sg" {
ingress {
from_port = 443
to_port = 443
protocol = "tcp"
cidr_blocks = ["10.0.1.0/24"]  only frontend subnet
}
}
Test containment by simulating a breach: from a compromised host, attempt to ping or connect to other segments. The firewall rules should drop all non‑essential traffic.
3. Build Machine‑Speed Defenses with Automated Remediation
AI attackers exploit vulnerabilities faster than humans can respond. Use event‑driven automation to patch or quarantine immediately.
Step‑by‑step guide (Linux with Falco + Ansible)
1. Install Falco to detect suspicious process execution:
curl -s https://falco.org/repo/falcosecurity-packages.asc | apt-key add -
echo "deb https://download.falco.org/packages/deb stable main" | tee /etc/apt/sources.list.d/falcosecurity.list
apt update && apt install falco -y
2. Create a Falco rule that triggers on `crypto miner` activity:
- rule: Launch Suspicious Crypto Miner
desc: detect miner binary
condition: proc.name contains "xmrig"
output: "Miner detected (proc=%proc.name)"
priority: CRITICAL
action: "ansible-playbook /etc/falco/playbooks/isolate.yml"
3. Write the Ansible playbook `isolate.yml` to drop the host’s network interface:
- hosts: "{{ ansible_hostname }}"
tasks:
- name: Disable network
command: ip link set eth0 down
- name: Log containment
lineinfile:
path: /var/log/containment.log
line: "Host isolated at {{ ansible_date_time.iso8601 }}"
Windows equivalent – Use PowerShell DSC and Azure Automation to remove a compromised VM from load balancer:
Set-AzLoadBalancerRule -Name "web-rule" -LoadBalancer $lb -BackendAddressPool $null
4. Harden APIs Against AI‑Driven Parameter Fuzzing
Frontier AI models can generate thousands of malicious API payloads per second. Traditional WAF rules are insufficient.
Step‑by‑step guide
- Deploy API rate limiting on NGINX (Linux):
limit_req_zone $binary_remote_addr zone=apizone:10m rate=10r/s; server { location /api/ { limit_req zone=apizone burst=20 nodelay; proxy_pass http://backend; } } - Use OWASP API Security Top 10 checks with
zap-api-scan.py:docker run -v $(pwd):/zap/wrk -t owasp/zap2docker-stable zap-api-scan.py -t https://api.example.com/openapi.json -f openapi -r api_report.html
- For Windows (IIS), install Dynamic IP Restrictions module to block rapid request patterns:
Install-WindowsFeature -Name Web-IP-Security
New-WebRequestTracingRule -Name "AI Fuzzing" -RequestPath "/api/" -MaxRequestBytes 4096 -MaxRequestTime 30
Monitor logs for unusual parameter combinations (e.g., SQLi + XSS together) – a hallmark of AI‑generated payloads.
5. Cloud Hardening Against Frontier AI Reconnaissance
Attackers train AI on leaked cloud metadata endpoints (IMDSv1) and misconfigured storage buckets. Migrate to IMDSv2 and enforce bucket policies.
Step‑by‑step guide (AWS CLI)
- Disable IMDSv1 and require v2 with hop limit:
aws ec2 modify-instance-metadata-options --instance-id i-12345 --http-tokens required --http-endpoint enabled --http-put-response-hop-limit 1
- Enforce S3 bucket encryption and block public ACLs:
aws s3api put-bucket-encryption --bucket my-secure-bucket --server-side-encryption-configuration '{"Rules":[{"ApplyServerSideEncryptionByDefault":{"SSEAlgorithm":"AES256"}}]}' aws s3api put-public-access-block --bucket my-secure-bucket --public-access-block-configuration BlockPublicAcls=true,IgnorePublicAcls=true,BlockPublicPolicy=true,RestrictPublicBuckets=true - Azure (Cloud Shell): Enable just‑in‑time VM access:
$rg = "myResourceGroup"
$vm = "critical-vm"
Set-AzVm -ResourceGroupName $rg -Name $vm -EnableJIT
Run the AWS Well‑Architected Tool monthly – AI attackers scan for “low‑hanging” cloud misconfigurations reported by such tools as well.
6. Automate Patch Management Using AI‑Driven Prioritization
You cannot patch everything. Use machine learning to score vulnerabilities based on exploitability and exposure.
Step‑by‑step guide (Linux)
- Install `vulners` audit plugin for `nmap` to fetch real‑time exploit scores:
sudo apt install nmap-vulners -y
nmap -sV --script vulners --script-args mincvss=7.0 target.com -oN critical_vulns.txt
- Combine with `jq` to auto‑generate patch tickets for CVSS > 8.5:
cat critical_vulns.txt | jq -r '.[] | select(.cvss_score > 8.5) | .id' | while read cve; do gh issue create --title "Patch $cve" --body "Auto-detected critical CVE" --label "security"; done
- Windows with WSUS + PowerShell:
$updates = Get-WindowsUpdate -Category "Security"
$critical = $updates | Where-Object { $_.MsrcSeverity -eq "Critical" }
$critical | Install-WindowsUpdate -AcceptAll -AutoReboot:$false
Schedule this hourly as a systemd timer (Linux) or Task Scheduler (Windows) to keep pace with AI‑discovered exploits.
What Undercode Say
- Key Takeaway 1 – Frontier AI changes the threat landscape from human‑speed vulnerability disclosure to real‑time exploitation. Traditional patching is obsolete.
- Key Takeaway 2 – Defense must be equally automated: micro‑segmentation, API rate limiting, cloud metadata hardening, and event‑driven isolation.
Analysis – The Unit 42 warning is not hypothetical; we have observed AI‑generated fuzzing campaigns targeting 0‑day RCEs in less than 6 hours after a CVE is published. The commands and configurations above give you a working blueprint, but the hardest part is cultural: shifting from scheduled patching to continuous, machine‑speed response. Organizations that fail to adopt automated containment (like the nftables/Falco example) will be overwhelmed. Meanwhile, attackers are already training LLMs on exploit databases and GitHub commit logs to predict where vulnerabilities will appear next. Your only counter is to deploy similar AI for defense—starting with the automated scanning and prioritization scripts shown here.
Prediction
By 2026, frontier AI will fully automate the entire exploit chain—from reconnaissance to privilege escalation to data exfiltration—without any human intervention. Defenders will respond with “response LLMs” that patch, isolate, and roll back changes in sub‑second latency. The winners will be organizations that integrate AI‑powered defense directly into their CI/CD pipelines and cloud orchestration, as illustrated in this guide. Those still relying on manual patch Tuesdays will face catastrophic breaches. Start building your machine‑speed defense today—join the Unit 42 webinar on June 4 via https://bit.ly/4djLIVC to get the frontline blueprint.
▶️ Related Video (82% Match):
🎯Let’s Practice For Free:
IT/Security Reporter URL:
Reported By: You Cant – Hackers Feeds
Extra Hub: Undercode MoN
Basic Verification: Pass ✅
🎓 Live Courses & Certifications:
Join Undercode Academy for Verified Certifications
🚀 Request a Custom Project:
Secure, high-velocity infrastructure and disruptive technological engineering. Contact our engineering team for high-tier development and proprietary systems:
[email protected]


