
Listen to this Post
Introduction:
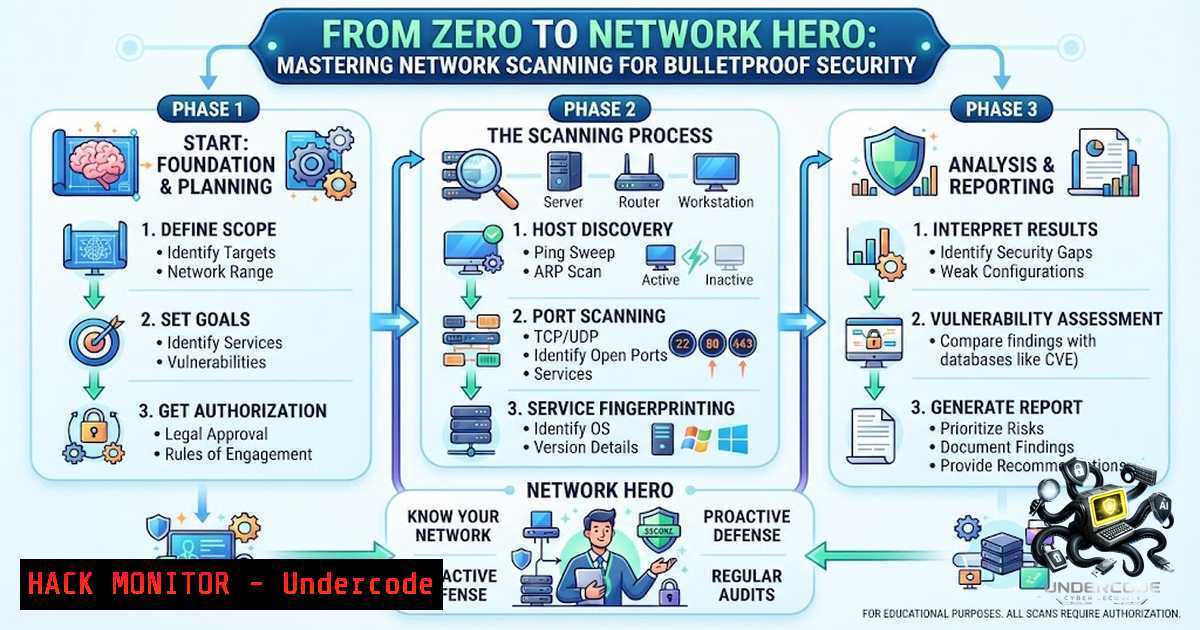
Before you can secure a system, you need to understand what is exposed. Network scanning is the foundational discipline that answers this critical question by discovering devices, services, and open ports on a network. Security professionals use it to understand their environment, identify potential risks, and verify that only intended services are accessible. As the cybersecurity adage goes, you cannot protect what you do not know exists—making network visibility the first and most essential step toward effective defense.
Learning Objectives:
- Understand the core concepts of network scanning: host discovery, port scanning, service enumeration, and network mapping
- Master Nmap, the industry-standard network scanning tool, through practical command-line examples
- Learn how to apply scanning techniques in both offensive (penetration testing) and defensive (security auditing) contexts
- Host Discovery: Finding What’s Alive on Your Network
Host discovery, also known as ping sweeping, is the process of determining which systems are active on a network. Before you can scan for open ports or enumerate services, you need to know which IP addresses are actually responding.
Step-by-Step Guide:
Step 1: Install Nmap – On Linux (Ubuntu/Debian), run:
sudo apt update && sudo apt install nmap -y
On Windows, download the installer from nmap.org and run it with administrator privileges. Verify installation with:
nmap --version
Step 2: Identify Your Network Range – On Linux, use `ifconfig` or ip addr; on Windows, use `ipconfig` to find your active network interface and determine the local subnet (e.g., 192.168.1.0/24).
Step 3: Perform a Ping Sweep – The most common host discovery command is:
nmap -sn 192.168.1.0/24
The `-sn` flag tells Nmap to perform host discovery only, without port scanning. This sends ICMP echo requests, TCP SYN packets to port 443, TCP ACK packets to port 80, and ICMP timestamp requests to verify host availability.
Step 4: Advanced Host Discovery Techniques – For networks that block ICMP, use TCP or UDP pings:
nmap -PS22,80,443 192.168.1.0/24  TCP SYN ping to specific ports
nmap -PU53,67,68,137 192.168.1.0/24  UDP ping to common ports
Step 5: Save Results – Redirect output to a file for documentation:
nmap -sn 192.168.1.0/24 -oN live_hosts.txt
2. Port Scanning: Identifying Open Doors
Once you know which hosts are alive, the next step is identifying open ports and the services running on them. Port scanning is the most recognized form of network scanning and is critical for understanding your attack surface.
Step-by-Step Guide:
Step 1: TCP SYN (Stealth) Scan – This is the most popular scan type because it is fast and less likely to be logged by applications:
sudo nmap -sS 192.168.1.10
The `-sS` flag performs a SYN scan, which sends SYN packets and never completes the TCP handshake, making it “stealthy”. Root/administrator privileges are required.
Step 2: TCP Connect Scan – For users without raw packet privileges, use:
nmap -sT 192.168.1.10
This completes the full TCP three-way handshake.
Step 3: UDP Scan – UDP scanning is slower but essential because many services (DNS, SNMP, DHCP) use UDP:
sudo nmap -sU 192.168.1.10
Step 4: Scan Specific Ports – To save time, target specific ports or ranges:
nmap -p 22,80,443 192.168.1.10  Specific ports
nmap -p 1-1000 192.168.1.10  Port range
nmap -p- 192.168.1.10  All 65535 ports (very slow)
Step 5: Fast Scan – For quick reconnaissance, scan only the top 100 most common ports:
nmap -F 192.168.1.10
3. Service Enumeration and Version Detection
Knowing that port 80 is open is useful, but knowing it runs Apache 2.4.49 (which has a known path traversal vulnerability) is what makes a security assessment valuable. Service enumeration gathers detailed information about applications and their versions.
Step-by-Step Guide:
Step 1: Basic Version Detection – Add the `-sV` flag to your scan:
nmap -sV 192.168.1.10
This probes open ports to identify service names and versions.
Step 2: Aggressive Version Detection – Increase the version detection intensity (0-9, default is 7):
nmap -sV --version-intensity 9 192.168.1.10
Step 3: Combined Scan – The `-A` flag enables OS detection, version detection, script scanning, and traceroute all in one:
nmap -A 192.168.1.10
Step 4: Banner Grabbing with Netcat – For manual verification, use Netcat to grab service banners:
nc -v 192.168.1.10 80
GET / HTTP/1.0
Step 5: Output to File – Save comprehensive results:
nmap -sV -oA service_enum 192.168.1.10
The `-oA` flag outputs results in normal, XML, and grepable formats simultaneously.
4. Operating System Fingerprinting
OS fingerprinting analyzes responses from a target to determine the operating system and sometimes the kernel version. This information helps tailor further attacks or hardening measures.
Step-by-Step Guide:
Step 1: Basic OS Detection – Use the `-O` flag:
sudo nmap -O 192.168.1.10
Step 2: Aggressive OS Guessing – If Nmap is unsure, use:
sudo nmap -O --osscan-guess 192.168.1.10
Step 3: Combined OS and Version Detection – For a comprehensive picture:
nmap -sV -O 192.168.1.10
Step 4: OS Detection Without Port Scan – When ports are filtered but you still want OS info:
sudo nmap -O -Pn 192.168.1.10
The `-Pn` flag skips host discovery and assumes the host is up.
5. NSE Script Scanning: Uncovering Vulnerabilities
The Nmap Scripting Engine (NSE) extends Nmap’s capabilities dramatically, allowing vulnerability detection, exploit execution, and advanced service interrogation.
Step-by-Step Guide:
Step 1: Default Script Scan – Run the default set of NSE scripts:
nmap -sC 192.168.1.10
Step 2: Vulnerability Scanning – Run all scripts in the “vuln” category to detect known vulnerabilities:
sudo nmap --script vuln 192.168.1.10
Step 3: Specific Script Categories – Run scripts by category (e.g., safe, intrusive, malware, discovery):
nmap --script "safe" 192.168.1.10
nmap --script "discovery" 192.168.1.10
Step 4: Custom Script Selection – Run specific scripts by name:
nmap --script http-headers,ftp-anon 192.168.1.10
Step 5: Save Vulnerability Scan Results:
sudo nmap --script vuln 192.168.1.10 -oN vuln_scan.txt
6. Production Environment Best Practices
Scanning in production requires discipline and caution. Unlike lab environments, production scans can impact performance, trigger alerts, or even cause outages if not done properly.
Step-by-Step Guide:
Step 1: Use Conservative Timing Templates – Nmap offers timing templates from 0 (paranoid) to 5 (insane). For production, use T2 or T3:
nmap -T2 -sS -p 22,80,443 192.168.1.10
Step 2: Target Specific Hosts, Not Whole Subnets – Avoid broad scans unless necessary:
nmap -sS -T2 -p 22,80,443 --script default target_host
Step 3: Avoid Aggressive Flags – Do not use `-A` or heavy NSE scripts unless needed for diagnostics.
Step 4: Schedule During Off-Peak Hours – Run scans when network traffic is lowest to minimize impact.
Step 5: Whitelist Scanning IPs – Add your scanning machine’s IP to firewall whitelists to avoid false positive alerts.
Step 6: Continuous Monitoring – One scan is not enough. Schedule periodic runs and compare outputs to detect infrastructure drift.
7. Windows-Specific Commands and Considerations
While Nmap is native to Linux, it works well on Windows with some considerations:
Installation: Download the installer from nmap.org and run with administrator privileges.
Network Interface Discovery:
ipconfig
Running Nmap from Command
nmap -sn 192.168.1.0/24
Zenmap GUI: Nmap for Windows includes Zenmap, a graphical interface that helps visualize scan results.
PowerShell Alternative: For Windows environments without Nmap, Test-1etConnection can perform basic port checks:
Test-1etConnection -ComputerName 192.168.1.10 -Port 80
What Undercode Say:
- Visibility is the Foundation of Security – You cannot protect what you do not know exists. Network scanning provides the essential visibility needed to identify exposed services, unauthorized devices, and misconfigurations before attackers find them.
-
Scanning is Both Offensive and Defensive – The same techniques used by penetration testers to find vulnerabilities are used by defenders to discover and remediate them. Understanding both perspectives makes you a more effective security professional.
The journey from understanding network scanning to mastering it is a continuous process. As Atharva Lokhande demonstrated by completing 67+ hands-on rooms on TryHackMe, practical experience bridges the gap between theory and real-world application. Network scanning is not just about running commands—it is about building a mental model of how networks operate, how devices communicate, and where weaknesses are most likely to hide. The true value of scanning lies not in the scan itself but in the analysis that follows: interpreting results, prioritizing risks, and taking action to reduce the attack surface. Every scan tells a story about your network—learning to read that story is what separates script kiddies from security professionals.
Prediction:
- +1 The democratization of network scanning tools through platforms like TryHackMe and HackTheBox will continue to produce a new generation of security professionals who are better prepared to defend against evolving threats.
-
+1 AI-powered network scanning will emerge, automating not just the discovery phase but also the analysis and prioritization of findings, reducing the time from scan to remediation.
-
-1 As scanning tools become more accessible, attackers will also leverage them more aggressively, leading to an increase in reconnaissance-driven attacks that exploit misconfigured or overlooked services.
-
-1 The proliferation of IoT and cloud environments will expand the attack surface faster than organizations can scan and secure it, creating persistent visibility gaps.
-
+1 Integration of network scanning into CI/CD pipelines will become standard practice, enabling security teams to catch misconfigurations before they reach production.
▶️ Related Video (86% Match):
https://www.youtube.com/watch?v=bCgohREh2nQ
🎯Let’s Practice For Free:
🎓 Live Courses & Certifications:
Join Undercode Academy for Verified Certifications
🚀 Request a Custom Project:
Secure, high-velocity infrastructure and disruptive technological engineering. Contact our engineering team for high-tier development and proprietary systems:
[email protected]
💎 Smart Architecture | 🛡️ Secure by Design | ⭐ Trusted by Thousands
IT/Security Reporter URL:
Reported By: Atharva Lokhande – Hackers Feeds
Extra Hub: Undercode MoN
Basic Verification: Pass ✅


