
Listen to this Post
Introduction
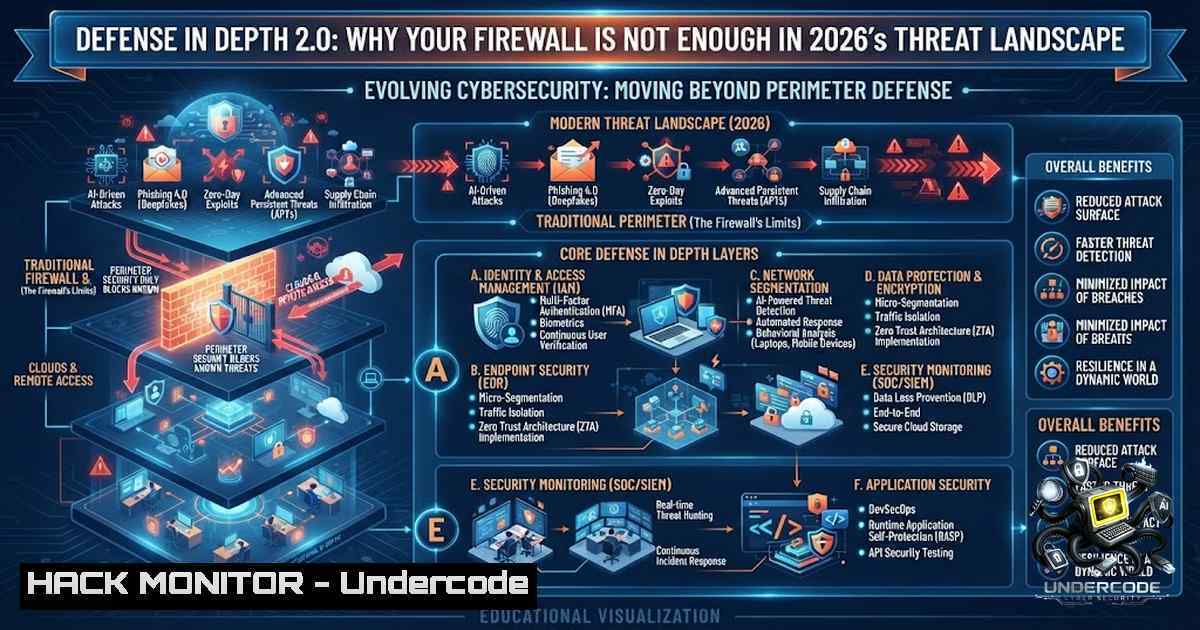
The cybersecurity industry has long understood that no single security control can provide absolute protection against determined adversaries. Defense in Depth represents the strategic implementation of multiple, overlapping security layers designed to create a comprehensive security posture where the failure of one control does not compromise the entire organization. This security architecture philosophy, originally derived from military strategy, has evolved into a sophisticated framework combining people, processes, and technology to protect modern enterprises against increasingly sophisticated cyber threats.
Learning Objectives
- Understand the architectural principles and implementation strategies of Defense in Depth across multiple security domains
- Master the technical configuration of layered security controls, including firewalls, identity management, endpoint protection, and monitoring systems
- Develop practical skills in deploying detection, response, and recovery mechanisms through hands-on command execution and tool configuration
You Should Know
1. Perimeter Security: Beyond Traditional Firewall Deployment
Modern perimeter security extends far beyond basic packet filtering to include Next-Generation Firewall capabilities, Web Application Firewall protection, and intelligent threat prevention. While traditional firewalls operated on simple allow/deny rules based on ports and protocols, NGFWs incorporate application awareness, user identification, and integrated threat intelligence to make dynamic security decisions.
Step-by-step guide for implementing NGFW security policies:
Begin by establishing a baseline security policy that denies all traffic by default, then selectively permit required services. For a typical enterprise deployment, configure zone-based policies that separate internal, DMZ, and external networks. Implement Application Control to identify and allow or block specific applications regardless of port usage, as modern applications frequently use non-standard ports to evade detection.
Linux iptables implementation:
 Set default policies to DROP
iptables -P INPUT DROP
iptables -P FORWARD DROP
iptables -P OUTPUT ACCEPT

Allow established connections
iptables -A INPUT -m state --state ESTABLISHED,RELATED -j ACCEPT

Allow SSH from management network only
iptables -A INPUT -p tcp --dport 22 -s 192.168.1.0/24 -j ACCEPT

Allow web traffic with rate limiting
iptables -A INPUT -p tcp --dport 80 -m limit --limit 25/minute --limit-burst 100 -j ACCEPT
iptables -A INPUT -p tcp --dport 443 -m limit --limit 25/minute --limit-burst 100 -j ACCEPT

Log dropped packets for analysis
iptables -A INPUT -j LOG --log-prefix "FW-DROPPED: " --log-level 4
iptables -A INPUT -j DROP
Windows Advanced Firewall configuration using PowerShell:
 Create inbound rule to block all traffic except specified services
New-1etFirewallRule -DisplayName "Block-All-Inbound" -Direction Inbound -Action Block

Allow RDP from specific management subnet
New-1etFirewallRule -DisplayName "Allow-RDP-Management" -Direction Inbound -Protocol TCP -LocalPort 3389 -RemoteAddress 192.168.1.0/24 -Action Allow

Enable logging for dropped packets
Set-1etFirewallProfile -1ame Domain,Public,Private -LogFileName "C:\Windows\System32\LogFiles\Firewall\pfirewall.log" -LogMaxSize 4096 -LogAllowed False -LogBlocked True

Configure ICMP rules for network troubleshooting while maintaining security
New-1etFirewallRule -DisplayName "Allow-Ping" -Direction Inbound -Protocol ICMPv4 -IcmpType 8 -Action Allow
Implement Web Application Firewall protection to defend against OWASP Top 10 vulnerabilities. For ModSecurity, the open-source WAF, configure the OWASP Core Rule Set to detect and block SQL injection, cross-site scripting, and other application-layer attacks.
Basic ModSecurity configuration for Apache:
 Enable ModSecurity
LoadModule security2_module modules/mod_security2.so

Load Core Rule Set
IncludeOptional /etc/modsecurity/crs-setup.conf
IncludeOptional /etc/modsecurity/rules/.conf

Set audit log for incident investigation
SecAuditEngine RelevantOnly
SecAuditLog /var/log/modsec_audit.log
SecAuditLogParts ABIJDEFHZ
2. Identity and Access Management: Zero Trust Implementation
IAM serves as the critical control point for ensuring that only authenticated and authorized users access resources. Zero Trust architecture fundamentally changes the security paradigm from implicit trust based on network location to explicit verification of every access request.
Multi-Factor Authentication deployment strategy:
Deploy MFA across all administrative interfaces and sensitive applications. For Microsoft environments, configure Conditional Access policies that evaluate risk signals such as user location, device compliance, and sign-in behavior before granting access.
Azure AD Conditional Access policy implementation:
 Install required module
Install-Module -1ame AzureAD -Force -AllowClobber

Connect to Azure AD
Connect-AzureAD

Create Conditional Access policy requiring MFA for all users
$conditions = New-Object -TypeName Microsoft.Open.MSGraph.Model.ConditionalAccessConditionSet
$conditions.Applications = @{IncludeApplications = @("All")}
$conditions.Users = @{IncludeUsers = @("All")}
$conditions.Locations = @{IncludeLocations = @("All")}

New-AzureADMSConditionalAccessPolicy -DisplayName "Require MFA for All Users" -State "enabled" -Conditions $conditions -GrantControls @{Operator = "OR"; BuiltInControls = @("mfa", "compliantDevice")}
Privileged Access Management implementation:
Implement a just-in-time (JIT) access model where privileged accounts are only activated when needed and automatically expire after a set duration.
Linux PAM configuration for privilege elevation:
 Edit /etc/pam.d/sudo to require MFA
auth required pam_google_authenticator.so
account required pam_unix.so

Configure sudo to log all commands
Defaults log_output
Defaults logfile=/var/log/sudo.log

Implement time-based restrictions
cat >> /etc/security/time.conf << EOF
;;root;!Wk0800-1700
;;wheel;!Wk0800-1700
EOF

Configure PAM to enforce resource limits
cat >> /etc/security/limits.conf << EOF
 soft maxlogins 3
 hard maxlogins 5
EOF
Role-Based Access Control configuration:
Implement least privilege principles by creating security groups that map to job functions and assigning permissions accordingly. For cloud environments, use AWS IAM or Azure RBAC to granularly control access.
AWS IAM policy for least privilege:
{
"Version": "2012-10-17",
"Statement": [
{
"Effect": "Deny",
"Action": "",
"Resource": "",
"Condition": {
"StringNotLike": {
"aws:username": "${aws:username}"
}
}
},
{
"Effect": "Allow",
"Action": [
"s3:GetObject",
"s3:PutObject"
],
"Resource": "arn:aws:s3:::company-bucket/${aws:username}/"
}
]
}
3. Endpoint Security: EDR/XDR Deployment and Configuration
Modern endpoint protection requires more than traditional antivirus signatures. Extended Detection and Response solutions provide comprehensive visibility and automated response capabilities across multiple security layers.
EDR deployment implementation:
Deploy endpoint agents that continuously monitor process execution, network connections, file system changes, and registry modifications. For Microsoft Defender for Endpoint, configure the device onboarding and policy settings.
Windows Defender configuration for advanced protection:
 Enable real-time protection
Set-MpPreference -DisableRealtimeMonitoring $false

Enable cloud-delivered protection
Set-MpPreference -CloudBlockLevel High
Set-MpPreference -CloudTimeout 50

Configure automatic sample submission
Set-MpPreference -SubmitSamplesConsent 2

Enable network protection
Set-MpPreference -EnableNetworkProtection Enabled

Configure attack surface reduction rules
Add-MpPreference -AttackSurfaceReductionRules_Ids "3b576869-a4ec-45e9-8569-5d8e120f0f8a" -AttackSurfaceReductionRules_Actions Enabled

Enable exploit protection
Set-ProcessMitigation -System -Enable SEHOP
Set-ProcessMitigation -System -Enable DEP
Set-ProcessMitigation -System -Enable ASLR
Linux endpoint hardening with osquery:
 Install osquery for endpoint visibility
apt-get install osquery
 or on RHEL/CentOS
yum install osquery

Configure osquery to monitor critical system files
cat > /etc/osquery/osquery.conf << EOF
{
"options": {
"host_identifier": "hostname",
"schedule_splay_percent": 10,
"pidfile": "/var/osquery/osquery.pidfile",
"database_path": "/var/osquery/osquery.db",
"logging_path": "/var/log/osquery",
"logger_plugin": "filesystem"
},
"schedule": {
"file_integrity": {
"query": "SELECT  FROM file_events;",
"interval": 300
},
"process_events": {
"query": "SELECT pid, name, path, cmdline, uid, gid FROM processes;",
"interval": 60
},
"network_connections": {
"query": "SELECT pid, family, local_address, remote_address, local_port, remote_port, state FROM process_open_sockets;",
"interval": 60
}
}
}
EOF

Start osquery service
systemctl start osqueryd
systemctl enable osqueryd
4. Application Security: Secure SDLC Implementation
Application security must be integrated throughout the software development lifecycle, not as a final gate before deployment. Implementing security in the development process reduces vulnerabilities and remediation costs.
Static Application Security Testing (SAST) with SonarQube:
 Install SonarQube scanner
wget https://binaries.sonarsource.com/Distribution/sonar-scanner-cli/sonar-scanner-cli-4.8.0.2856-linux.zip
unzip sonar-scanner-cli-4.8.0.2856-linux.zip
export PATH=$PATH:/path/to/sonar-scanner/bin

Run SAST scan
sonar-scanner \
-Dsonar.projectKey=my_project \
-Dsonar.sources=. \
-Dsonar.host.url=http://localhost:9000 \
-Dsonar.login=myauthenticationtoken
API Security testing with OWASP ZAP:
 Install OWASP ZAP
docker pull owasp/zap2docker-stable

Perform active scan against API endpoint
docker run -t owasp/zap2docker-stable zap-api-scan.py \
-t https://api.example.com/swagger.json \
-f openapi \
-r report.html \
-p passive_scan_progress.log

Implement API rate limiting using NGINX
cat > /etc/nginx/conf.d/rate-limit.conf << EOF
limit_req_zone \$binary_remote_addr zone=api_limit:10m rate=10r/s;
limit_req_zone \$binary_remote_addr zone=api_limit_burst:10m rate=10r/s;

server {
location /api/ {
limit_req zone=api_limit burst=20 nodelay;
limit_req_status 429;

API key validation
if (\$http_x_api_key !~ ^[A-Za-z0-9]{32}$) {
return 401;
}

proxy_pass http://backend_api;
proxy_set_header X-Forwarded-For \$proxy_add_x_forwarded_for;
proxy_set_header X-Real-IP \$remote_addr;
}
}
EOF
Vulnerability Scanning with Trivy:
 Install Trivy
wget https://github.com/aquasecurity/trivy/releases/download/v0.18.0/trivy_0.18.0_Linux-64bit.deb
dpkg -i trivy_0.18.0_Linux-64bit.deb

Scan container image for vulnerabilities
trivy image --severity CRITICAL,HIGH --exit-code 1 my-app:latest

Scan filesystem
trivy fs --severity CRITICAL,HIGH /path/to/application/code
5. Monitoring and Detection: SIEM Implementation
Security Information and Event Management (SIEM) serves as the central nervous system for security operations, aggregating logs and events from across the infrastructure to detect threats.
ELK Stack implementation for log aggregation:
Deploy Elasticsearch, Logstash, and Kibana (ELK) for centralized log management and analysis. Configure Logstash to ingest logs from various sources and normalize them for efficient querying.
Logstash configuration for Windows Event Logs:
input {
winlogbeat {
port => 5044
}
syslog {
port => 514
type => syslog
}
}

filter {
if [bash] == "windows-security" {
mutate {
add_field => { "event_source" => "WindowsSecurity" }
}

Extract specific event IDs
if [bash] == 4624 {
mutate {
add_tag => ["login_success"]
}
}
if [bash] == 4625 {
mutate {
add_tag => ["login_failure"]
}
}
}

GeoIP enrichment for threat detection
geoip {
source => "source_ip"
target => "geoip"
database => "/usr/share/GeoIP/GeoLite2-City.mmdb"
}
}

output {
elasticsearch {
hosts => ["localhost:9200"]
index => "logs-%{+YYYY.MM.dd}"
}
}
SIEM rule creation for detecting brute force attacks:
-- Query for detecting multiple failed login attempts
SELECT
source_ip,
COUNT() as failure_count,
window_start,
window_end
FROM
logs
WHERE
event_id = 4625 AND
timestamp BETWEEN now() - INTERVAL '5 minutes' AND now()
GROUP BY
source_ip, window_start, window_end
HAVING
COUNT() > 10
SOAR workflow automation with TheHive and Cortex:
 Python script for automated alert response
import requests
from datetime import datetime

def block_ip(ip_address):
 Add IP to firewall block list
headers = {'Content-Type': 'application/json'}
payload = {
'ip': ip_address,
'reason': 'SIEM automated response - Brute force detected',
'blocked_at': datetime.now().isoformat()
}

response = requests.post(
'https://firewall-api.company.com/block',
json=payload,
headers=headers,
auth=('api_key', 'secret_key')
)
return response.status_code == 200

def create_thehive_case(alert_data):
 Create case in TheHive for further investigation
case_data = {
'title': f'Brute Force Attack from {alert_data["source_ip"]}',
'description': f'{alert_data["failure_count"]} failed logins detected',
'severity': 3,
'tags': ['bruteforce', 'automated_response']
}

response = requests.post(
'https://thehive.company.com/api/case',
json=case_data,
headers={'Authorization': 'Bearer API_KEY'}
)
return response.json()
6. Incident Response and Recovery
A well-defined incident response plan ensures organized and efficient handling of security breaches. The NIST SP 800-61 framework provides guidance on preparation, detection, analysis, containment, eradication, and recovery.
Automated forensic acquisition script:
!/bin/bash
 Incident Response - Forensic Acquisition Script

Create acquisition directory
TIMESTAMP=$(date +%Y%m%d_%H%M%S)
ACQ_DIR="/forensics/${TIMESTAMP}"
mkdir -p ${ACQ_DIR}

Collect system information
uname -a > ${ACQ_DIR}/system_info.txt
ps auxwf > ${ACQ_DIR}/process_list.txt
netstat -tulpn > ${ACQ_DIR}/network_connections.txt
ss -tulpn >> ${ACQ_DIR}/network_connections.txt

Collect logs
cp /var/log/auth.log ${ACQ_DIR}/
cp /var/log/syslog ${ACQ_DIR}/
cp /var/log/apache2/access.log ${ACQ_DIR}/
cp /var/log/apache2/error.log ${ACQ_DIR}/

Collect suspicious files for analysis
find /tmp -mmin -60 > ${ACQ_DIR}/recent_tmp_files.txt
find / -perm -4000 -ls > ${ACQ_DIR}/suid_files.txt

Create hash of collected files
sha256sum ${ACQ_DIR}/ > ${ACQ_DIR}/files_hashes.txt

Create disk image for deeper analysis (requires dd)
dd if=/dev/sda of=${ACQ_DIR}/disk_image.dd bs=4M status=progress

Encrypt the forensic data
tar -czf ${ACQ_DIR}.tar.gz ${ACQ_DIR}/
gpg --symmetric --cipher-algo AES256 ${ACQ_DIR}.tar.gz
rm -rf ${ACQ_DIR}
Windows incident response collection:
 Windows Incident Response Collection Script

Create evidence directory
$timestamp = Get-Date -Format "yyyyMMdd_HHmmss"
$evidence_path = "C:\Forensics\$timestamp"
New-Item -ItemType Directory -Path $evidence_path -Force

Collect system information
systeminfo > "$evidence_path\systeminfo.txt"
Get-Process | Export-Csv "$evidence_path\processes.csv"
Get-Service | Export-Csv "$evidence_path\services.csv"

Collect network connections
netstat -anob > "$evidence_path\netstat.txt"
Get-1etTCPConnection | Export-Csv "$evidence_path\tcp_connections.csv"

Collect scheduled tasks
Get-ScheduledTask | Export-Csv "$evidence_path\scheduled_tasks.csv"

Collect Windows event logs
Get-WinEvent -LogName Security -MaxEvents 1000 | Export-Csv "$evidence_path\security_events.csv"
Get-WinEvent -LogName System -MaxEvents 1000 | Export-Csv "$evidence_path\system_events.csv"

Collect registry information
reg export HKLM\SOFTWARE "$evidence_path\software_registry.reg"
reg export HKLM\SYSTEM "$evidence_path\system_registry.reg"

Create hash
Get-FileHash -Path "$evidence_path\" > "$evidence_path\hashes.txt"
7. Cloud Security Hardening
Cloud environments require specific security configurations to protect workloads and data. Implementing security groups, network ACLs, and proper identity management is critical for cloud security posture.
AWS Security Group configuration:
{
"SecurityGroup": {
"GroupName": "web-tier-sg",
"VpcId": "vpc-12345678",
"InboundRules": [
{
"Protocol": "tcp",
"FromPort": 80,
"ToPort": 80,
"CidrIp": "0.0.0.0/0"
},
{
"Protocol": "tcp",
"FromPort": 443,
"ToPort": 443,
"CidrIp": "0.0.0.0/0"
},
{
"Protocol": "tcp",
"FromPort": 22,
"ToPort": 22,
"CidrIp": "10.0.1.0/24"
}
],
"OutboundRules": [
{
"Protocol": "tcp",
"FromPort": 0,
"ToPort": 65535,
"CidrIp": "0.0.0.0/0"
}
]
}
}
Cloud infrastructure vulnerability scanning with Prowler:
 Install Prowler for AWS security assessment
git clone https://github.com/prowler-cloud/prowler
cd prowler
pip install -r requirements.txt

Run security assessment
./prowler -c all -M csv,json

Generate HTML report
./prowler -c all -M html -o /path/to/report
What Undercode Say
Defense in Depth is not about implementing every security control available; it’s about strategically selecting and integrating controls that address specific organizational risks while maintaining operational efficiency.
Organizations often make the mistake of treating security as a checklist exercise rather than a continuous process of improvement and adaptation. The layered approach recognizes that security controls work together synergistically – when properly implemented, a defense-in-depth strategy creates a security posture greater than the sum of its individual components.
Implementation of defense-in-depth requires balancing security with usability, as overly restrictive controls often lead to workarounds that undermine security objectives.
The human element remains the most critical component of any security strategy. Security awareness training and cultivating a security-conscious culture are essential for ensuring that personnel understand and support security initiatives rather than bypassing them.
Prediction
+1 The continued integration of artificial intelligence and machine learning capabilities across security layers will significantly enhance threat detection and response automation, enabling organizations to identify sophisticated attacks more rapidly and respond with reduced human intervention.
+N As organizations expand their cloud and hybrid deployments, the attack surface continues to grow exponentially, requiring more complex security architectures that are challenging to maintain consistently across diverse environments.
+1 Implementation of Zero Trust principles will become mainstream, with organizations moving from perimeter-based security to identity-centric models that provide more granular control and better protection against lateral movement attacks.
-1 The cybersecurity skills gap will persist, with organizations struggling to find qualified personnel to design, implement, and maintain comprehensive defense-in-depth strategies, potentially leading to significant security gaps.
+1 Automated security orchestration and remediation capabilities will mature, enabling faster incident response and reducing the time between detection and containment of security incidents.
-1 Adversaries will increasingly leverage AI-powered attack tools to probe and exploit vulnerabilities across multiple layers simultaneously, making defense-in-depth more critical yet more challenging to implement effectively.
+1 Organizations that successfully implement defense-in-depth with strong emphasis on detection and response capabilities will achieve significant competitive advantage through enhanced customer trust and reduced business disruption from security incidents.
▶️ Related Video (80% Match):
🎯Let’s Practice For Free:
🎓 Live Courses & Certifications:
Join Undercode Academy for Verified Certifications
🚀 Request a Custom Project:
Secure, high-velocity infrastructure and disruptive technological engineering. Contact our engineering team for high-tier development and proprietary systems:
[email protected]
💎 Smart Architecture | 🛡️ Secure by Design | ⭐ Trusted by Thousands
IT/Security Reporter URL:
Reported By: Arif Ullah – Hackers Feeds
Extra Hub: Undercode MoN
Basic Verification: Pass ✅


