Listen to this Post
Introduction:
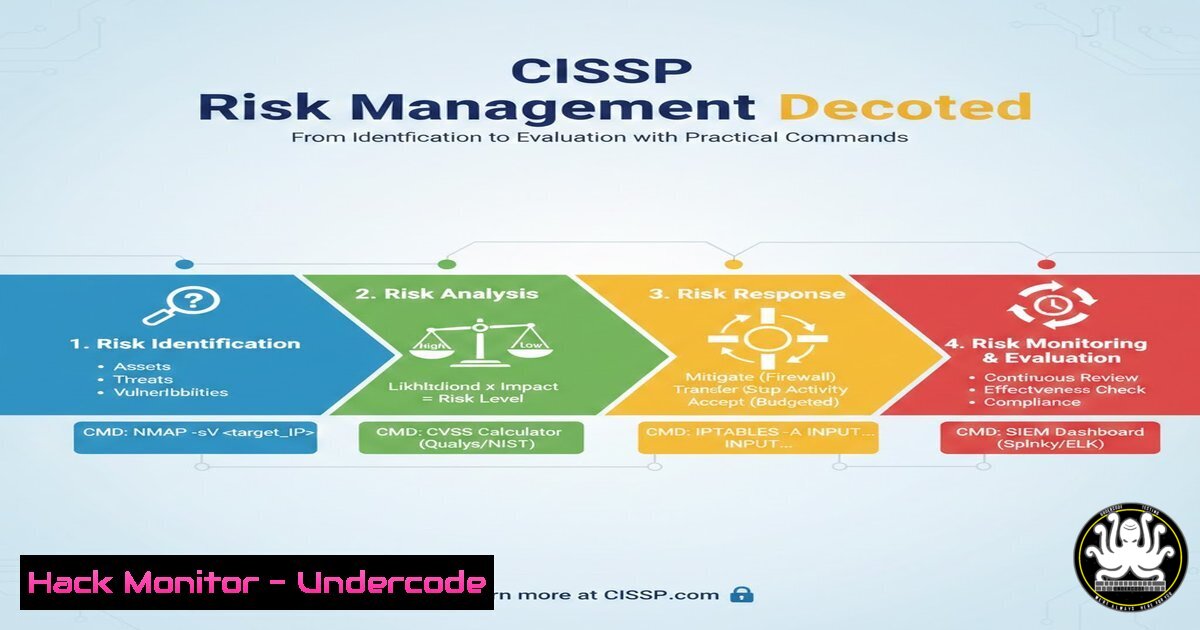
In the complex landscape of information security, understanding risk is not just a compliance checkbox but the bedrock of a resilient defense strategy. Risk management, a core domain of the CISSP certification, involves a structured process of identifying, analyzing, and evaluating potential threats to an organization’s assets. This article dissects the critical terminology—from Risk Identification to Risk Evaluation—and bridges the gap between theory and practice by providing actionable Linux and Windows commands to help security professionals quantify and visualize these concepts in real-world environments.
Learning Objectives:
- Distinguish between the key phases of Risk Management: Identification, Analysis, Assessment, and Evaluation.
- Define and differentiate between Risk Appetite and Risk Tolerance with practical organizational examples.
- Apply technical commands and scripts to simulate risk scenarios, analyze system vulnerabilities, and evaluate security postures.
You Should Know:
1. Risk Identification: The Discovery Phase
The first step is to ask, “What could go wrong?” This involves listing assets, threats, and vulnerabilities without yet measuring their potential impact. In a technical context, this translates to taking an inventory of your environment to discover what you need to protect.
- Linux Command (Network Discovery):
Use `nmap` to identify live hosts and open services, which are potential entry points for attackers.Scan a subnet to identify active devices and open ports (Risk Identification) nmap -sV 192.168.1.0/24
- Windows Command (Asset Inventory):
Use PowerShell to list installed software, identifying potentially outdated or vulnerable applications.List all installed software on a Windows machine Get-WmiObject -Class Win32_Product | Select-Object Name, Version
2. Risk Analysis: Measuring Likelihood and Impact
Once risks are identified, we analyze them by assessing their probability and potential impact. This is where qualitative analysis (High/Medium/Low) meets quantitative analysis (dollar values). In practice, this involves scanning for vulnerabilities to gauge the likelihood of exploitation and assessing the criticality of the asset to determine impact.
- Linux Command (Vulnerability Likelihood):
Use a vulnerability scanner like `openvas` or a simple script to check for known vulnerabilities (CVEs) in installed packages.Example using Lynis for security auditing (analyzing system weaknesses) sudo lynis audit system
- Windows Command (System Health & Impact):
Check for critical system errors that could indicate stability or security issues, impacting availability.Check the System event log for critical errors (impact on availability) Get-EventLog -LogName System -EntryType Error -Newest 20
3. Risk Assessment: Combining Identification and Analysis
Risk Assessment provides a prioritized view of risks. By combining the inventory from Step 1 with the vulnerability data from Step 2, we create a risk register. A common output is a heat map. Technically, this is about correlating data.
- Linux Command (Correlation):
Parse logs to correlate failed login attempts (a threat) with specific user accounts (an asset).Count failed SSH login attempts from /var/log/auth.log sudo cat /var/log/auth.log | grep "Failed password" | awk '{print $9}' | sort | uniq -c | sort -nr
4. Defining Risk Appetite and Tolerance
These are business decisions, not technical configurations. Risk Appetite is the “big picture” willingness to accept risk (e.g., “We are risk-averse regarding customer data”). Risk Tolerance is the measurable deviation from that appetite (e.g., “We can tolerate up to 1 hour of downtime”).
- Technical Translation (Setting Limits):
While the values are business inputs, they are enforced technically via thresholds and alerts. - Linux Command (Implementing Tolerance):
Set a disk usage alert. If disk usage exceeds 90% (your tolerance), trigger a warning.Check disk usage and alert if /dev/sda1 exceeds 90% (implementing a tolerance threshold) df -h | grep "/dev/sda1" | awk '{print $5}' | sed 's/%//' | while read percent; do if [ $percent -gt 90 ]; then echo "ALERT: Disk usage above tolerance threshold."; fi; done - Windows PowerShell (Implementing Tolerance):
Monitor CPU load.
 Alert if CPU load exceeds 95% for a sustained period
$cpu = (Get-Counter "\Processor(_Total)\% Processor Time").CounterSamples.CookedValue
if ($cpu -gt 95) { Write-Host "ALERT: CPU usage exceeds risk tolerance." }
5. Risk Evaluation: Making the Decision
This is the final step where you compare your analyzed risk against your tolerance levels to decide if the risk is acceptable or requires treatment (mitigation, transfer, avoidance, acceptance). This often involves a “go/no-go” decision for system changes or deployments.
- Linux Command (Evaluation Script):
A script to check if a system meets the minimum security baseline (risk acceptance criteria) before deployment.Simple evaluation script to check if SSH root login is disabled (a control) if grep -q "^PermitRootLogin no" /etc/ssh/sshd_config; then echo "Risk Acceptable: Root login is disabled." else echo "Risk Unacceptable: Root login is enabled. Must mitigate." fi
6. Technical Controls for Risk Mitigation
Once a risk is deemed unacceptable, we implement controls. Here are examples of hardening commands that directly address identified risks.
- Linux Command (Mitigation – Disable Unused Services):
If you identified an unnecessary service like `telnet` during the identification phase, disable it to reduce the attack surface.sudo systemctl stop telnet.socket sudo systemctl disable telnet.socket
- Windows Command (Mitigation – Enforce Password Policy):
To mitigate the risk of brute-force attacks, enforce a strong password policy.Set minimum password length via command line net accounts /minpwlen:12
7. Cloud Risk Evaluation (AWS Example)
In cloud environments, risk evaluation often involves checking configurations against best practices using tools like AWS CLI.
- AWS CLI Command (Checking S3 Bucket Permissions):
Identify S3 buckets that are publicly accessible, which represents a high-impact data leakage risk.List S3 buckets and check their public access settings (Risk Analysis) aws s3api list-buckets --query "Buckets[].Name" --output text | xargs -I {} aws s3api get-public-access-block --bucket {} 2>&1
What Undercode Say:
- Context is King: A vulnerability (likelihood) only becomes a risk when paired with a valuable asset (impact). Running the `nmap` command is useless unless you understand what data resides on the discovered host.
- The Business-Technical Bridge: Risk Appetite and Tolerance are not technical settings you can `grep` from a file; they are business philosophies. However, as the commands above show, you must be able to translate those philosophies into concrete thresholds (
df -h,CPU > 95%) and technical controls.
The provided LinkedIn breakdown simplifies a complex domain into digestible components. By integrating these steps with technical execution, security professionals move from being theoretical advisors to operational defenders. Understanding that Risk Assessment is a continuous cycle, not a one-time event, is crucial. The commands listed serve as a starting point for automating the data collection needed to feed into your organization’s risk management framework, ensuring that decisions are based on current, empirical evidence rather than guesswork.
Prediction:
As IT environments become more ephemeral with containers and serverless architectures, the traditional “list and measure” approach to risk will become obsolete. We will see a rise in Real-Time Risk Posture Management, where AI-driven tools continuously scan infrastructure-as-code and running instances, automatically comparing them against pre-defined risk tolerance thresholds. The role of the security professional will shift from manually running the `nmap` scans to defining the business logic for these automated risk evaluation engines, making the concepts outlined in Bastien Biren’s post more critical than ever, but executed at machine speed.
▶️ Related Video (86% Match):
🎯Let’s Practice For Free:
IT/Security Reporter URL:
Reported By: Biren Bastien – Hackers Feeds
Extra Hub: Undercode MoN
Basic Verification: Pass ✅


