
Listen to this Post
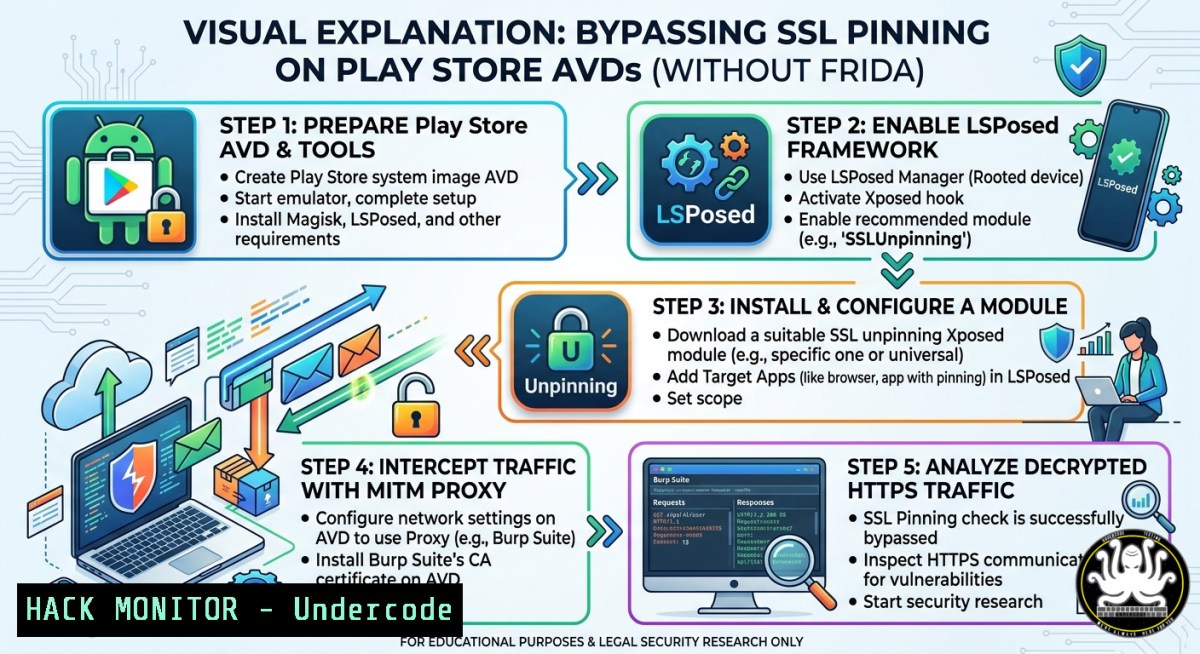
Introduction:
As mobile app security measures have grown more sophisticated, so too have the tools and techniques for testing them. SSL Pinning (or certificate pinning) was once a formidable barrier for security researchers, preventing many from intercepting and analyzing an app’s encrypted HTTPS traffic without specialized knowledge. This article breaks down a powerful, Frida-free method for bypassing SSL pinning on Google Play Store Android Virtual Devices (AVDs) by leveraging the `rootAVD` project to obtain system-level privileges, thus allowing a custom CA certificate to be installed with system authority.
Learning Objectives:
- Understand the core components of SSL Pinning and why it is a critical security control for mobile applications.
- Master a step-by-step technique to root a Play Store AVD and install a custom CA certificate as a system authority.
- Apply a complete traffic interception workflow on a non-rooted emulated device using ADB and common proxy tools like Burp Suite or Caido.
You Should Know:
⚠️ Legal & Ethical Warning: The techniques described are for educational and defensive security research only. Always ensure you have written authorization from the app owner before testing any application that is not your own.
- Setting Up Your Environment: Android Studio and Platform-Tools
The foundation of this method is a properly configured Android development environment. We’ll be using an AVD with Google Play Store, which requires Android Studio.
Step-by-step guide:
- Install Android Studio & Git: Download and install both from their official sources.
- Install Platform-Tools: Launch Android Studio, navigate to
Settings > Languages & Frameworks > Android SDK > SDK Tools, and select “Android SDK Platform-Tools”. - Configure Environment Variables: This allows you to use ADB commands from any terminal window.
Windows: Search for “environment variables” and add the pathC:\Users\<YourUser>\AppData\Local\Android\Sdk\platform-tools.
Linux/macOS: Edit your `~/.zshrc` or `~/.bashrc` file and add the following lines:For macOS export ANDROID_HOME="~/Library/Android/sdk" For Linux export ANDROID_HOME="/home/<user>/Android/Sdk" export PATH="$PATH:$ANDROID_HOME/tools:$ANDROID_HOME/platform-tools"
Then, reload the configuration with `source ~/.zshrc`.
2. Rooting the Play Store AVD with rootAVD
The core of this technique lies in gaining root access. We will use the open-source `rootAVD` script, which automates the process of patching the AVD’s ramdisk.
Step-by-step guide:
- Clone the rootAVD repository: Open a terminal and navigate to your desired directory, then run:
git clone https://gitlab.com/newbit/rootAVD.git
This script is the key to unlocking the emulator’s full potential.
- Create a Play Store AVD: In Android Studio’s Virtual Device Manager, click “Create Device”. Select a hardware profile (e.g., “Medium Phone”), then choose a system image that includes Google Play Store. Boot the AVD once to ensure it’s functioning.
- Run the rootAVD Script: Open a terminal inside the `rootAVD` directory and execute the script using the path to your specific AVD’s
ramdisk.img.Example for an AVD with Android 13 (API 33) .\rootAVD.bat system-images\android-33\google_apis_playstore\x86_64\ramdisk.img
The script will patch the image, and the AVD will shut down automatically.
- Verify Root Access: Perform a Cold Boot of the AVD. Once it starts, open the terminal and run:
adb shell
su -
If a prompt appears on your AVD asking for root permissions, accept it. Then type
whoami. If the response isroot, you have successfully gained root access.
3. Installing Custom CA Certificate with System Authority
With root access, we can now install a custom CA certificate—for example, from Burp Suite or Caido—so that the Android system trusts it globally, effectively bypassing basic SSL pinning.
Step-by-step guide:
1. Prepare the CA Certificate:
For Burp Suite: Export the CA certificate from Burp in DER format (cacert.der). Then, generate the Android-specific hash and rename the file.
openssl x509 -inform DER -subject_hash_old -in cacert.der | head -1
mv cacert.der 9a5ba575.0
For Caido: Convert the PEM certificate to DER and rename it similarly.
openssl x509 -in ca.crt -outform DER -out caido.der
openssl x509 -inform DER -subject_hash_old -in caido.der | head -1
mv caido.der ce01745e.0
This step is crucial because Android uses this hash-based filename to recognize the certificate.
2. Push the Certificate to the Emulator: Transfer the renamed certificate (e.g., 9a5ba575.0) to the emulator’s shared storage.
adb push 9a5ba575.0 /storage/self/primary/
3. Run the Injection Script: The original article provides an all-in-one script that mounts a temporary filesystem, copies the existing system certificates, and injects our custom CA certificate at the system level while maintaining the correct permissions. Save this script as `script.sh` on your host machine, push it to the emulator, and execute it with root privileges.
adb push script.sh /storage/self/primary/
adb shell
su -
sh /storage/self/primary/script.sh
The script will output `System certificate injected` upon completion.
4. Configuring Proxy and Intercepting Traffic
The final step is to route the emulator’s traffic through your chosen proxy tool (e.g., Burp Suite) to start analyzing the HTTPS requests.
Step-by-step guide:
- Set Up the Proxy: Ensure your proxy (e.g., Burp) is listening on an interface that the emulator can reach (e.g.,
192.168.1.14:8082). The provided `proxyadb()` function simplifies this process via ADB. - Connect the AVD to the Proxy: From your host terminal, source the `proxyadb` function and connect.
source proxyadb.sh
proxyadb --connect 192.168.1.14 8082
- Test the Interception: Launch an app on the AVD, such as the Reddit app used in the original guide, and observe the traffic appearing in your proxy tool. You have now successfully bypassed the app’s SSL pinning.
5. Understanding the Limitations and Continuous Execution
While this method is powerful, it’s important to understand its limitations and operational requirements.
Step-by-step guide:
- Persistence: The custom CA injection is not permanent. Every time the AVD is rebooted, the script must be re-run. This is because the certificate is injected into a `tmpfs` (temporary file system) in memory.
- Detection: More advanced applications use runtime checks and obfuscated pinning logic that this method may not bypass. This technique is effective against applications that rely solely on system-level trust stores.
- Automation: For continuous testing, this process can be automated. The `proxyadb` script can be extended to re-run the CA injection script and set the proxy automatically after every AVD boot, ensuring a consistent testing environment.
What Undercode Say:
- Key Takeaway 1: Bypassing SSL pinning is no longer an esoteric skill reserved for elite reverse engineers. Using tools like
rootAVD, a motivated security researcher can set up a complete traffic interception lab in under an hour, lowering the barrier to entry for mobile app security testing. - Key Takeaway 2: This technique serves as a powerful reminder that security controls on a device an attacker or tester physically controls are fundamentally fragile. The “defense in depth” principle is non-negotiable; relying solely on SSL pinning is a dangerous gamble. App developers must incorporate multiple, complementary layers of security, including runtime protection, code obfuscation, and strong server-side validation, to create a truly resilient application.
This guide, based on research by Mateo Fumis and highlighted by security professional Mohit Soni (CRTO, OSCP), underscores that while SSL pinning remains a valuable control, it is not an impenetrable fortress. The rapid evolution of emulation and rooting tools continues to level the playing field, making robust, layered security the only viable path forward in the modern threat landscape.
Prediction:
The technique detailed here is not a novel “vulnerability” but a clever chaining of existing capabilities. Its public dissemination will lower the skill barrier for security testing, leading to a democratization of mobile app security analysis. Consequently, we will see a distinct and rapid shift in the security posture of high-value mobile applications. Developers will be forced to move beyond static pinning and invest more heavily in Runtime Application Self-Protection (RASP), integrity checks, and behavioral analysis on the server side. SSL pinning will increasingly be viewed not as a standalone solution, but as a minor speed bump in a layered defense, forcing attackers to combine multiple, more complex exploits to achieve the same goal.
▶️ Related Video (74% Match):
🎯Let’s Practice For Free:
IT/Security Reporter URL:
Reported By: 0xfrost Bypassing – Hackers Feeds
Extra Hub: Undercode MoN
Basic Verification: Pass ✅


