Listen to this Post
Introduction
In the modern era of remote work and constant connectivity, the lines between personal convenience and corporate security often blur. The recent post by a Cloud Architect heading on vacation without his PC—having pre-scheduled content on security and DevSecOps—highlights a critical, often overlooked practice: the “burner” or travel laptop. This concept extends beyond simply taking a device on holiday; it is a strategic security measure rooted in DevSecOps principles. This article explores how to build, configure, and utilize a secure travel laptop to ensure that a week of relaxation doesn’t turn into a month of incident response.
Learning Objectives
- Understand the DevSecOps rationale behind using isolated hardware for travel.
- Learn to harden a Linux and Windows operating system for temporary, high-risk environments.
- Implement secure VPN configurations and endpoint protection.
- Master the process of secure data sanitization and device repurposing post-travel.
You Should Know:
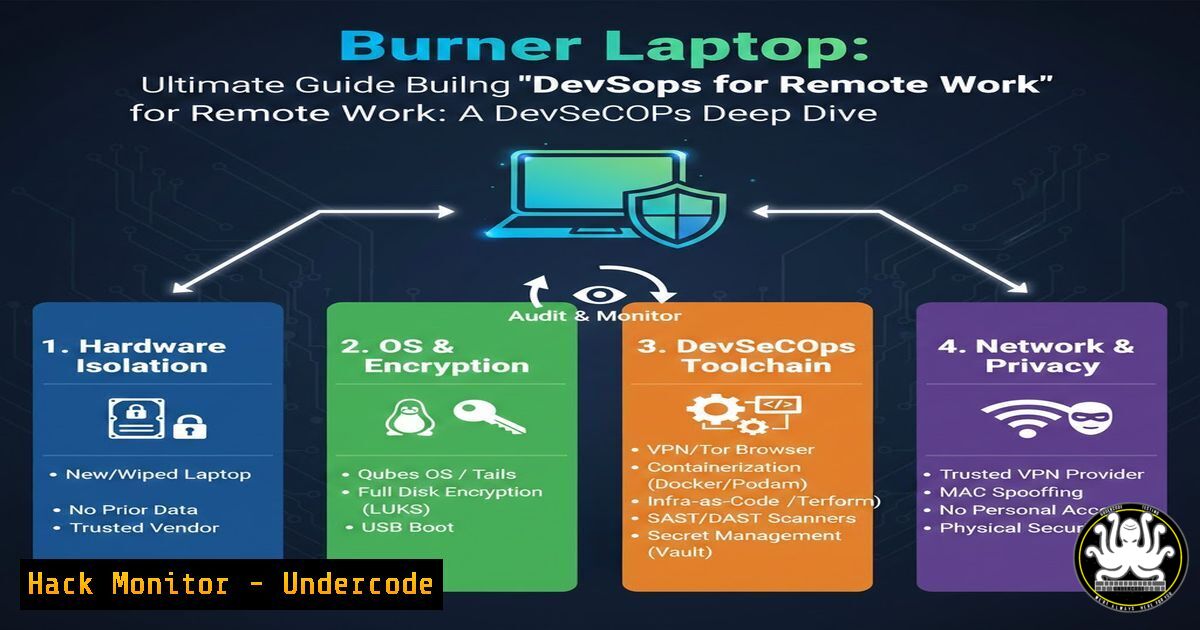
1. The “Burner” Laptop Philosophy and OS Selection
The core idea behind a travel laptop is isolation. Your primary workstation contains years of accumulated credentials, intellectual property, and persistent access tokens. Taking this device to a hotel in Guadeloupe (or anywhere outside a controlled corporate environment) exposes it to risks like Evil Maid attacks, untrusted Wi-Fi, and physical theft. A “burner” device ensures that if compromised, the blast radius is limited to the data on that device, which should be minimal.
– Step 1: Choose Your Weapon. For maximum security and control, Linux (Ubuntu 22.04 LTS or Fedora) is preferred due to its open-source nature and granular control over permissions. For users requiring specific Windows-only tools, Windows 10/11 Pro can be used but requires stricter hardening.
– Step 2: Fresh Installation. Do not clone your main drive. Perform a clean installation of the OS. During installation, use full-disk encryption (LUKS for Linux, BitLocker for Windows). This is your first line of defense against data theft if the device is lost.
2. Hardening the Core Operating System
Before any work is done, the OS itself must be stripped of unnecessary attack surfaces. This involves disabling services that are common vectors for exploitation in public spaces (like Bluetooth and printer sharing) and configuring a host-based firewall.
– Linux Hardening Commands:
 Update the system
sudo apt update && sudo apt upgrade -y  Debian/Ubuntu
 sudo dnf update -y  Fedora/RHEL

Enable and configure UFW (Uncomplicated Firewall)
sudo ufw default deny incoming
sudo ufw default allow outgoing
sudo ufw allow ssh  Only if you need remote management
sudo ufw enable

Disable unnecessary services (e.g., Bluetooth, CUPS printing)
sudo systemctl disable bluetooth.service
sudo systemctl stop bluetooth.service
sudo systemctl disable cups.service
sudo systemctl stop cups.service
– Windows Hardening (PowerShell as Admin):
 Set network profile to Public (most restrictive)
Get-NetConnectionProfile | Set-NetConnectionProfile -NetworkCategory Public

Disable SMBv1 (a legacy, vulnerable protocol)
Disable-WindowsOptionalFeature -Online -FeatureName smb1protocol

Enable built-in firewall and block all inbound by default
Set-NetFirewallProfile -Profile Domain,Public,Private -Enabled True -DefaultInboundAction Block
3. VPN Configuration and DNS Leak Prevention
Public Wi-Fi in airports and hotels is a prime location for Man-in-the-Middle (MitM) attacks. A VPN creates an encrypted tunnel, protecting your traffic from snooping. However, a misconfigured VPN can leak DNS requests, revealing your browsing history even when the VPN is “connected.”
– Step 1: Choose a Trusted Provider. Select a reputable VPN provider that supports OpenVPN or WireGuard protocols. Avoid free VPNs, as they often monetize user data.
– Step 2: Configure Kill Switch. Ensure the VPN client has a “kill switch” feature enabled. This blocks all internet traffic if the VPN connection drops unexpectedly.
– Step 3: Verify DNS Leaks. After connecting, visit a DNS leak test website (like dnsleaktest.com) to confirm all traffic is routed through the VPN tunnel.
– Step 4: Manual WireGuard Setup (Linux). For granular control, use WireGuard.
sudo apt install wireguard
 Place your configuration file (e.g., wg0.conf) in /etc/wireguard/
sudo wg-quick up wg0
 Check status
sudo wg show
4. Application-Level Security: Browsers and Credentials
The browser is the most common attack vector. It handles cookies, sessions, and extensions, making it a goldmine for attackers. The travel laptop should operate with a “least privilege” mindset regarding identities.
– Browser Isolation: Use a separate browser profile (e.g., Firefox or Chromium) exclusively for work-related tasks. Do not log into personal social media or email in this profile.
– Essential Extensions: Install only critical security extensions:
– uBlock Origin: To block malicious ad networks and cryptominers.
– HTTPS Everywhere: To enforce encrypted connections where possible.
– Password Manager: Do not type passwords manually. Use a cloud-based password manager (like Bitwarden or 1Password). Log into the manager, and let it autofill credentials. This prevents keylogging and ensures you are not reusing weak passwords. Ensure the manager’s browser extension uses biometric or master-password authentication for each fill.
5. Data Isolation and Cloud-First Strategy
The goal of the travel laptop is to be a thin client. It should hold no long-term data. All work should be done in the cloud or on a remote server.
– Principle: If the laptop is stolen, the only thing lost is hardware, not data.
– Implementation:
– Use SSH with key-pair authentication to connect to a powerful cloud instance (EC2, DigitalOcean Droplet) or your home server to perform heavy computational tasks.
– SSH Key Generation:
ssh-keygen -t ed25519 -a 100 -f ~/.ssh/travel_key
 Copy the public key to your remote server
ssh-copy-id -i ~/.ssh/travel_key.pub [email protected]
– Store documents in cloud-synced folders (Nextcloud, Google Drive) but ensure two-factor authentication (2FA) is enabled on the cloud account. Do not leave files in the local “Downloads” folder.
6. Physical Security and BIOS Configuration
Software security is useless if someone can simply boot from a USB stick and reset your passwords, or install a hardware keylogger.
– BIOS/UEFI Password: Set a strong supervisor password in the BIOS. This prevents an attacker from changing the boot order to a live USB or disabling Secure Boot.
– Secure Boot: Ensure Secure Boot is enabled. This verifies that the bootloader has not been tampered with by malware.
– Tamper-Evident Seals: For high-value trips, consider using a tamper-evident sticker or security screw over the chassis screws. This won’t stop a determined attacker but will provide evidence of physical tampering.
7. The “Return to Base” Protocol: Sanitization
The most critical part of the DevSecOps cycle for a travel laptop is the decommissioning phase. Upon returning, the device must be treated as potentially compromised.
– Step 1: Data Transfer. Transfer any absolutely essential work files created during the trip to your main workstation after a thorough antivirus scan. Assume the files are dirty.
– Step 2: Wipe the Drive. Do not just “reset” the device. Use a secure erase method.
– Linux (using `dd` or shred):
 Identify the correct drive (e.g., /dev/sda) using lsblk
sudo dd if=/dev/urandom of=/dev/sda bs=4M status=progress
– Windows: Use the `format` command with the `/p` parameter to overwrite every sector, or utilize the “Reset this PC” feature with the “Remove files and clean the drive” option enabled.
– Step 3: Reinstall. Perform a clean OS installation from scratch. The laptop is now ready for its next mission or to be stored until the next trip.
What Undercode Say:
- Isolation is Paramount: The travel laptop isn’t about convenience; it’s about risk compartmentalization. Treating it as a disposable asset fundamentally changes your threat model and limits the damage from physical or network-based attacks.
- Automate the Hardening: Manual configuration is prone to error. Security professionals should script this entire process using Ansible or a similar configuration management tool. This ensures that every “burner” laptop, whether for the CEO or the intern, is built to the exact same immutable standard.
Prediction:
As geopolitical tensions rise and digital surveillance becomes more pervasive, the concept of the “travel laptop” will evolve from a niche security practice to a standard corporate policy enforced by cyber insurance. We will likely see the rise of “transient VDI” solutions—ephemeral virtual machines hosted by the corporation that are accessed via a thin client on any hardware, rendering the physical device’s state completely irrelevant. The focus will shift entirely to securing the authentication handshake between the user and the ephemeral cloud desktop.
🎯Let’s Practice For Free:
IT/Security Reporter URL:
Reported By: Stephanerobert1 Securite – Hackers Feeds
Extra Hub: Undercode MoN
Basic Verification: Pass ✅


